
User's Manual


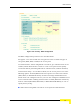


Table Of Contents
- Compliances
- About This Manual
- Table of Contents
- Chapter 1 - Product Description
- Chapter 2 - Hardware Installation
- 2.1 Hardware Description
- 2.2 Installation Requirements
- 2.3 Installation
- 2.3.1 Attaching the SU-ODU to the Mounting Plate
- 2.3.2 Attaching the Mounting Plate to the Wi· unit
- 2.3.3 Connecting the Wi· unit to the SU-ODU
- 2.3.4 Preparing the Power Cable
- 2.3.5 Pre-Configuration and Testing
- 2.3.6 Mounting the Wi· Unit
- 2.3.7 Connecting the Grounding Cables
- 2.3.8 Connecting to Power Source
- 2.4 Post Installation Configuration of the AP/SU-ODU
- Chapter 3 - Initial Configuration
- Chapter 4 - System Configuration
- 4.1 Introduction
- 4.2 Advanced Configuration
- 4.3 SNMP
- 4.4 Radio Interface
- 4.5 Status Information
- Chapter 5 - Command Line Interface
- 5.1 Using the Command Line Interface
- 5.2 Entering Commands
- 5.2.1 Keywords and Arguments
- 5.2.2 Minimum Abbreviation
- 5.2.3 Command Completion
- 5.2.4 Getting Help on Commands
- 5.2.5 Partial Keyword Lookup
- 5.2.6 Negating the Effect of Commands
- 5.2.7 Using Command History
- 5.2.8 Understanding Command Modes
- 5.2.9 Exec Commands
- 5.2.10 Configuration Commands
- 5.2.11 Command Line Processing
- 5.3 Command Groups
- 5.4 General Commands
- 5.5 System Management Commands
- 5.5.1 country
- 5.5.2 prompt
- 5.5.3 system name
- 5.5.4 username
- 5.5.5 password
- 5.5.6 ip ssh-server enable
- 5.5.7 ip ssh-server port
- 5.5.8 ip telnet-server enable
- 5.5.9 ip http port
- 5.5.10 ip http server
- 5.5.11 ip http session-timeout
- 5.5.12 ip https port
- 5.5.13 ip https server
- 5.5.14 APmgmtIP
- 5.5.15 APmgmtUI
- 5.5.16 show apmanagement
- 5.5.17 show system
- 5.5.18 show version
- 5.5.19 show config
- 5.5.20 show hardware
- 5.6 System Logging Commands
- 5.7 System Clock Commands
- 5.8 DHCP Relay Commands
- 5.9 SNMP Commands
- 5.9.1 snmp-server community
- 5.9.2 snmp-server contact
- 5.9.3 snmp-server location
- 5.9.4 snmp-server enable server
- 5.9.5 snmp-server host
- 5.9.6 snmp-server trap
- 5.9.7 snmp-server engine-id
- 5.9.8 snmp-server user
- 5.9.9 snmp-server targets
- 5.9.10 snmp-server filter
- 5.9.11 snmp-server filter-assignments
- 5.9.12 show snmp groups
- 5.9.13 show snmp users
- 5.9.14 show snmp group-assignments
- 5.9.15 show snmp target
- 5.9.16 show snmp filter
- 5.9.17 show snmp filter-assignments
- 5.9.18 show snmp
- 5.10 Flash/File Commands
- 5.11 RADIUS Client
- 5.12 802.1X Authentication
- 5.13 MAC Address Authentication
- 5.14 Filtering Commands
- 5.15 WDS Bridge Commands
- 5.16 Spanning Tree Commands
- 5.17 Ethernet Interface Commands
- 5.18 Wireless Interface Commands
- 5.18.1 interface wireless
- 5.18.2 vap
- 5.18.3 speed
- 5.18.4 multicast-data-rate
- 5.18.5 channel
- 5.18.6 transmit-power
- 5.18.7 radio-mode
- 5.18.8 preamble
- 5.18.9 antenna control
- 5.18.10 antenna id
- 5.18.11 antenna location
- 5.18.12 beacon-interval
- 5.18.13 dtim-period
- 5.18.14 fragmentation-length
- 5.18.15 rts-threshold
- 5.18.16 super-g
- 5.18.17 description
- 5.18.18 ssid
- 5.18.19 closed-system
- 5.18.20 max-association
- 5.18.21 assoc-timeout-interval
- 5.18.22 auth-timeout-value
- 5.18.23 shutdown
- 5.18.24 show interface wireless
- 5.18.25 show station
- 5.19 Rogue AP Detection Commands
- 5.20 Wireless Security Commands
- 5.21 Link Integrity Commands
- 5.22 IAPP Commands
- 5.23 VLAN Commands
- 5.24 WMM Commands
- Appendix A - Troubleshooting

110 Operation
Chapter 4 - System Configuration
Key Caching: WPA2 provides fast roaming for authenticated clients by
retaining keys and other security information in a cache, so that if a client
roams away from an access point and then returns, re-authentication is not
required. When a WPA2 client is first authenticated, it receives a Pairwise
Master Key (PMK) that is used to generate other keys for unicast data
encryption. This key and other client information form a Security Association
that the access point names and holds in a cache.
Preauthentication: Each time a client roams to another access point it has to
be fully re-authenticated. This authentication process is time consuming and
can disrupt applications running over the network. WPA2 includes a
mechanism, known as pre-authentication, that allows clients to roam to a new
access point and be quickly associated. The first time a client is authenticated
to a wireless network it has to be fully authenticated. When the client is about
to roam to another access point in the network, the access point sends
pre-authentication messages to the new access point that include the client’s
security association information. Then when the client sends an association
request to the new access point, the client is known to be already
authenticated, so it proceeds directly to key exchange and association.
To configure WPA, click Security, select one of the VAP interfaces by clicking
More. Select one of the WPA options in the Authentication Setup table, and then
configure the parameters displayed beneath the table.