
Installation guide

a. Enter “Water-On Duration”: This is the number of minutes the zone will water before waiting to soak.
b. Enter “Soak Duration”: This is the number of minutes the zone will soak before watering continues.
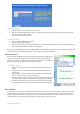
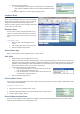
5. Select the appropriate water source from the “Water Source" drop-down list. If your system has only one water
source and is using the default water source, "<Unassigned>" will be displayed.
6. Select the appropriate watering restriction from the “Watering Restriction” list. This enables the zone to operate
independently of the system. You must create a watering restriction before it can be assigned to a zone. You may
modify the restriction by clicking on the "Edit..." button.
7. Enter the “Flow Rate” in Gallons per Minute (gpm). If your system has a flow meter it will automatically assign flow
rates to each zone as it waters. If you are not using a flow meter, it is not necessary to indicate a flow rate.
8. To save the configuration, click the “Apply Changes” button.
Flow Meter
Flow meters allow the controller to monitor flow rates for zones and the system. Flow
meters enable the system to maximize efficiency by automatically managing the water
usage. If a flow meter is installed the Acclima Irrigation software can measure the flow rate
at the flow meter.
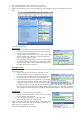
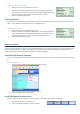
To configure the flow meter
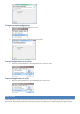
1. Select the flow meter in the “Configure Devices” screen. It will be displayed in the
“Other Devices” section.
2. Enter a descriptive name for the flow meter in the “Name” box.
3. Select a water source from the “Attached to Water Source” drop-down list.
4. Select the appropriate pipe diameter from the “Pipe Diameter/ Flow Meter” drop-
down list.
5. If your flow meter is not in the drop down list, you may enter custom settings by clicking on the “Custom Settings”
tab.
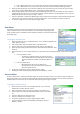
a. Enter the “KFactor” value.
i. The “KFactor” equals the gallons per pulse of your flow
meter multiplied by 60. ie: KFactor=(Gallons per Pulse)*60
The minimum KFactor is 0.002. The maximum KFactor is
100.
b. Enter the “Offset” value.
i. Many flow meters do not use an offset. If the
documentation of your flow meter does not specify an
offset it should be set to 0.
6. To save the configuration, click the “Apply Changes” button.
7. Readings are taken and displayed by clicking the “Flow Reading…” button.
Pressure Meter
Pressure meters work in conjunction with flow meters to monitor the water pressure in your system. They are helpful for
diagnosing problems such as broken sprinkler heads, broken pipes and other flow problems. You can set warning levels to
allow the system to either warn you or shut down if the pressure gets too high or too low.
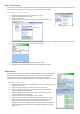
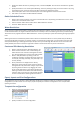
To configure pressure meters
1. Select the pressure meter in the “Configure Devices” screen. It will be
displayed in the “Other Devices” section.
2. Enter a descriptive name for the pressure meter in the “Name” box.
3. Select a water source from the “Attached to Water Source” drop-down
list.
4. Enter the “High Pressure Threshold” in psi.
5. Enter the “Low Pressure threshold” in psi.
6. To save the configuration, click the “Apply Changes” button
7. Pressure readings are taken and displayed by clicking the “Pressure
Reading…” button.