
Installation Sheet

1
WHAT YOU NEED
•
Screwdriver
• Wire Cutters
• Wiring Supplies as Specified
by Electrical Code
2
4
2
CERTIFICATION: cETLus DAMP
3
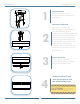
MOUNT CROSSBAR
If there is an existing fixture remove it.
Install the crossbar and mount it to the J-Box with
the supplied screws.
MAKE WIRE CONNECTION
Expose the supply wires from the J-box.
Gently pull the supply wires through the hole in the
canopy. Connect the black supply wire to
the black fixture wire. Secure with the supplied wire nuts.
Connect the white supply wire to the white fixture wire.
Secure with the supplied wire nuts. Attach the green
J-Box wire around green hexagonal head scre
w or
connect it to the green supply gr
ounding wire of the
fixture. Secure all wires with electrical tape
(not supplied). Tuck all wires carefully into the J-Box.
Place the canopy up to the crossbar and secure with
the supplied screws.
MOUNT THE FIXTURE
Hold the acrylic shade up to the canopy.
Align the centre hole of canopy and acrylic shade
and secure with the supplied screw knob.
RESTORE THE ELECTRICITY AND
CHECK THE OPERATION OF YOUR
NEW ACCESS LIGHTING FIXTURE
If the fixture is to be removed or replaced,
please ensure that the electricity is
switched off and that the fitting is cool
before touching it.
CAUTION
Dimmable xture - see attached list for compatible dimmer switches.
VER: 18.01.1
NO.
20820LEDD / 20821LEDD