
Installation Guide

CERTIFICATION: cULus DAMP
NO.
20724, 25, 26LEDDLP
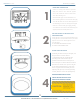
MAKE WIRE CONNECTIONS
If there is an existing fixture remove it. Expose the
supply wires from the J-box. Attach the supplied
screws to the crossbar and secure the crossbar to the
J-box with the mounting screws.
Connect the black supply wire to the black fixture wire.
Secure with the supplied wire nuts. Connect the white supply
wire to the white fixture wire. Secure with the supplied wire
nuts. Attach the green J-Box wire around green hexagonal
head screw or connect it to the green supply grounding
wire of the fixture. Secure all wires with electrical tape (not
supplied). Tuck all wires carefully into the J-box.
UNT THE FIXTURE TO THE BACK PLATE
AND INSERT BULBS
Position the fixture over the protruding threaded screws
twisting the fixture to ensure that the narrow part of the
keyhole is over the screw head. Tighten the screws.
Insert the bulb(s).
DO NOT EXCEED THE MAXIMUM WATTAGE
AS STATED ON THE WARNING LABEL.
SECURE THE GLASS SHADE
Position the glass shade over the pan and gently twist
the glass shade in a clockwise direction.
** CAUTION Align the glass such that the three
protruding portions of the metal base lip are
positioned in the three flat areas of the glass rim.
Now turn the glass in a clockwise direction so that the
protrusions move into the narrow groove on the glass
rim. DO NOT FORCE GLASS. Glass is secure when
there is no gap between base and the glass. Over
tightening of the glass may result in the glass being
extremely difficult to remove when replacing lamps.
RESTORE THE ELECTRICITY AND
CHECK THE OPERATION OF YOUR
NEW ACCESS LIGHTING FIXTURE
2
Dimmable fixture - see attached list for compatible dimmer switches.
VER: 17.10.1
1
2
3
4
Please ensure that the fitting is
cool and switched off before
replacing the bulb.
DO NOT use bulbs that might
exceed the maximum wattage as
stated on caution label.
CAUTION