
Installation Guide

CERTIFICATION: cULus DAMP
2
1
2
3
4
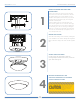
MOUNT CROSSBAR AND MAKE WIRE
CONNECTIONS
If there is an existing fixture remove it. Expose the supply
wires from the J-box. Secure the crossbar to the J-box with
the supplied mounting screws ensuring that the two screws
attached to the back plate face downwards, away from the
mounting surface. Gently pull the supply wires through the
center hole in the back plate.
Connect the black supply wire to the black fixture wire.
Secure with the supplied wire nuts. Connect the white supply
wire to the white fixture wire. Secure with the supplied wire
nuts. Attach the green J-Box wire around green hexagonal
head screw or connect it to the grounding wire of the fixture.
Secure all wires with electrical tape (not supplied). Tuck all
wires carefully into the J-box.
MOUNT THE FIXTURE
Secure the fixture canopy to the crossbar by inserting the
screws attached to the crossbar through the designated
holes in the fixture canopy and secure with the supplied
nuts.
SECURE THE GLASS SHADE
Put the neck of the glass shade in place by
inserting dimples located in the fixture, revolve the
glass shade until tight fit
RESTORE THE ELECTRICITY AND
CHECK THE OPERATION OF YOUR NEW
ACCESS LIGHTING FIXTURE
If this fixture is to be removed or
replaced, please ensure that the
electricity is switched off and
that the fitting is cool before
touching it.
NO. 20626LEDSWACD; 20626LEDSWAD