pro Steam Cleaner User guide Model No: ASC3001 For Customer Services & Spare Parts please call 0845 209 7461 Opening times: Monday - Friday 8am – 6pm & Saturday 9am – 1pm Or visit us at www.productcareuk.
Contents Page Safety instructions …………………………….……….. 3 Steam cleaner feature diagram ………………………………....….. 6 Unpacking your steam cleaner ……………………………….……..
IMPORTANT SAFETY INSTRUCTIONS READ CAREFULLY AND KEEP FOR FUTURE REFERENCE Safety instructions WARNING: It is hazardous for anyone other than a competent person to carry out any service or repair operation that involves the removal of a cover which gives protection against exposure to electrical parts. If the supply cord is damaged, it must be replaced by the manufacturer, its service agent or similarly qualified persons in order to avoid a hazard. This product is intended for household use only.
Safety instructions • Do not direct steam at people, animals, electrical outlets, or equipment containing electrical components. • Unplug from power outlet when not in use. Do not leave steam unit unattended while plugged in. • Do not use with damaged cord or plug. • Do not use steam unit if it has been dropped, damaged, left outdoors or dropped into water. • Keep the steam unit away from water; do not allow it to get wet. If unit is wet, do not plug unit into wall socket or turn unit on.
Safety instructions • The filling aperture must not be opened during use. • Do not use appliance in an enclosed space filled with vapor given off by oil-based paint, paint thinner, some moth proofing substances, flammable dust, or other explosive or toxic vapors. • Do not use on leather, wax polished furniture or floors, synthetic fabrics, velvet or other delicate, steam-sensitive materials. • Do not immerse unit in water or other liquids.
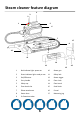
Steam cleaner feature diagram 2 3 4 5 1 6 11 7 17 8 10 9 12 14 16 13 15 1 Red indicator light: power on 10 Steam gun 2 Green indicator light: ready to use 11 Safety lock 3 On/Off button 12 Steam trigger 4 Carry handle 13 Floor cloth 5 Safety cap 14 Floor brush 6 Floor brush slot 15 Small cloth 7 Elbow attachment 16 Funnel 8 Steam hose 17 Measuring jug 9 3x Extension tubes 6
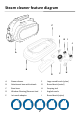
Steam cleaner feature diagram C E G I J A B D F H A Steam cleaner F Large round brush (nylon) B Attachment base with wheels G Round brush (metal) C Base lever H Scraping tool D Window Cleaning/Garment tool I Angled nozzle E Jet nozzle adaptor J Round brush (nylon) 7
Unpacking your steam cleaner Before using your steam cleaner Remove all packaging and lay out the separate components. Check the steam unit after unpacking for any visual damage such as: • Misaligned or damaged parts • Damage to the main body and separate components • Damage to the plug or cable. If you can see any damage do not use the steam cleaner and refer to page 22. To access the accessories, push down the base lever on the side of the product and detach from the base using the handle.
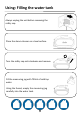
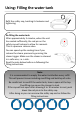
Using: Filling the water tank Always unplug the unit before removing the safety cap. Place the steam cleaner on a level surface. Turn the safety cap anti-clockwise and remove. Fill the measuring jug with 750ml of cold tap water. Using the funnel, empty the measuring jug carefully into the water tank.
Using: Filling the water tank Refit the safety cap, twisting it clockwise and tightening. Re-filling the water tank After approximately 5 minutes, when the unit has cooled sufficiently, the red pin on the safety cap will release to allow for removal. This is a pressure release valve. You can speed up the cooling time if you release the steam pressure by pressing the steam trigger. Make sure the steam is released in a safe area, i.e. a sink. Read the note below before re-following the filling instructions.
Using your steam cleaner Operating the steam cleaner Before you plug the appliance in, check the water tank is full. If it is not, refer to page 9. Plug the mains plug into a socket and turn the cleaner on by pressing the on/off button. The red power indicator light will illuminate. If the light does not illuminate, refer to page 18 for problem solving. The steam cleaner should take approximately 5 minutes to heat up to steam temperature. This will be indicated by the following: 1.
Using your steam cleaner Steam hose Before turning the cleaner on, place the hose into the steam socket. To place the steam hose and handle into the main steam cleaner: • Open the steam socket, • Press the hose in firmly until it clicks in place. • To remove the hose press the side buttons inwards and pull out. Steam gun Press the steam trigger to release steam from the nozzle. Direct the steam at a cloth or into a sink until the steam is emitted evenly.
Using: accessories Attaching the main tools The two main accessories for this product are the jet nozzle adaptor and the elbow attachment. They both attach to the steam gun in the same manner. NOTE: The elbow nozzle comes pre-assembled with the floor brush attached. Jet nozzle adaptor Attach this tool to the steam gun to give concentrated, direct steam. It can also be used with the other small tools provided – refer to page 15.
Using: accessories Elbow attachment To connect or remove the elbow attachment, twist the elbow joint so that is faces downwards (the triangle lip should be exposed above the floor brush – diagram A.) Remove or fit the elbow attachment. When fitting, turn 180° till the elbow attachment represents diagram B. The floor brush is now fully assembled. Cotton cloth The floor brush is suitable for the cleaning of large washable wall and floor areas.
Using: accessories Attaching the small tools NOTE: The jet nozzle adaptor must be attached before fitting small tools. If the cleaning effect of the steam alone is not acting as required for a specific task, the following small tools may help. All tools attach to the jet nozzle adaptor, simply: • Push the small tools onto the nozzle adaptor, aligning the arrows. • Twist anticlockwise to lock and clockwise to remove.
Storing your steam cleaner When you have finished cleaning, turn the steam cleaner off by pressing the OFF button. Turn the power off at the plug socket and remove the plug. Allow the device to cool before removing attachments. After approximately 5 minutes, when the unit has cooled sufficiently, the red pin on the safety cap will release to allow for removal - this is a pressure release valve. You can speed up the cooling time by releasing the steam pressure by pressing the steam trigger.
Cleaning and Care Before you clean the appliance, disconnect the mains plug from the wall socket. To clean the exterior of the device, use a damp, soft cloth and mild detergent. NEVER IMMERSE THE STEAM UNIT IN WATER. When wiping off the main body, do not allow moisture in the area around the indicator light. Wash non-electrical accessories in warm soapy water and allow to dry thoroughly before reuse. If the steam unit is damaged, contact the customer service helpline.
Problem Solving PROBLEM POSSIBLE PROBLEM POSSIBLE SOLUTION 1. Trouble assembling attachments. 1. There are a number of attachments that can be used with this steam cleaner. The steam gun clips in to the steam socket on the side of the cleaner. To detach the base, push the lever on the side of the base and lift the cleaner using the handle. The jet nozzle adaptor can be pushed on the nozzle of the steam gun – the clip should protrude through to show it is secure.
Problem Solving PROBLEM POSSIBLE PROBLEM POSSIBLE SOLUTION 1. The power button has not been pressed/The cleaner has not had time to heat. 2. Water tank may not be filled/may need refilling. 1. Press the power button located on the carry handle to illuminate the indicator light. Ensure you have waited 5 minutes for the water to heat up sufficiently before trying to steam clean. 2. Make sure the water tank is filled. The tank takes up to 750ml of water.
Problem Solving PROBLEM Indicator lights Cannot open the safety cap There is a peculiar smell coming from the unit Parts have broken/need replacing I have lost the instruction manual provided POSSIBLE PROBLEM POSSIBLE SOLUTION 1. What do the indicator 1. With the steam knob facing you, the light on the left lights mean? illuminates red when there is power to the steam cleaner. This means the water is heating.
Guarantee This product is guaranteed for 12 months from the date of the original purchase. If any defect arises due to faulty materials or workmanship the faulty product must be returned to the place of purchase. Refund or replacement is at the discretion of the retailer. The following conditions apply: • The product must be returned to the retailer with the original proof of purchase.
Customer services Attach your receipt to this page for proof of purchase. We’re here should you need us. For Customer Services & Spare Parts please call 0845 209 7461 Opening times: Monday - Friday 8am – 6pm & Saturday 9am – 1pm Or visit us at www.productcareuk.com Produced for: G2S Limited Unit 12 Lodge Bank Industrial Estate Horwich England BL6 5HY This symbol is known as the 'Crossed-out wheelie bin Symbol'.
Spare parts Safety cap Jet nozzle adaptor Window cleaner/upholstery attachment Garment steamer cloth Round brush (nylon) Round brush (metal) Large round brush (nylon) Scraping tool Angled nozzle Measuring jug Funnel Extension tubes Elbow attachment Floor brush/Floor cloth Steam gun 23
Connection to the mains supply WARNING- THIS APPLIANCE MUST BE EARTHED This appliance is designed to operate from a mains supply of AC230V 240V ~ 50/60HZ. Check that the voltage marked on the product corresponds with your supply voltage. This product is fitted with a 13A plug complying with BS1363.
Connection to the mains supply For UK use only – Plug fitting details (where applicable): As the colours of the wires in the mains lead of this appliance may not correspond with the coloured markings identifying the terminals in your plug, proceed as follows: The GREEN/YELLOW wire is the EARTH and must be connected to the terminal which is marked with the letter E or by the earth symbol or coloured GREEN or GREEN/YELLOW.
Model number: ASC3001 R3