
User's Guide

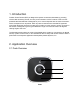

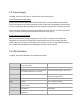

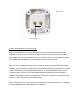


Table Of Contents

2.2 Power Supply!
The OSC uses 8~24V AC power or 5V DC power as its power source. !
For AC-Powered (Doorbell) Setup:!
Loosen the two screws on the back of the Doorbell Mount. Connect hardwired AC doorbell
wires to the inputs on the mount and rescue screws. Install OSC Camera Body to the Doorbell
mount by rotating the device 90 degrees to lock into place. Secure bottom security lock screw. !
*Note: It is recommended to use wire with a diameter less than 15mm to connect to the power
input. The torque on the screw should be less than 24.5 nm (2.5 kg-m)!
For DC (Security Camera) Setup: !
With the Corded Attachment unplugged from power source, rotate the Camera Body 90
degrees to lock into place on Attachment. Secure bottom security lock screws. Plug USB
power cable into a 5V powered USB Type-A port to power camera, or plug USB power cable
into included AC wall adapter. Plug wall adapter into wall to power camera. !
2.3 LED Indicators!
The OSC has built-in RGB LEDs to indicate device status.!
Blue
Flash every 2 seconds (ON for 1 second,
OFF for 2 seconds)
Wi-Fi setup mode
Spinning
Motion triggered, waiting for answer
Breathing/pulsing at 2 second rate (fade ON
for 1 second, fade OFF for 1 second)
Video/audio streaming or 2-way voice
Amber
ON for 2 seconds
Finished warm up upon power on,
entering normal operation
Green
ON for 3 seconds
Successfully setup/paired to wifi.
Red
Spinning
Wi-Fi connection problem
Flash every 1 second (ON for 1 second, OFF
for one second)
Unable to connect to server
Quick flash 5x
Setup failed
Amber/White
3 quick amber flashes, then 2x spinning
white circles
Reset to factory default