
Operation Manual


49
Normally, the channel range does not need to be changed. If several GewaLink transmitters
are to be used in the same area and you do NOT want to control the same equipment, it
may be necessary to use different channel ranges.
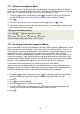
Table 3 shows the different settings.
Table 3: Channel ranges
Channel ranges, GewaLink channels
00-23
1
16-39
2
32-55
3
56-79
4
80-103
5
104-127
6
Level 1
00-05
16-21
32-37
56-61
80-85
104-109
Level 2
06-11
22-27
38-43
62
1
-67
86-91
110-115
Level 3
12-17
28-33
44-49
68-73
92-97
116-121
Level 4
18-23
34-39
50-55
74-79
98-103
122-127
1
Channel 62 is a stop code and cannot control any function. On the other hand you can store channels/codes
on this button which in turn can control a function.
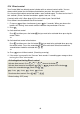
Do as follows to set the channel range:
1. First press
---
and then simultaneously press
2
for 2 seconds. When you release the
buttons the “Setting” alert sounds and the indication lamp on button 2 flashes.
2. Press
4
.
3. Choose the channel range
1
to
6
according to table 3 above.
4. If the action is successful, the “Success” alert sounds. If something goes wrong or takes
too long, the “Error” alert sounds.
Setting the channel range
Press
---
+
2
2 sec
,
4
, choose the channel range.
1
= 00-23,
2
= 16-39,
3
= 32-55,
4
= 56-79,
5
= 80-103,
6
= 104-127
Default setting: GewaLink channel 16-39
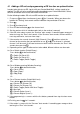
5. Button Labelling
The buttons on your Control Medi are marked with numbers as
standard. The numbered label can be replaced with a
personalised design. On Abilia’s website it is possible to
create your own button labels using pre-designed templates
with symbols and text.
The document can also be downloaded. The labeling is
printed on a clear sheet or white paper and inserted through
the slit on your Control Medi. Before the button label is
inserted, the keyguard must be removed.
Remove the keyguard by gripping the middle, and then lifting it
straight up, see photo.
Keyguard