
3.5
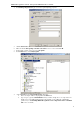

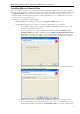
Table Of Contents
- Introduction
- Architecture
- Installation
- System Requirements
- Installing ABBYY Recognition Server Components
- Installing ABBYY Recognition Server Components via the Command Line
- Installing ABBYY Recognition Server using Microsoft Systems Management Server (SMS)
- Manual Registration of the SharePoint Connection Library
- Installing the Hardware Key Drivers
- Installing Microsoft Search IFilter
- Installing ABBYY Recognition Server 3.5 IFilter via the Command Line
- Installing ABBYY Recognition Server 3.5 IFilter using Microsoft Systems Management Server (SMS)
- Removing ABBYY Recognition Server 3.5 in silent mode
- Upgrading from the previous release of ABBYY Recognition Server
- Upgrading from the previous version of ABBYY Recognition Server
- Protection Technology and License Activation
- Administering
- Getting Started
- Registering a New Server
- Registering a New Processing Station
- Creating a New Workflow
- Configuring Document Separation
- Configuring E-mail Processing
- Configuring Verification
- Configuring Document Indexing
- Configuring Publishing Documents to a SharePoint Server
- Transfering Recognition Server Settings to another Server
- Managing Licenses
- Managing User Accounts
- Setting Up Google Search Appliance Connector
- Setting Up Microsoft Search IFilter
- Connection Settings
- Troubleshooting
- The Server Manager fails to establish a connection with the Processing Station installed on a different computer
- The Server Manager fails to establish a connection with the Verification Station, the Indexing Station, or the Remote Administration Console installed on a different computer
- No connection with the external FTP server
- The workflow does not start with the following error message: “Some of the working folders are inaccessible”
- When processing images, a “The Server Manager is out of disk space” warning appears on the computer where the Server Manager is running
- How to retrieve an image document that is being processed by ABBYY Recognition Server
- Digits in brackets are appended to the names of output files
- The Verification Station hangs at startup
- The Scanning Station fails to export a batch, and the following message appears: "Cannot access the Input folder of the workflow. Use a workflow with a shared folder if the server is on another computer."
- Recognition Server is unable to retrieve messages from POP3 e-mail server or send messages via SMTP server
- Document separation by barcodes does not work correctly
- An access to file error message appears when working with the program
- Technical Support

ABBYY Recognition Server 3.5 System Administrator’s Guide
30
Registering a New Processing Station
If the Server Manager and a Processing Station have been installed on different computers, you need to register the
Processing Station in the Recognition Server. To register a new Processing Station:
1. Select the ABBYY Recognition Servers\Recognition Server\Processing Stations node.
2. Click
(Register New Processing Station) on the toolbar or select the corresponding item on the shortcut
menu.
3. In the dialog box that opens, specify the name of the station and the name or IP of the computer on which the
Processing Station is installed.
4. Click the Test Connection button to check the connection to this computer.
5. Click OK. The created Processing Station will be added to the Processing Stations node.
Creating a New Workflow
To create a new workflow, select the Workflows node and either click (New Workflow) on the toolbar or select
the corresponding item on the shortcut menu. You can also create new workflows by creating a copy of an existing
workflow and changing its options. To create a copy of an existing workflow, select the Duplicate item on the shortcut
menu of the workflow.
In the Workflow Properties dialog box, specify the following:
• General tab:
o Workflow name which will be displayed in the Workflows node
o Workflow activity, which can be scheduled (see Creating a Schedule in the Main Help) and
workflow priority
• Input tab:
o In the Get images from drop-down list, select the type of Input folder
o The path to the Shared Folder, Exchange Mailbox Folder, POP3 E-mail Server or FTP server, the
username and password to the POP3 server, the login and password to the FTP server (see
Configuring E-mail Processing for more information about the e-mail configuration)
o For images added from FTP or shared folder, specify the task creation method: For each file or For
each folder. If a new task is created for each folder, in the Create next job after field, specify for
how long the job is formed.
Note: Specify a small time-out (several seconds) if all the files are already in the Input folder when the
workflow is started. If the documents are placed to the Input folder directly from the scanner, the
time-out must be greater than the pause between scanned pages.
• Process tab:
o Recognition language(s)
o Using custom dictionary
o Recognition mode
• Document Separation tab:
o Document separation method (see Configuring Document Separation)
• Quality Control tab:
o Verification settings (see Configuring Verification)
o Exceptions folder
• Indexing tab:
o Indexing settings (see Configuring Document Indexing)
• Output tab:
o Output formats and their settings
o Output destination and the file naming rule
To view or adjust the properties of a workflow, select the corresponding node and either click
(Properties) on the
toolbar or select the corresponding item on the shortcut menu.