
3.5
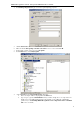

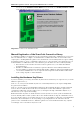
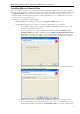
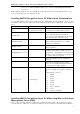
Table Of Contents
- Introduction
- Architecture
- Installation
- System Requirements
- Installing ABBYY Recognition Server Components
- Installing ABBYY Recognition Server Components via the Command Line
- Installing ABBYY Recognition Server using Microsoft Systems Management Server (SMS)
- Manual Registration of the SharePoint Connection Library
- Installing the Hardware Key Drivers
- Installing Microsoft Search IFilter
- Installing ABBYY Recognition Server 3.5 IFilter via the Command Line
- Installing ABBYY Recognition Server 3.5 IFilter using Microsoft Systems Management Server (SMS)
- Removing ABBYY Recognition Server 3.5 in silent mode
- Upgrading from the previous release of ABBYY Recognition Server
- Upgrading from the previous version of ABBYY Recognition Server
- Protection Technology and License Activation
- Administering
- Getting Started
- Registering a New Server
- Registering a New Processing Station
- Creating a New Workflow
- Configuring Document Separation
- Configuring E-mail Processing
- Configuring Verification
- Configuring Document Indexing
- Configuring Publishing Documents to a SharePoint Server
- Transfering Recognition Server Settings to another Server
- Managing Licenses
- Managing User Accounts
- Setting Up Google Search Appliance Connector
- Setting Up Microsoft Search IFilter
- Connection Settings
- Troubleshooting
- The Server Manager fails to establish a connection with the Processing Station installed on a different computer
- The Server Manager fails to establish a connection with the Verification Station, the Indexing Station, or the Remote Administration Console installed on a different computer
- No connection with the external FTP server
- The workflow does not start with the following error message: “Some of the working folders are inaccessible”
- When processing images, a “The Server Manager is out of disk space” warning appears on the computer where the Server Manager is running
- How to retrieve an image document that is being processed by ABBYY Recognition Server
- Digits in brackets are appended to the names of output files
- The Verification Station hangs at startup
- The Scanning Station fails to export a batch, and the following message appears: "Cannot access the Input folder of the workflow. Use a workflow with a shared folder if the server is on another computer."
- Recognition Server is unable to retrieve messages from POP3 e-mail server or send messages via SMTP server
- Document separation by barcodes does not work correctly
- An access to file error message appears when working with the program
- Technical Support

ABBYY Recognition Server 3.5 System Administrator’s Guide
29
Administering
ABBYY Recognition Server 3.5 is administrated via a separate component, the Remote Administration Console, which is
based on the Microsoft Management Console (MMC). The Remote Administration Console allows administrators to
change Recognition Server’s properties, connect Processing Stations and manage their properties and activity, create and
manage workflows, add users to the system and assign Administrator and Verifier permissions to the users, monitor
connected Verification Stations and the job queue, view and export the job log and the server log, and manage licenses.
If several ABBYY Recognition Servers are installed in the local area network, they can all be registered in the same
Remote Administration Console and thus all managed from a single point.
Getting Started
If you install the Server Manager and the Remote Administration Console on different computers, you need to register
the installed ABBYY Recognition Server in the Remote Administration Console (see Registering a New Server for
details).
If you install the Processing Station and the Server Manager on different computers, you will need to register the
Processing Station in the Processing Stations node (see Registering a New Processing Station for details).
After you install ABBYY Recognition Server 3.5, a Default Workflow is configured, which has the following settings:
• The Input folder, Output folder and Exceptions folder are set to Default Workflow\Input Folder, Default
Workflow\Output Folder, and Default Workflow\Exceptions Folder respectively. The root folder is:
o %ALLUSERSPROFILE%\Application Data\ABBYY Recognition Server 3.5 – for Windows XP,
Windows Server 2003;
o %PUBLIC%\ABBYY\ABBYY Recognition Server 3.5 – for Windows Vista, Windows 7, Windows
Server 2008, Windows Server 2008 R2.
• The format of the output file is set to PDF.
• The recognition language is set to English.
• The input image is moved to the Output folder without conversion.
You can view the properties of the Default Workflow in the Workflow Properties dialog box, which can be opened in
the Workflows node. You can also create new workflows in this node (see Creating a New Workflow for details).
To recognize a document:
• Copy an image or PDF file into the Input folder of the Default Workflow, or scan images with the Scanning
Station and export them to the Default Workflow of ABBYY Recognition Server.
• Shortly (the actual time required depends on the complexity of the document and your hardware resources)
the recognition results will be placed into the Output folder.
• If the document cannot be processed (e.g. the image file is corrupted or its format is invalid), the image will be
placed into the Exceptions folder. An XML result file with a description of the error will also be placed in this
folder.
Registering a New Server
The installed copy of ABBYY Recognition Server must be registered in the Remote Administration Console if the Server
Manager and the Remote Administration Console have been installed on different computers.
To register a new Recognition Server:
1. Select the ABBYY Recognition Servers node and either click
(Register New Server) on the toolbar or
select the corresponding menu item on the shortcut menu.
2. In the Register New Recognition Server dialog box, provide the name, description, and location (i.e. DNS
name or IP address) of the Server Manager component.
3. Click the Test Connection button to check the connection. If connection has been successfully established,
the word "Connected" will appear next to the button.
4. In the Authentication group, provide the correct authentication parameters.
5. Click OK. A node corresponding to the registered copy will appear in the ABBYY Recognition Servers node.