
3.0

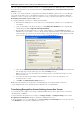


Table Of Contents
- Introduction
- Architecture
- Installation
- System Requirements
- Installing ABBYY Recognition Server Components
- Installing ABBYY Recognition Server Components via the Command Line
- Installing ABBYY Recognition Server using Microsoft Systems Management Server (SMS)
- Manual Registration of the SharePoint Connection Library
- Installing the Hardware Key Drivers
- Installing Microsoft Search IFilter
- Installing ABBYY Recognition Server 3.0 IFilter via the Command Line
- Installing ABBYY Recognition Server 3.0 IFilter using Microsoft Systems Management Server (SMS)
- Protection Technology and License Activation
- Administering
- Getting Started
- Registering a New Server
- Registering a New Processing Station
- Creating a New Workflow
- Configuring Document Separation
- Configuring E-mail Processing
- Configuring Verification
- Configuring Document Indexing
- Configuring Publishing Documents to a SharePoint Server
- Transfering Recognition Server Settings to another Server
- Managing Licenses
- Managing User Accounts
- Setting Up Google Search Appliance Connector
- Setting Up Microsoft Search IFilter
- Connection Settings
- Troubleshooting
- The Server Manager fails to establish a connection with the Processing Station installed on a different computer
- The Server Manager fails to establish a connection with the Verification Station, the Indexing Station, or the Remote Administration Console installed on a different computer
- No connection with the external FTP server
- The workflow does not start with the following error message: “Some of the working folders are inaccessible”
- When processing images, a “The Server Manager is out of disk space” warning appears on the computer where the Server Manager is running
- How to retrieve an image document that is being processed by ABBYY Recognition Server
- Digits in brackets are appended to the names of output files
- The Verification Station hangs at startup
- The Scanning Station fails to export a batch, and the following message appears: "Cannot access the Input folder of the workflow. Use a workflow with a shared folder if the server is on another computer."
- Recognition Server is unable to retrieve messages from POP3 e-mail server or send messages via SMTP server
- Document separation by barcodes does not work correctly
- An access to file error message appears when working with the program
- Technical Support

ABBYY Recognition Server 3.0 System Administrator’s Guide
Configuring Verification
ABBYY Recognition Server 3.0 includes Verification Stations that allow you to check and correct the recognized text.
The pages that require verification arrive to the Verification Station automatically after they are recognized. Detailed
information about Verification Station operation can be found in the Verification Station Help.
The verification settings in Recognition Server are specified for each workflow. For each Recognition Server workflow,
you can select one of the following options:
• No verification – all pages will be exported into the output document after recognition and will not be
routed to a Verification Station.
• Verify all pages – all pages will be queued for verification after they are recognized and before they are
exported to an output file.
• Verify only pages on which uncertain characters exceed N% only pages recognized with low
confidence will be queued for verification.
If you create a workflow with verification enabled, by default all users are allowed to verify pages from this workflow,
which means that if there are some pages queued for verification, any user who runs a Verification Station will receive a
page from the workflow.
However, it is possible to restrict the verification permissions for a workflow, so that only a limited number of users (so
called “Verifiers”) may verify pages from this workflow.
To restrict the verification permissions for a workflow:
1. Select the workflow in the Workflows node and click
(Properties) on the toolbar, or select the
corresponding item on the shortcut menu.
2. In the Workflow Properties dialog box, navigate to the Quality Control tab and click the Assign
Verifiers… button.
3. In the Assigned Operators dialog box, select the option Restrict access to this workflow for all users
except the operators listed below, and then select the desired verifiers from the list. If a username you need
is not on the list, you should first add it to the list of Recognition Server Verifiers.
4. Click OK and save the workflow properties.
To add a verifier to the Recognition Server:
1. In the Users node click
(Add User) or select the corresponding item on the shortcut menu.
2. Enter the user name in DOMAIN\username or COMPUTER\username format.
3. Select the Verifier option and then select the workflows this user should be allowed to verify.
4. Select the option Allow the user to choose workflows on the stations if you want the user to be able to
select which workflows to verify.
5. Click OK and then click the Refresh button. The new verifier will be added to the Users node.
Using the Verification Station in a workgroup network
If the Verification Station and the Server Manager are installed on different computers in a workgroup network, the
following requirements should be met:
• The user account under which the Verification Station is run must be the Administrator or a member of the
Power Users group with a nonempty password.
• On the computer on which the Server Manager is installed, there must exist user accounts with the same
usernames and passwords as those of the users who will run the Verification Station.
Configuring Document Indexing
ABBYY Recognition Server 3.0 includes Indexing Stations that allow you to assign meaningful attributes to recognized
documents. The documents that require indexing arrive at the Indexing Station automatically after they are recognized
and if necessary verified. Detailed information about Indexing Station operation can be found in the Indexing Station
Help.
The indexing settings in the Recognition Server are specified for each workflow. For each Recognition Server workflow,
you should specify one or several document types on the Indexing tab of the Workflow Properties dialog box. If you do
32