
3.0
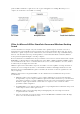
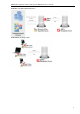

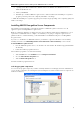
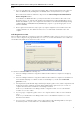
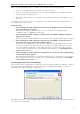
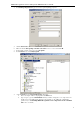
Table Of Contents
- Introduction
- Architecture
- Installation
- System Requirements
- Installing ABBYY Recognition Server Components
- Installing ABBYY Recognition Server Components via the Command Line
- Installing ABBYY Recognition Server using Microsoft Systems Management Server (SMS)
- Manual Registration of the SharePoint Connection Library
- Installing the Hardware Key Drivers
- Installing Microsoft Search IFilter
- Installing ABBYY Recognition Server 3.0 IFilter via the Command Line
- Installing ABBYY Recognition Server 3.0 IFilter using Microsoft Systems Management Server (SMS)
- Protection Technology and License Activation
- Administering
- Getting Started
- Registering a New Server
- Registering a New Processing Station
- Creating a New Workflow
- Configuring Document Separation
- Configuring E-mail Processing
- Configuring Verification
- Configuring Document Indexing
- Configuring Publishing Documents to a SharePoint Server
- Transfering Recognition Server Settings to another Server
- Managing Licenses
- Managing User Accounts
- Setting Up Google Search Appliance Connector
- Setting Up Microsoft Search IFilter
- Connection Settings
- Troubleshooting
- The Server Manager fails to establish a connection with the Processing Station installed on a different computer
- The Server Manager fails to establish a connection with the Verification Station, the Indexing Station, or the Remote Administration Console installed on a different computer
- No connection with the external FTP server
- The workflow does not start with the following error message: “Some of the working folders are inaccessible”
- When processing images, a “The Server Manager is out of disk space” warning appears on the computer where the Server Manager is running
- How to retrieve an image document that is being processed by ABBYY Recognition Server
- Digits in brackets are appended to the names of output files
- The Verification Station hangs at startup
- The Scanning Station fails to export a batch, and the following message appears: "Cannot access the Input folder of the workflow. Use a workflow with a shared folder if the server is on another computer."
- Recognition Server is unable to retrieve messages from POP3 e-mail server or send messages via SMTP server
- Document separation by barcodes does not work correctly
- An access to file error message appears when working with the program
- Technical Support

ABBYY Recognition Server 3.0 System Administrator’s Guide
• Operating system: Microsoft Windows 7, Windows Server 2008, Windows Vista, Windows Server 2003,
Windows XP, Windows 2000
• Memory: 128 MB RAM
• Hard disk space: 10 MB for ABBYY Recognition Server 3.0 IFilter installation, the hard disk space required for
program operation depends on the complexity and number of the images.
*
— Note: The hard disk space required for program operation may be larger depending on the complexity, quality, and
number of the images.
Installing ABBYY Recognition Server Components
The installation program will guide you through the installation of ABBYY Recognition Server. Please close all
applications prior to installing ABBYY Recognition Server.
Note: To communicate with Microsoft SharePoint Server, the Server Manager and the Remote Administration Console
require Microsoft .NET Framework 2.0 or higher to be installed. If you are going to configure Recognition Server to
publish documents to a SharePoint library, you should install Microsoft .NET Framework prior to installing ABBYY
Recognition Server.
If you choose to install Microsoft .NET Framework later, you will have to register the SharePoint connection library
manually afterwards. See the Manual Registration of the SharePoint Connection Library section for details.
To install ABBYY Recognition Server:
1. Insert the ABBYY Recognition Server 3.0 CDROM into the CDROM drive. The installation program will launch
automatically.
2. Follow the installation program instructions.
If the installation program does not launch automatically:
1. Click the Start button on the Taskbar and select Settings>Control Panel.
2. Select the Add or Remove Programs item.
3. Click the Add New Programs button.
Follow the installation program instructions.
Selecting program components
You can select the program components you wish to install. By default the Server Manager, the Remote Administration
Console, the Processing Station, the Scanning Station, the Indexing Station, and the Verification Station components are
marked for installation.
15