
Specifications


Application note Connecting CP600 to motion products via Modbus RTU AN00200-003
ABB Motion control products 6
www.abb.com/motion
The dialog changes slightly and now includes an additional area showing the slave devices that have been added to the Modbus
RTU network.
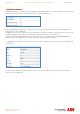
Click on the ‘Add’ button…the software now asks the user to enter details about the connected slave device….
Our ABB Motion Product (e100 controller) we’re using for this example has a serial node address of 1 (where this was set either by
BUSNODE(_busSERIAL1) or via Mint Workbench) so we’ve entered this as the Node ID.
The Timeout (in ms) is how long the HMI will wait for a reply from the connected slave(s) before deciding a particular communication
transaction has failed. Typically the responses should occur within 10ms so the default timeout of 1 second (1000ms) is adequate.
The delay setting determines how long the HMI waits before processing further Modbus transactions. If this is set to 0 the HMI will
read/write data as quickly as possible (e.g. after reading data from the slave it will read again with no delay). In practise there’s no
point updating the HMI this quickly (and the more frequently we communicate with the controller the greater the loading on the
connected slave processors) so a setting of 200 to 400ms is more typical.
Num of repeats sets how many times the HMI attempts a particular Modbus transaction before deciding a communication error has
occurred. The default value of 2 is adequate for all applications.
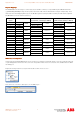
Finally we need to select a PLC model. When using Modbus RTU we are able to select from NextMove ES/ESB-2, e100 motion
product or e150 motion product. For this example we’ll select an e100 motion product.
The software returns to the previous screen and now shows our configured node in the list of slave controllers. To add another
slave device repeat the above process. To modify any settings, highlight the slave controller and click on the “Modify” button.
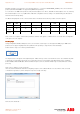
Once all the required slave devices have been added click on the “Comm…” button. We can now setup the properties of the HMI’s
serial port to suit the connected slave devices…
For HMIs with a single 9 way d-type connector select “Com1” as the required port. If the HMI has more than one serial port set
‘Port’ to match whichever port is physically wired.