Dialog 4106 Basic/Dialog 4147 Medium Analog Telephones User Guide Cover Page Graphic Place the graphic directly on the page, do not care about putting it in the text flow. Select Graphics > Properties and make the following settings: • Width: 15,4 cm (Important!) • Height: 11,2 cm (May be smaller) • Top: 5,3 cm (Important!) • Left: -0,3 cm (Important!) This text should then be hidden.
Title EN/LZT 103 78 R2A © Aastra Telecom Sweden AB 2008. All rights reserved.
Table of Contents Table of Contents page General Information .......................................... 5 Description ....................................................... 7 Incoming Calls ............................................... 12 Outgoing Calls ............................................... 13 During Calls .................................................... 18 Settings .......................................................... 20 Installation ..................................................
Table of Contents 4 Dialog 4106 Basic/Dialog 4147 Medium
General Information General Information The latest version of this user guide can be downloaded from: http://www.aastra.com Copyright All rights reserved. No parts of this publication may be reproduced, stored in retrieval systems, or transmitted in any form or by any means, electronic, mechanical, photocopying, recording or otherwise, without prior written permission of the publisher except in accordance with the following terms.
General Information Declaration of Conformity Hereby, Aastra Telecom Sweden AB, SE-126 37 Hägersten, declares that this telephone is in conformity with the essential requirements and other relevant provisions of the R&TTE directive 1999/5/EC. Details to be found at: http://www.aastra.
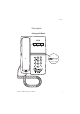
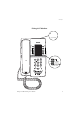
Description Description Dialog 4106 Basic 1 8 7 9 (bottom side) 2 6 3 5 4 Dialog 4106 Basic/Dialog 4147 Medium 7
Description 1 Programmable keys Three keys for storing frequently called numbers. You can store one number per key, see section “Dial By a Function Key” on page 15. Note: If you unplug the telephone, stored numbers will remain for about 24 hours. 2 Mute/Prog a. Switch microphone on or off. See section “During Calls” on page 18. b. Enter programming mode. See section “Settings” on page 20. 3 Message Waiting key a. A flashing light indicates a waiting message. b.
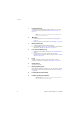
Description Dialog 4147 Medium 12 (upper side) 1 2 3 3 13 9 14 10 11 (bottom side) 4 8 5 7 6 Dialog 4106 Basic/Dialog 4147 Medium 9
Description 1 Program Store frequently called numbers. 2 Message Waiting/2nd a. A flashing light indicates a waiting message. b. Key for access to secondary key functions (these functions are stated on the second line of the corresponding key). 3 Programmable keys Eight keys for storing frequently called numbers. You can store two numbers per key. 4 Mute Switch microphone on or off. See section “During Calls” on page 18. 5 Loudspeaker on/off / Headset key a. Switch loudspeaker on or off.
Description 11 Message Waiting switch Switch Message Waiting indication on or off. Also used to reverse the polarity in case of crossed line cables. See section “Settings” on page 20. 12 Data port Data port for connection of a modem, PC or other telephone equipment. 13 Loudspeaker (beneath handset) 14 Handset with hearing aid function Please note: The handset may attract and retain small metal objects in the earcap region.
Incoming Calls Incoming Calls A ring signal indicates an incoming call. u d 12 Answer calls Lift the handset. Replace the handset to end the call.
Outgoing Calls Outgoing Calls Make calls u d How to make calls. Lift the handset and dial the number. Replace the handset to end the call. Wait for dial tone © Sometimes it is required to wait for a new dial tone after dialing the prefix digit when making an external call. In such situations, you must store the pause for a new dial tone into the number: Press. Manual dial pause control: You can control the length of a dial pause manually if you store the pause after the fifth digit or later.
Outgoing Calls Number presentation restriction If you do not want your name and number to be displayed to the person you are calling, you can use the following procedure. Notes: This function is only available in newer versions of the exchange, and it might be blocked for use on your extension (programmed by your system administrator). u *42# z The number presentation restriction is only valid for the ongoing call, i.e. the procedure has to be repeated the next time you want to use it. Lift the handset.
Outgoing Calls Bypass u *60* z # If this function is allowed from your extension, you can bypass an; activated Diversion, activated Follow-me or activated Absence information on a specific extension. Lift the handset. Dial and enter the extension number. Press and wait for answer. Dial By a Function Key Note: For the Dialog 4147 phone, make sure that the programming slide switch is set to the “Prog On” position. See section “Enable/Disable Program key” on page 24.
Outgoing Calls Program How to program a directory number on the programmable keys. On the Dialog 4106 phone: The Dialog 4106 has four keys for programming; the three programmable keys and the Message key. u ¥ î z ¥ d Note: To store a number on the Message key, just press the key during the following procedure like a normal programmable key. Lift the handset. Wait for dial tone. Press. Press a programmable key. If a number is already stored, it will be erased automatically.
Outgoing Calls u î î Program z î d Program On the Dialog 4147 phone: Lift the handset. Wait for dial tone. Press. Press a programmable key. Note: To store a number on the second level, press the Message Waiting/2nd key before pressing the programmable key. If a number is already stored, it will be erased automatically. If you would like to erase a number, store a 0 instead of the telephone number. Dial the number.
During Calls During Calls Group listening (loudspeaking) Note: This function is only for the Dialog 4147 phone. This function lets other people in your room listen to your phone conversation. You speak in the handset while the other party´s voice is heard on the loudspeaker. Â During an ongoing conversation: Press to switch between loudspeaker and handset. When the key lamp is lit, the other party´s voice is heard on the loudspeaker. Note: You can adjust the volume, see section “Settings” on page 20.
During Calls Monitoring Note: This function is only for the Dialog 4147 phone. Â d ÄÂ u You have an ongoing conversation via the handset. Press to switch the loudspeaker on. Replace the handset. The loudspeaker monitors the call. Note: When the loudspeaker is on, the microphone is automatically switched off in the handset. You can adjust the volume, see section “Settings” on page 20. Press to end the call. From Monitoring to handset Lift the handset. Continue your conversation via the handset.
Settings Settings The Dialog 4106 and Dialog 4147 phones are equipped with a couple of setting options, you can for instance set and adjust a personal volume and ring signal. Handset, headset and loudspeaker volume There are two separate volume settings, one for the loudspeaker and one for the handset/headset. Use the Volume keys to change the volume of the handset/headset or loudspeaker during a call. ì 20 • Adjust the handset listening volume when the handset is off hook.
Settings Programming of ring signal By programming, you can adjust the ring character and ring volume. To change the ring character and volume, you have to enter the programming mode. Programming the ring character and volume for the Dialog 4106 u ¥ # z The ring signal character can be adjusted with three different characters, each with another three volume levels. Lift the handset. Wait for the dial tone. Press. Press. Enter digit from the table below.
Settings Programming the ring character and volume for the Dialog 4147 The ring signal character can be adjusted with five different characters and three different volume levels. u î 7 z Program Program ring character: Lift the handset. Wait for the dial tone. Press. Press. Enter digit from the table below. You can hear the chosen character. Digit (character) 0 1 2 3 4 î d Program 22 Ring character – Repetition rate 1 time 2 times 4 times 6 times 10 times Note: Default setting is digit 0. Press.
Settings u î 6 z Program Program ring volume: Lift the handset. Wait for the dial tone. Press. Press. Enter digit from the table below. You can hear the chosen volume. Digit (character) 1 2 3 î d Program u î 9 0 1 î d Program or Program Ring volume Soft Medium Loud Note: Default setting is digit 3. Press. The selected ring volume is stored. Replace the handset to finish the procedure. Switch off/on ring signal: Lift the handset. Wait for the dial tone. Press. Press. Press. 0=Off and 1=On.
Settings Hearing aid compatibility Since your telephone has a built-in inductive coupler for the hardof-hearing, anyone so desiring can use the telecoil in his/her hearing aid while telephoning. To do so, simply switch the hearing aid in the T position. Message Waiting indication Your incoming messages can be indicated by a rapidly flashing Message key.
Settings Headset Notes: This function is only supported for the Dialog 4147 phone. To install the Headset, see section “Installation” on page 27. You can adjust the volume of the headset, see section “Handset, headset and loudspeaker volume” on page 20. Headset calls are handled via the Loudspeaker/Headset key. To enable the Headset functionality, you have to change the Loudspeaker/Headset switch into the Headset position. At the bottom side of your phone: Slide the switch to the required position.
Settings Flash time Note: This function is only supported for the Dialog 4147 phone. Some systems require a different flash time for the R-key. You can set two different flash times (timed breaks). u î 2 0 1 î d Program or Program 26 Change flash time: Lift the handset. Wait for the dial tone. Press. Press. Press. 0=100 ms and 1=600 ms. Default setting is digit 0. Press. Replace the handset to finish the procedure.
Installation Installation Install cables Handset cable to the left Handset cable to the right You can put the cable to the handset in the notch underneath the telephone. The cable to the exchange has to be plugged in “LINE” and the handset cable has to be plugged in “HANDSET”. Note: The headset and the data port connections are for use with the Dialog 4147 phone only. For headset servicing and replacement, contact your local service centre or retailer shop.
Installation Install stands and adapt telephone Position high Press to fasten stand 28 Position low Release to remove stand Dialog 4106 Basic/Dialog 4147 Medium
Installation Install card Note: This section only applies to the Dialog 4147 phone. Use the Designation Card Manager to make and print your own designation cards. The Designation Card Manager is included on the Telephone Toolbox CD for MD110 Communication System. For more information, please contact your Aastra Certified Sales Partner.
Installation Wall mounting The phone can be wall mounted without using a special console. Useful for instance in conference rooms or public areas. 30 1 Use a screwdriver to remove the handset hook. 2 Turn the hook upside down and insert. 3 Use a screwdriver to remove the two plastic covers. 4 Drill wall holes according to measure. 5 Mount screws according to measures and attach the phone.
Installation Placing the telephone • Do not place your telephone on sensitive surfaces. Use a non-slippery pad to protect your furniture from possible damage. • Do not place your telephone near sources of extreme heat, e.g. near the radiator. • Make sure that the line cable isn’t creased. Cleaning the telephone Use a slightly moistened (not wet) soft cloth or an anti-static cloth and wipe off the telephone carefully. Do not use rough cloth, solvents or aggressive cleaning fluids.
Troubleshooting Troubleshooting This section contains information on how to solve common operational problems. Go through the following steps if you encounter any problems. If this does not solve the problem, contact your system administrator. If others have similar problems, there may be a system error. Fault check list 1. Make sure your telephone is connected to an analog line. 2. Read the Installation chapter. Make sure that you have done everything correctly and that everything is properly connected.
Index Index A Answer calls 12 B Bypass 15 C Cleaning the telephone 31 Copyright 5 D Declaration of Conformity 6 Description 7 Dialog 4106 Basic 7 Dialog 4147 Medium 9 Dial By a Function Key 15 During Calls 18 Monitoring 19 Mute 19 During calls Group listening (loudspeaking) 18 F Fault check list 32 Flash time 26 G General Information 5 Group listening (loudspeaking) 18 H Handset, headset and loudspeaker volume 20 Headset 25 Hearing aid compatibility 24 I Incoming Calls 12 Dialog 4106 Basic/Dialog 4147 Med
Index S Settings 20 Flash time 26 Handset, headset and loudspeaker volume 20 Headset 25 Hearing aid compatibility 24 Message Waiting indication 24 Programming of ring signal 21 34 T Troubleshooting 32 Fault check list 32 W Wall mounting 30 Warranty 5 Dialog 4106 Basic/Dialog 4147 Medium
Subject to alteration without prior notice. For questions regarding the product, please contact your Aastra Certified Sales Partner. Also visit us on http://www.aastra.com © Aastra Telecom Sweden AB 2008. All rights reserved.