
User guide


Configuration
26
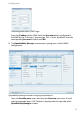
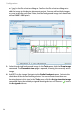
Navigate to the Image management page and select one or more images. In
the Tasks pane, shift the Overview size slider to the desired downscaling
factor. Click the Set overview size command.
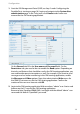
Alternatively, select the Adjust overview size command to set the scaling
factor in a preview. The area covered by the overview image is displayed as a
coloured square. Drag the cyan dot in the right upper corner to change the
square’s size. Drag the red middle dot to move the square. Note, that only the
square’s size will change the overview image scaling while the square’s
position is ignored.
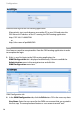
8. When ready placing images, generate the images for the OM Locating server.
Again select one or more background images on the Image management
page. In the Tasks pane, click the Generate command. Select the desired
destination directory in the file selection dialogue. You may create a new
directory with the [folder] icon. Confirm the file selection dialogue with Open
to start the image generation.
The image generation task will create a standard image and zoomed image for
every locating device and store the corresponding image files in the
destination directory. Also, the image file names are determined by the MAC
address of the locating device as described under Locating Images Technical
Details starting on page 23.