
User guide


Configuration
23
Locating Images Technical Details
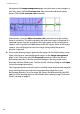
The portable part’s location is presented with two graphical views:
■ The upper view shows the overall floor plan, for example an overview with the
highlighted RFP and the covered area.
■ The lower view shows the RFP’s detailed location. The display is overlaid by a
centred radio wave animation.
You need to provide two bitmap graphic files for any RFP managed by the OMM
with the following properties:
■ The uppercased MAC address of the RFP determines the file name. An
overview graphic is named “[MAC].png” and the detailed graphic is named
“[MAC]-zoom.png”.
Examples: “0030420D102E.png”, “0030420D102E-zoom.png”
You can view the MAC address using the OM Management Portal (OMP): for
RFPs, navigate to the Radio fixed parts: device list page.
■ The file is formatted as Portable Network Graphics (PNG) file with a fixed size of
256x256 pixels. You can use any colour depth, but you should not use an alpha
channel or the animation extension to ensure compatibility with older browser
versions.
Please note: You also should backup the graphic files stored on the
OM Locating server on a regularly basis (see Backup and
Restore starting on page 12).
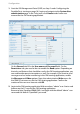
Generating Location Images by Using the OMP
Using the OMP, you can generate location images. You add the images showing
the floor plan of the buildings belonging to the OM system into the OMP. Then,
you place the RFPs on these images. Finally, for each of the RFPs the location
images will be generated in the format and size as required by the OM Locating
application.
The OMP provides the special Planning mode to perform these steps.
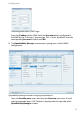
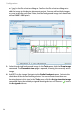
1. Start the OM Management Portal (OMP). Browse the OpenMobility
installation media for a file named “OMP.jar”. Double click the file to start
the OMP. After logging in, click on the Planning mode icon in the toolbar
to switch to the planning mode. Navigate to the Device placement: Image
management page.
2. You need to add at least one background image such as a floor plan or similar.
In the Tasks pane, select the Add image command. Select an image file (*.png