
User guide


Installation
13
If you need to restore the OM Locating application from your backup, stop the
Tomcat service and restore the files. To do so, press the [Alt+F2] keyboard combi-
nation and run the “su - -c "nautilus /var" ” command in a terminal (see step 8 on
page 10). You also need to change the restored files ownership after copying. To
do so, run the “su -c "chown -R tomcat /var/lib/OML/" ” in a terminal.
Upgrading OM Locating from Previous Version
If you already run an older version of the OM Locating application, you can
upgrade to a newer version with the following steps.
Note, that the configuration database (located in the data folder, see Backup and
Restore on page 12) of the OM Locating application is silently updated to the
newer version. Downgrading of the configuration database from a newer version
to an older version is not supported by the OM Locating application.
1. Make a backup copy of the OM Locating application (see Backup and Restore
on page 12). Take extra care to backup the configuration database located in
the data folder under “/var/lib/OML” and the site location images located in the
“/var/lib/tomcat6/webapps/OML/images/locations” folder.
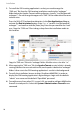
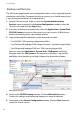
2. Stop the Tomcat service. To do so, select the System: Administration: Server
Settings: Services menu command. In the Service Configuration window,
select the “tomcat” entry and click the Stop button.
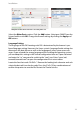
3. Remove the /var/lib/tomcat6/webapps/OML folder. To do so, press the [Alt+F2]
keyboard combination and run the “su - -c "nautilus /var/lib/tomcat6/
webapps" ” command in a terminal (see step 5 on page 10). Right click the
“OML” folder icon and select the Move to trash context menu command.
4. Copy the newer “OML.war” file to the “webapps” folder, thereby overwriting
the old “OML.war” file (see also step 5 on page 10).
5. Switch back to the Service Configuration window. Click the Start button to
restart the Tomcat service. The Tomcat service re-creates the “OML” folder from
the “OML.war” file.
6. Restore the site location images into the “/var/lib/tomcat6/webapps/OML/
images/locations” folder.
Please note: Some Tomcat installations support auto-deploy by simply
dropping a new “*.war” file into the “webapps” folder. This is
not supported officially because it may not function properly.
The auto-deploy feature also erases the site location images
automatically.