
User guide


Installation
9
CAUTION! The OM Locating configuration folder is "/var/lib/OML/".
Please make sure that the folder exists and tomcat is the
owner of the folder.
New installations:
The OM Locating data folder is now a separate folder which has to be created man-
ually once before starting the OM Locating Application for the first time. Log in as
root to the Red Hat Linux operating system and run the command
"mkdir /var/lib/OML/"
and change the ownership of this directory
"chown tomcat:tomcat /var/lib/OML/".
Update of existing installations:
If updating from a version prior to OMM 4.0SP4 the following steps have to be
done once.
1. Create the new OM data folder as described in the above paragraph.
2. Stop the Tomcat service.
3. Copy the OML data files from the old location to the new directory by running
the command:
"cp -a /var/cache/tomcat6/work/OML/* /var/lib/OML/"
4. Make sure you have a backup of your Location images (located in /var/lib/
tomcat6/webapps/OML/images/locations)
5. Remove the old OML.war and the OML directory manually:
"rm -fr /var/lib/tomcat6/OML.war /var/lib/tomcat6/OML"
6. Start the Tomcat service.
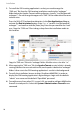
7. Deploy the new OML.war file.
8. Wait until OML is deployed and restore your local Locations images to the
directory "/var/lib/tomcat6/webapps/OML/images/locations"
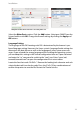
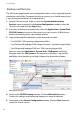
Tip: For the experienced administrator: install Apache Tomcat.
Drop the “OML.war” file to the “webapps” folder and restart
Apache Tomcat. Browse to “http://localhost:8080/OML/”.
Login with “admin” and “OpenMob”. Continue reading with
Backup and Restore starting on page 12.