SIP-DECT OM Locating Application Installation, Administration & User Guide
Welcome to Aastra Thank you for choosing this Aastra product. Our product meets the strictest requirements with regard to quality and design. The following user guide will assist you in using your SIP-DECT OM Locating Application and provide answers to all your most important questions. If you should require further technical support or information about other Aastra products, please contact the person responsible for your system or get in touch with your local dealer.
Contents OpenMobility Locating Application . . . . . . . . . . . . . . . . . . . . . . . . . . . . . . . . . . . . . . 1 Features and Benefits . . . . . . . . . . . . . . . . . . . . . . . . . . . . . . . . . . . . . . . . . . . . . . . . . . . . . . . 2 Use Cases. . . . . . . . . . . . . . . . . . . . . . . . . . . . . . . . . . . . . . . . . . . . . . . . . . . . . . . . . . . . . . . . . . . 3 Other Valid Documentation . . . . . . . . . . . . . . . . . . . . . . . . . . . . . . . . . . . . . . . . . . .
Message Receipt on the Handset . . . . . . . . . . . . . . . . . . . . . . . . . . . . . . . . . . . . . . . 45 Viewing Video Cameras. . . . . . . . . . . . . . . . . . . . . . . . . . . . . . . . . . . . . . . . . . . . . . . . . . . . 46 Handling Table Views. . . . . . . . . . . . . . . . . . . . . . . . . . . . . . . . . . . . . . . . . . . . . . . . . . . . . . 47 Sorting Tables. . . . . . . . . . . . . . . . . . . . . . . . . . . . . . . . . . . . . . . . . . . . . . . . . . . . . . . . . .
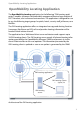
OpenMobility Locating Application OpenMobility Locating Application The OpenMobility Locating application (in the following “OM Locating application”) enables customers to comfortably manage and locate a large amount of DECT handsets, also in diversed environments. The application is designed for use by e.g. the following target groups: hospitals, hotels, security staff, jailhouses, care facilities. The OM Locating application offers an integrated message and alerting function.
OpenMobility Locating Application The OM Locating application can be run within the SIP-DECT OpenMobility solution since release 2.0. Aastra provides the following handsets for use with the OM Locating application: ■ Aastra 610d ■ Aastra 620d ■ Aastra 630d (with alarm sensor) ■ Aastra 612d ■ Aastra 622d ■ Aastra 632d (with alarm sensor) ■ Aastra 650c These DECT terminals provide comfortable messaging features and are particularly suitable for use with the locating application.
OpenMobility Locating Application The operator can initiate a locating alert to trigger an audible alarm on the handset which sent the ManDown/SOS call. In addition, the operator can send messages to other handset users to inform them about the event and e.g. to request them to bring help to the person who sent the ManDown/SOS call. The history function stores information on each event hold in the OM Locating server database.
OpenMobility Locating Application SOS – a handset user presses a button The DECT handset user presses a button to signal an alarm condition. The SOS automatically triggers a phone call to the operator. The operator who is using the OM Locating application is able to locate the current position of the DECT handset user. ManDown – a person looses consciousness The DECT handset sensor detects “ManDown” and the handset automatically sets up a call in the hands-free mode.
OpenMobility Locating Application ■ The licence confirmation for the OM Locating application. ■ The installation CD. ■ The user guide entitled “SIP-DECT; OM Locating Application” (included in PDF format on the CD). ■ The “SIP-DECT; Aastra 600 c/d; Messaging & Alerting Applications ” user guide (included in PDF format on the CD). Notes on Licences Application licence In order to use the OM Locating application, you need the appropriate Licences to configure and use the application.
OpenMobility Locating Application Notes on GAP / Aastra 142d Handsets While handover between different RFPs is possible for DECT GAP or Aastra 142d handsets, the messaging function is not supported on these devices. For this reason, only a limited feature set can be used together with these devices: 6 ■ Basic handset locating based on RFP is possible. ■ Triggering an SOS alarm is possible with the Aastra 142d handset. ■ The RFP visibility feature is not supported.
OpenMobility Locating Application Notes on Operating Conditions The OM Locating application is designed to work straightforward, secure, and reliable. However, it should be noted that you need to ask your data protection officer to ensure compliance to your company or country data protection rules.
Installation Installation The OM Locating application is realized as a Java application to be run under the Apache Tomcat application server environment. In order to install and run the OM Locating application, you need to setup the Apache Tomcat 6 server on a PC running “Red Hat Enterprise Linux Server 6”. Alternatively you can use CentOS 6.5 as operating system. Make sure that the Apache Tomcat6 server is enabled and started in runlevel 3, 4, and 5, e.g.
Installation CAUTION! The OM Locating configuration folder is "/var/lib/OML/". Please make sure that the folder exists and tomcat is the owner of the folder. New installations: The OM Locating data folder is now a separate folder which has to be created manually once before starting the OM Locating Application for the first time. Log in as root to the Red Hat Linux operating system and run the command "mkdir /var/lib/OML/" and change the ownership of this directory "chown tomcat:tomcat /var/lib/OML/".
Installation 1. To install the OM Locating application’s servlet, you need to copy the “OML.war” file from the OM Locating installation media to the “webapps” folder below the Apache Tomcat working directory (usually “/var/lib/tomcat6/ webapps/”). Do not change the upper case “OML” of the web archive file name to lower case. Press the [Alt]+[F2] keyboard combination. In the Run Application dialogue, activate the Run in terminal option.
Installation Add port 8080 to the firewall’s trusted ports list Select the Other Ports section. Click the Add button. Select port “8080” from the list and confirm with OK. Change the firewall settings by clicking the Apply and OK buttons. Language Setting The language of the OM Locating web GUI is determined by the browser’s preferred language setting. However, the Linux system’s language/locale setting also determines the date format as well as the language of some system error messages.
Installation Backup and Restore The OM Locating application stores configuration data as well as acquired location data below a data folder. To prepare for disaster recovery, you should make at least a copy the respective folders on a regularly basis. 1. Stop the Tomcat service. To do so, select the System: Administration: Services menu command. In the Service Configuration window, select the “tomcat” entry and click the Stop button. 2.
Installation If you need to restore the OM Locating application from your backup, stop the Tomcat service and restore the files. To do so, press the [Alt+F2] keyboard combination and run the “su - -c "nautilus /var" ” command in a terminal (see step 8 on page 10). You also need to change the restored files ownership after copying. To do so, run the “su -c "chown -R tomcat /var/lib/OML/" ” in a terminal.
Installation Tip: 14 With previous versions of the OM Locating application, you may have installed and enabled the Oracle Java runtime environment. If you want to switch to OpenJDK, you may do so by entering “/usr/sbin/alternatives --config java” at a root prompt.
Configuration Configuration The configuration of the OM Locating application takes place in three logical steps, described in the following sections: ■ Configuring the Portable Parts starting on page 16: describes how to enable portable parts (DECT phones) to be located and how to add a user account for OM Locating. ■ Configuring the OMM Connection starting on page 18: describes how to establish a connection between the OM Locating application and the OMM.
Configuration alarm scenario configuration should use the DISTRESS_OPERATOR_TIMEOUT alarm trigger for this purpose. In addition, the alarm scenario should define a confirmation or timeout to ensure proper reaction on the escalated event. For details see the “SIP-DECT; OM Integrated Messaging & Alerting Application” user guide. You also need to add the file download URL to the system settings.
Configuration OM Management Portal (OMP): login Enter the IP address of the OMM. Enter the User name that is configured at the OMM for the “Full access” account type. This is “omm” by default. Enter the corresponding Password. Confirm with OK. 3. The OpenMobility Manager window opens, giving access to the OMM’s configuration. OpenMobility Manager window: changing a portable part Open the Portable parts menu and select the Overview menu item.
Configuration 4. Double-click an arbitrary portable part from the list. This opens a tabbed details view for the selected portable part on the lower right part of the OpenMobility Manager window. 5. Switch to the Locating tab. Select or de-select one of the following options to change the configuration: Locating permission option (Aastra 600 c/d only): If enabled, the portable part is able to determine the location of other portable parts.
Configuration 1. Start the OM Management Portal (OMP, see Step 2 under Configuring the Portable Parts starting on page 16). Login and navigate to the System: User administration page. In the Tasks pane, click Create to add a new user account for the OM Locating application. On the General tab, fill in the User name and Password fields. On the Permissions tab, you need at least to enable the Read option.
Configuration Administrative login to the OM Locating application Alternatively, start a web browser on another PC in your LAN and enter the DNS-Name or IP address of the PC running the OM Locating application: http://192.168.1.1:8080/OML or http://dns-name-of-pc:8080/OML Note Your browser needs to accept cookies from the OM Locating application in order to complete the login. 3. If this is your first login to the OM Locating application, the OMM Configuration tab is displayed automatically.
Configuration Password: Enter the password for the OMM user account. You need to enter the same password again into the Password (confirm) input field. Address: Enter the IP address of the OMM. Alternatively, enter the DNS-Name of the OMM. Note, that you cannot change the Standby Address field which is updated automatically later on. This information field shows the resilient or stand-by OMM’s IP address.
Configuration Configuring the Workstation Computers For using the OM Locating application user interface, the desired operator needs access to a standard PC with a web browser. Please mind the following points when configuring and operating the workstation: ■ The workstation and the PC running the OM Locating application should be connected with a reliable and secure network connection.
Configuration Locating Images Technical Details The portable part’s location is presented with two graphical views: ■ The upper view shows the overall floor plan, for example an overview with the highlighted RFP and the covered area. ■ The lower view shows the RFP’s detailed location. The display is overlaid by a centred radio wave animation.
Configuration or *.jpg) in the file selection dialogue. Confirm the file selection dialogue to add the image to the device placement project. You can add multiple images, e.g. one image for each floor. Note, that the background image size should not exceed 3000 x 3000 pixels. 3. Select the desired background image. In the Tasks pane, click the Show image command. The Placement view page is opened, showing the currently active image. 4. Add RFPs to the image. Navigate to the Radio fixed parts pane .
Configuration 5. Navigate to the Placement view page. New locating devices will be placed in the upper left corner of the image. You may need to drag the image using the mouse to shift the display in order to display the upper left corner of the image. Alternatively, right click the image and select the Reset view command. Drag the a locating device icon to the desired place on the image that corresponds to the physical location of the locating device. Note, that RFP icons show up in light green.
Configuration Navigate to the Image management page and select one or more images. In the Tasks pane, shift the Overview size slider to the desired downscaling factor. Click the Set overview size command. Alternatively, select the Adjust overview size command to set the scaling factor in a preview. The area covered by the overview image is displayed as a coloured square. Drag the cyan dot in the right upper corner to change the square’s size. Drag the red middle dot to move the square.
Configuration Generated Images (from above example) 9. While the OMP automatically stores and reopens the current device placement project, you should create a backup archive of your project. In the Tasks pane, click the Export project command. Select the desired destination directory in the file selection dialogue. Confirm the file selection dialogue to export the device placement project.
Operation and Daily Usage Operation and Daily Usage This chapter describes the components of the OM Locating application and how to operate it in daily usage. It addresses normal users (operators) as well as the administrator. Tip: For quick information access, it is recommended to prepare an individual short user guide which is tailored to your organization. A template can be found in the chapter entitled Short User Guide on page 55. Login / Logout Login page Login procedure 1.
Operation and Daily Usage Please note: It is recommended that you do not activate the remember me option in order to prevent third parties to log in under your user name in case you temporarily logged out. 4. Click Sign in. The OM Locating application now connects the OpenMobility Manager (OMM). The OMM manages the DECT handset locations and the alarm messages which are sent by the DECT handset users.
Operation and Daily Usage Handling Events Alarm messages (ManDown or SOS calls) which have been triggered by the DECT handsets are listed in the Events menu of the OM Locating application. The users (operators) are thereby notified about each event and requested to call attention to this event or incidence and to initiate an action or a chain of actions.
Operation and Daily Usage Event information For each event the following information is displayed: ■ #: Events are automatically numbered. This number serves as an internal identifier of the event and can not be edited. ■ State: indicates the current event state. – A new event is marked as New with a blinking icon. When the event comes in, a small information window pops up at the bottom of the screen.
Operation and Daily Usage Performing Actions on Events The upper part of the events tab contains a several command buttons to handle the events. Note: The rules for handling events will be established by the company safety officer of your organization. Accepting an event When an event (alarm message) comes in, it has to be accepted by the operator. Also events which have been forwarded to you (see next section), must be accepted. Escalated events which arrived within the last 24 hours can be accepted also.
Operation and Daily Usage 4. From the Forward to drop-down list, select the user (operator) to whom you want to forward the event. 5. Enter a comment in the input field to inform the recipient about the reason of forwarding. 6. Click OK to close the dialogue. If you want to cancel the action, click on the icon. The operator to whom the event was forwarded is indicated in the events table in the Recipient column. Note: It is possible to reverse the forwarding by pressing the Accept command button.
Operation and Daily Usage Sending messages It is possible to send a message to one or multiple recipients. In case of a ManDown call, it is recommended to initiate a locating alert, see page 34. Messages can also be sent to trigger follow-up activities in connection with a ManDown/SOS call, see page 44. Searching for an event To search for a specific event in a large table, use the search input field (see page 49). You can also browse through the pages of a multiple page table (see page 48).
Operation and Daily Usage 5. Confirm: Accept the preselected Read confirmation type or select another one from the drop down list (Complete, Order). The selected confirmation type defines the confirmation sequence that has to be performed on the handset that receives the locating alert (see also the chapter entitled Message Receipt on the Handset starting on page 45). 6. Optional: You can enter a message text in the input field.
Operation and Daily Usage Exporting Event Data The complete events data stored in the in the OM Locating server database can be exported to a *.csv file, e.g. for archiving or for analysis. This feature is only available for users which belong to the administrators user group (see also the chapter entitled Managing Users on page 50). Please note: Make sure to observe regulations regarding data protection when archiving event data! 1. Click the Export command button above the events table. 2.
Operation and Daily Usage The Portable Parts tab of the Subscriber menu provides an overview of the handset locations. Using this menu, you can identify the current position of a handset, track a handset’s location over time (see page 39), check the RFP visibility for selected handsets (see page 41), and send messages to selected handsets (see page 44). For each handset the table displays the following information: ■ Name, Call no.
Operation and Daily Usage click the appropriate entries. To select all entries, activate the check box in the first column of the table header. 2. Click the Tracking command button above the portable parts table. Alternatively, you can click on the tracking status icon behind each handset entry to switch the mode. Note Note, that the Tracking option has to be enabled for the respective handset (see the chapter entitled Configuring the Portable Parts starting on page 16).
Operation and Daily Usage Calling up the Location History You can track a handset’s location over time. The location history displays information on the RFP’s to which the handset has been connected. A maximum of 50 entries are available. Using this feature, you can view the current position of a person and also the person’s movement in your organization as long as he/she carries the handset. 1. Select the desired handset entry in the portable parts table. 2.
Operation and Daily Usage tracking data contains connection date, time and location for the current day. The Type column indicates why the handset position data was updated. Note: To view the current location information of a handset for which the tracking mode is deactivated (see page 37), click the Update command button above the portable parts table. 3.
Operation and Daily Usage Checking RFP Visibility Depending on the RFP arrangement in your organization, a handset might be in the visibility radius of multiple RFPs. To identify the RFP nearest to the handset, you can use the RFP visibility feature. This helps to determine the concrete handset user’s location, e.g. if the user does not answer a call or message. For this function, the DECT portable part is queried by the OMM.
Operation and Daily Usage Best visibility Good visibility Acceptable visibility Bad visibility Worst visibility 2. In order to locate the handset in the graphics on the upper part of the dialogue, click on the appropriate location entry in the lower list. If the handset is of the type Aastra 600 c/d, the graphic will also show a field strength indicator. 3. To close the dialogue, click on the icon.
Operation and Daily Usage Message status overview The messages table displays information on the status of each message. The message has been sent. The message was delivered. The recipient has read the message. The recipient has completed the message order (see page 45). The sending of the message failed. In this case send the message again (see page 44). Viewing details of a message 1. You can view details of a selected message. Select the appropriate entry in the message table. 2.
Operation and Daily Usage Searching for a message To search for a specific message in a large table, use the search input field (see page 49). You can also thumb through the pages of a multiple page table (see page 48). Furthermore, you can adapt the table display to your needs (see page 47). Sending Messages You can send a message to one or multiple recipients which are equipped with a message-capable device, e.g an Aastra 600 c/d handset. (Aastra 142d or DECT GAP handsets do not support this feature.) 1.
Operation and Daily Usage 4. Confirm: Select the confirmation type (Read, Complete, Order). The selected confirmation type defines the confirmation sequence that has to be performed on the handset that receives the message (see also the chapter entitled Message Receipt on the Handset starting on page 45). 5. In the message input field, the content of the last distress event which is currently not closed is displayed. You can edit this text or overwrite it with an own text, e.g. “fire alarm, leave building”.
Operation and Daily Usage Callback to the operator The call number of the operator who has sent the message is displayed within the message. To call back the operator, the handset user must simply press the call key . Message confirmation Depending on the confirmation type the operator applied to the message, the handset user has to perform one or more confirmation steps. Confirmation on the handset is done by pressing the appropriate softkey.
Operation and Daily Usage 1. Open the Surveillance menu and switch to the All cameras tab. The All cameras tab display thumbnail videos of all configured video cameras. 2. Click the icon to switch to list view. This view offers some details about the video image such as RFP location and video size. Click the icon to switch to tiles view. This view offers larger video thumbnails. 3. To view an enlarged live video image in a dialogue, click on the desired thumbnail video.
Operation and Daily Usage Sorting Tables 1. You can sort entries in ascending or descending order. Click on the column header of the column you wish to use as your sorting criterion. The small icon in the respective table header indicates the sorting criterion; table is sorted ascending, table is sorted descending. 2. To reverse the order of the entries, simply click the column once again. Showing / Hiding Table Columns 1. You can show and hide single table columns.
Operation and Daily Usage Searching for Table Entries Search input field In large tables, you can search for a specific entry. 1. In the Search input field on the upper part of the screen enter a search string, e.g a text, a phone number, or a date (complete string or part of it). The text search is not case-sensitive. 2. Press the [Enter] key or click the 3. Clicking on the button to start the search. button removes the search text.
Administration Administration This chapter describes the administration of the OM Locating application, such as adding and removing user accounts and viewing the software versions. It addresses the administrator. Please note: The functions described in this section are available for the administrator only. Note The configuration database of the OM Locating application is stored in a separated directory below the Apache Tomcat installation (see Backup and Restore starting on page 12 for details).
Administration Note: You can search for a specific entry, e.g. in a large user table, see Searching for Table Entries on page 49. You can also thumb through the pages of a multiple page table (see page 48). Furthermore, you can adapt the table display to your needs (see page 47). 2. Select the appropriate command button above the table: New: creates a new user, see page 51. Edit: edits the data of an existing user, see page 52. Delete: deletes an existing user, see page 53.
Administration Note for the administrator: Inform the users about their passwords. It is recommended to advise users to periodically change their password for security purposes. 5. Phone no.: Enter the user’s contact phone number. If the user sends a message (e.g. in case of a a distress event (ManDown or SOS call), this number will be displayed as callback number within the message. Note, that the SOS phone number and the Phone no. setting configured here should match.
Administration 5. Password, Confirm password: Type in the new user password in these fields. If the password should not be changed, type in the existing user password and confirm it. 6. Phone no.: If the contact phone number was changed, enter it here. This number will be displayed as callback number within a message that the user has sent. 7. Click OK to confirm the settings and to close the dialogue. Clicking Cancel discards the settings.
Administration Version Information The About: Versions menu item gives you information about the versions of the OpenMobility components and the used licences. Versions tab 1. Select the About:Versions menu item. 2. To view detailed information on a component, click the appropriate component entry in the Versions table. 3. To get licence information, click the appropriate hyperlink in the Licences of Used Components table. The related website will open in a separate browser tab.
Short User Guide Short User Guide The following operating information is intended for the OM Locating application users (operators with the users user group authorization). It sums up important actions which these operators will perform in daily usage. The administrator can use these instructions as a template to create an individual short user guide for the OM Locating application in his/her organization. Login / Logout 1.
Short User Guide Note: A red icon indicates that the connection to the OMM is interrupted. If the connection is not re-established after some seconds, contact your administrator for help. 4. Logout: Logout after you finished using the application. Handling a ManDown Call 1. Incoming events are displayed in the Events: Distress Events menu. A ManDown call is indicated with a blinking and the icon.
Short User Guide 4. Send a message to one or more recipient. Select the appropriate table entry before. To select multiple recipients, press and hold the [CTRL] key and then click the entries. 5. Click the Send Message command button above the table. The Send Message dialogue opens. 6. Select the Emergency message type in the Priority field. Select the conformation type (Read, Complete, Order) from the Confirm drop down list.
Short User Guide Locating a Handset 1. Select the Subscriber: Portable Parts menu item. 2. Select the desired handset entry in the portable parts table. 3. Click on the icon on the right side of the Portable Parts tab. The Detail Information window is displayed and the current location of the handset in graphics on the upper part. The lower list of the window displays the location history which shows the user’s movement through your organization. 4.
Short User Guide The RFP visibility dialogue opens. This process may take some seconds because the handset location information is updated. The icons in the Visibility column indicate the quality of the connection between handset and RFP. The better the quality, the nearer the handset is located to the RFP. Best visibility Good visibility Acceptable visibility Bad visibility Worst visibility 5. To close the RFP visibility dialogue, click on the icon.
Short User Guide Editing Own User Data You can change your password for accessing the OM Locating application. 1. Select the Administration: Users menu item. 2. In the Users table, click on your user entry. 3. Click Edit to call up the Edit User Properties dialogue. 4. Password, Confirm password: Type in your new password in these fields. 5. Phone no.: If your contact phone number was changed, enter it here. This number will be displayed as callback number within a message you have sent. 6.
Appendix Appendix Technical Data Number of application users: 10 OM Locating server Server PC: – 2 Ghz CPU – 1 GB RAM – 10 GB hard disk space – 100 MBit/s Ethernet adapter Operating system: – Red Hat Enterprise Linux 6 Server OM Locating clients / workstation computers – PC capable of running a recent browser with JavaScript, Cookies, and DHTML – Adobe Flash plugin must be installed – Sound card and set of speakers is recommended – Ethernet connection to OM Locating server – Screen resolution of 1280x10
Appendix PP Portable Part RFP Radio Fixed Part SIP Session Initiation Protocol URL Uniform Resource Locator Trademarks Linux® is a registered trademark of Linus Torvalds. Red Hat® is a registered trademark of Red Hat, Inc. Apache TomcatTM is a trademark of the Apache Software Foundation. Firefox®, Mozilla® are registered trademark of the Mozilla Foundation. OracleTM and JavaTM are a registered trademarks of Oracle Corporation.
Index Index A All Closed Distress Events 30 Architecture 1 B Backup 12 C Closed Distress Events 30 Configuration 15 OMM connection 18 OMM prerequisites 15 Connection 21 D DECT Locatable (option) 18 Distress Events 30 DNS-Name 20 E Event accept 32 actions 32 close 33 forward 32 search 34 Events history 35 information 31 types 30 F Firewall 11 H Handsets Aastra 142d 6 Aastra 600d 2 Aastra 650c 2 DECT GAP 6 Hardware Requirements 8 History 3 events 35 location 39 I Installation 8 J Java 8 L Locating permissio
Index SOS number 18, 52 SSL 18 T Tracking (option) 18 Tracking mode 37 U Use Cases 3 64
Notes Notes 65
67
Copyright 2014 www.aastra.com All rights reserved As of 02.04.