Aastra 600 c/d series Aastra 610d, 612d, 620d, 622d, 630d, 632d, 650c OpenCom 1000 communication systems Release 6.
Welcome Thank you for choosing an Aastra product. Our product stands for highest quality standards combined with high-quality design. The following User's Guide will assist you in using your Aastra DECT telephone and provide answers to all your most important questions. If you should require further technical support or information about other Aastra products, please contact the person responsible for your system or get in touch with your local dealer.
Contents General information..................................................................................................................1 Prescribed use / Declaration of Conformity …………………………………………………3 Notes on safety …………………………………………………………………………3 Note for wearers of hearing aids …………………………………………………………4 Communications Regulation Information for Aastra 610d, 612d, 620d, 622d, 630d, 632d ……4 FCC Notices (U.S.
Contents Switching hands-free operation on/off ……………………………………………………25 Acknowledging an appointment/alarm clock ……………………………………………26 Adjusting the volume of the earpiece during the call ……………………………………26 Switching the ringer on/off ………………………………………………………………26 Switching ringer off at call ………………………………………………………………27 Illumination / display dimming …………………………………………………………27 Activating the display illumination ………………………………………………………27 Changing the brightness/contrast of the display …………………………………………27 Muting the handse
Contents Making an external call on a phone with an external preferred key ………………………42 Making an internal call on a phone with an external preferred key ………………………42 Calling via specific routes………………………………………………………………42 Dial / predial ……………………………………………………………………………43 Predial menu …………………………………………………………………………43 Call from the redial list (local / system) ……………………………………………………43 Calling from the local caller list …………………………………………………………44 Calling from the system’s caller list ………………………………………………………45 Calling from y
Contents Call diversion ………………………………………………………………………61 System ………………………………………………………………………………61 System menu ………………………………………………………………………61 Settings ……………………………………………………………………………61 Protection functions …………………………………………………………………61 Profiles ………………………………………………………………………………61 "Info" menu …………………………………………………………………………62 “Function list” menu ……………………………………………………………………63 "Active features" menu …………………………………………………………………64 “Directories” menu ……………………………………………………………………64 "Time/Alarms" menu …………………………………………………………………65 "Audi
General information General information Aastra 610d - 3 softkeys (2 of which are programmable) / 2 sidekeys (+/-) - 2 programmable navigation keys - Caller list for 30 entries* - Redial list for 20 entries* - Local phone book for 200 entries - Connection socket for headset - Safety class IP 50 Aastra 620d - 1 hotkey / 3 sidekeys (programmable) - 3 softkeys (2 of which are programmable) - 2 programmable navigation keys - Caller list for 50 entries* - Redial list for 30 entries* - Local phone book for 200 e
General information Aastra 650c - 1 hotkey / 3 sidekeys (programmable) - 3 softkeys (of which 2 are programmable) - 2 programmable navigation keys - Caller list for 50 entries - Redial list for 30 entries - Local phone book for 200 entries - Headset connection via cable or Bluetooth - Mini USB connection - microSD card interface - Safety class IP 50 - Supports CAT-iq broadband audio The Aastra 650c telephone supports the new CAT-iq DECT standard.
General information Prescribed use / Declaration of Conformity This product can be used in all EU member states on an OpenCom 1000 communication system. The telephone complies with the radio-specific European harmonised standards for DECT. The CE mark on the product confirms its conformance with the technical directives for user safety and electromagnetic compatibility, the relevant declaration of conformity according to European Directive 99/5/EC applies at the date of issue.
General information • Do not hold the handset up to your ear in handsfree mode or when the ringer is ringing as the volume can be very loud. • This product’s earcap region (at the front) and the loudspeaker region (at the rear) is slightly magnetic and may pick up metallic objects, such as staples or pins. Please check both regions for metallic objects before use.
General information cations Commission (FCC) of the U.S. Government. These limits are part of comprehensive guidelines and establish permitted levels of RF energy for the general population. The guidelines are based on the safety standards previously set by both U.S. and international standards bodies. These standards include a substantial safety margin designed to assure the safety of all persons, regardless of age and health.
Installation Installation Inserting the standard battery Aastra 610d, 612d, 620d, 622d, 650c Push the battery cover downwards until it disengages from the locking mechanism and lift off. Insert the battery with the contacts downwards. Replace the battery cover and push upwards until it snaps into place. Aastra 630d, 632d Undo the two screws on the back of the handset with a suitable tool and remove the cover.
Installation Installing/removing a mounting bracket or rotary clip Aastra 610d, 612d, 620d, 622d, 650c Place the supplied fixing bracket on both openings at the upper end of the handset and snap in place by pressing downwards. To remove the fixing bracket, press into the small cutouts at the edge of the bracket and pull the two sides slightly apart. All devices can also be fitted with a rotary clip as an accessory.
Installation Headset connection/Bluetooth® All handsets have a 2.5 mm jack plug at the bottom left for connecting a headset. Only use the recommended headsets (see Accessories page 106). The Aastra 620d/622d/630d/632d/650c mobile handsets have a Bluetooth interface (2.0) for corresponding headsets. With a headset only audio data can be transferred via the Bluetooth interface. Safety information Headsets (earphones and headphones) can produce very loud and high-pitched feedback.
Installation USB and external charging connection Not Aastra 610d, 612d: A mini USB connection (2.0) is located at the bottom right. This has two functions: • as an interface for connecting to a PC to load data from or to the device, for example. If the handset is connected to a PC, the battery is charged at the same time. The charging process is, however, slower than if the handset is charged in the charging unit.
Installation Power supply / Power supply unit The power supply unit is designed for 100V to 240V AC (50-60 Hz). It is supplied with four change adapters enabling virtually worldwide use. Where necessary, connect the plug normally used in your country to the power supply unit. There are two versions of the plug-in power supply unit that are connected slightly differently: Version 1: Press the pushbutton switch on the power supply unit and push out the existing plug upwards.
Installation • Never carry or store the battery together with electrically conducting objects (neck chains, pencil leads, etc.) • Never attempt to open the battery, never modify it in any way or subject it to severe blows. • Never immerse the battery in fresh or salt water. • Never use or leave the battery in direct sunlight, in a vehicle parked in blazing sunlight or in any other location with high temperatures.
Commissioning Commissioning Make sure you charge up the battery before you use your handset for the first time as it ships out with only a low charge level. To do so, place the handset (switched on or off) in the charger cradle. If the handset is switched off (e.g. after the battery has been inserted for the first time), it will remain switched off in the charger cradle, but will still be charging. The LED flashes alternately green and red to indicate this status.
Commissioning Battery: Charging states The charge status of the battery is indicated on the display. The displays mean: Batteries are 61 - 100 % charged Batteries are 31 - 60 % charged Batteries are 11 - 30 % charged Batteries are 6 - 10 % charged Batteries are 0 - 5 % charged Battery charging • If the handset is placed in the charger cradle when the battery is completely discharged, there is no indication until a specific charge status is reached.
Commissioning Select … Menu ❯❯❯ System > New system • Enter the access code (also referred to as the AC code). Your system administrator will provide you with the access code (which consists of 1 to 8 digits). • Select Enter PARK. Enter the PARK code. Your system administrator will also provide you with the PARK code. • Confirm with Ok. The registration process is then initiated.
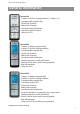
Function overview Function overview Displays, softkeys, LEDs and key functions Key assignment (on delivery) Emergency call key (Aastra 630d, 632d only) Earpiece LEDs Aastra 610d, 612d: +/- keys (volume adjustment) Aastra 620d/622d/630d/ 632d/650c: 3 sidekeys (programmable) and volume adjustment Hotkey (programmable) (not Aastra 610d, 612d) Displays Rear: Loudspeaker Navigation keys (programmable in part) 3 softkeys (programmable in part) Open listening/Hands-free mode Call key/consultation call key
Function overview Display arrangement Symbols on the upper display line: Signal strength Microphone switched off Battery charge status Battery charging Loudspeaker switched on Headset active Bluetooth headset ready to use Bluetooth connection active Voice box message (if available) Ringer switched off Call key pressed Call filter active Alarm sensor active (Aastra 630d only) New unread messages (Message waiting) Read messages (Message waiting) Call diversion (immediately) active Devices with microSD-Card (
Function overview Softkey line and idle display The three keys below the display are called softkeys. The functions assigned to these keys are shown in the bottom display line. The key function changes automatically according to the operating state of the handset. When the handset is delivered the following symbols are shown in the softkey line: Enables selection from the redial list. Navigation menu. This is used to call up a selection list with frequently used features.
Function overview LED The LED (3-colour/red-orange-green) at the upper corner signals specific events that currently cannot be changed as they are required by the system or can be switched on or off by you (s. page 83). Please refer to the following table for more details.
Function overview Key functions The following table gives an overview of the various key functions (on delivery). Key Right softkey Duration short Left softkey long short Middle softkey long short Navigation key Top Navigation key Bottom Navigation key left long short short short long . . .
Function overview Key Navigation key right Duration short long Hands-free short Key C short long Call key (pick-up), green short long End key (hang-up), red short long Number keys - short Number long . . . in status Standby, connection Menüs Description Call up the profile settings (delivery setting) or call up the programmed function Go forward one menu level.
Function overview Key Number Key Key - Duration . . . in status Description long Standby Select the corresponding Quick Call destination (if Quick Call programmed) short Standby Editor long Standby Enter * in predial To switch between upper and lower case when entering text.
Navigating in menus Navigating in menus Example: Setting the language 1. Open the menu - depending on the configuration of your handset, press - the softkey ❯❯❯ or - briefly press the end key and select the menu item from the list. 2. Use the navigation keys π/† to select the Settings entry from the list and press the Ok softkey or the navigation key ®. 3. Use the navigation keys π/† to select the Display entry from the list and press the Ok softkey or the navigation key ®. 4.
Navigating in menus entry or enter a new character. You can correct entries by moving the cursor to the number/letter to be deleted with the √/® keys and then pressing the C key. You can now add new characters at this point. Every word is automatically started with an upper case letter. Press the * key several times to switch between upper and lower case (A or a is shown) or only upper case at the start of the word (Aa is shown). Confirm your inputs with Ok. 5. Now select the next line from † (e.g.
Navigating in menus Editors Entering names/call numbers Various Editors are available to help you enter new call numbers and names on the lists or to edit existing ones (e.g. phone book). The maximum length for entering call numbers (numbers) is 32 characters and for entering names (letters) is 24 characters.
Basic functions Basic functions Switching the handset on/off Switching the handset on To switch on press and hold the End key seconds. until the display lights again. This can take up to 10 Switching the handset off Press the End key and hold it down for a moment or … Press the End key briefly, select Switch off and press Ok. The handset will switch off after a confirmation prompt. Note If the handset is switched off when placed in the charger cradle, it remains switched off but continues to be charged.
Basic functions Do not hold the handset up to your ear in handsfree mode or when the ringer is ringing as the volume can be very loud. Acknowledging an appointment/alarm clock You are notified of an appointment or alarm clock by the specified ringer and the LED flashing red for approx. 45 sec. The display shows the corresponding text. You can acknowledge the signalling with Esc.
Basic functions Switching ringer off at call If you want to switch off the ringer for a call that has just come in, press the C key. You can still accept the call as long as the caller has not hung up. Illumination / display dimming The keyboard and display are lit. The illumination is activated each time a key is pressed or a call is made; it remains lit for a user-definable amount of time.
Basic functions Press the softkey once more when you want to talk with your call partner again. Your call partner on the telephone can hear you again. Automatic hide / Info window If you are in a menu or an entry mask when a call comes in, the information relevant to the call appears on the display (caller name/call number etc.). After completing the call you return to the where you were before the call arrived.
Basic functions Signalling the alarm clock or an appointment With an alarm clock or appointment reminder call (see page 66), the ringer is connected for 1 minute and the display indicates any event text that may be stored. To terminate the call completely, use the Stop softkey. Pressing the Pause softkey interrupts the ringer for 5 minutes, after which it resumes. Instead of Pause you can also press the red End key or the C-key.
Basic functions Local caller list • • • • 30 entries (Aastra 610d, 612d) or 50 entries (Aastra 620d, 622d, 632d, 630d, 650c). The caller list comprises answered and missed calls (but not if busy) in a single list. Entries on the list can be added to other menus (e.g. add to VIP list). If the handset is connected in parallel with a corded system phone: A callback from the handset's caller list does not delete the entry from the caller list of the parallel system phone.
Basic functions Predial The previously selected entry is transferred to the predial for calling. Add to... The call number of the entry is transferred into your personal phone book, the call filter or the VIP list. Details ... Further information on the entry is displayed. Delete Deletes the entry. Delete all Deletes the entire list. Edit system lists The system’s caller lists generally offer the following possibilities: Pressing the C-key briefly: Deletes the selected entry.
Basic functions Registration Switch the headset to "Pairing mode". Follow the User's Manual of the headset for this. Switch on the function in Menu ❯❯❯ -> Settings -> Bluetooth -> BT Status. Open the Menu ❯❯❯ -> Settings -> Bluetooth -> Subscribe headset and then press the New softkey. The headset that is found is shown by its name on the display. Confirm the display with Ok and enter the PIN of the headset. The headset is now logged in and the symbol appears on the top line of the display.
Basic functions • If a Bluetooth connection is interrupted because you have exceeded its operating range, you can restore the connection by switching the headset off and back on again (once you are back within range). Special key (Hotkey) /VIP list (not Aastra 610d, 612d) On delivery the special key (hotkey) at the top right of the 620d, 622d, 630d, 632d and 650c handsets is prepared as VIP phone book/VIP list for saving up to six telephones to be available very quickly (the key can be reprogrammed).
Basic functions Adapting to your environment Your handset has two functions which can be used to adapt the handset to loud environments: If you activate the function using the menu ❯❯❯ Audio > Ringer settings > Noise detection, the ringer volume is automatically increased in loud ambient noise. Make sure in this case that you have not set the ringer volume to “Increasing”.
Basic functions Note You can also use the emergency call key / SOS key when the key lock or phone lock is activated. When calling up the menu of system features (e.g. system menu) it may not be possible to use the emergency/SOS key. So avoid menu settings during safety-critical applications of the handset. Alarm Sensor (Aastra 630d / 632d only) The Aastra 630d and 632d handset is equipped with an alarm sensor that permanently determines the handset’s tilt angle and movement.
Basic functions Escape alarm The escape alarm is triggered if the sensor detects violent handset movements for user-definable period of time. As with the no movement alarm the sensor has three sensitivity settings. To guarantee a reliable operation it is advisable to test the sensitivity of the escape alarm with the person to be monitored. There is a setting for each alarm type to activate / deactivate the sensor supervision in an active call (Alarm in conversation).
Basic functions Settings for other alarm parameters Alarm number If the SOS emergency number is predefined by the system, this menu item is not displayed. If you always store the SOS emergency number preceded by the R-key feature (enquiry / hold), the emergency call can also be made during a call (depending on the system / and handset – see above). To enter the R-key feature, press the #-key three times (see also page 24).
Basic functions Call keys / select line The term “call keys” is taken from corded system phones, which have individual keys for making calls. On the handset they are represented in the Call keys menu as virtual keys on a list. In menus which are displayed to you depending on the handset’s connection status, you can access these “keys” by selecting Select line. Where provided, these are the “keys” which you use to make and receive calls.
Basic functions Direct call key with signalling “Direct call keys with signalling” are special call keys that allow a connection to be set up to one destination partner only. When you are making a call using a “direct call key with signalling” your phone’s other call keys remain free. This means other callers can reach you. MULTIPLE key A MULTIPLE key is a call key (device key or INTERNAL/EXTERNAL key) programmed on several phones. This means that MULTIPLE keys have the same (internal) call number.
Telephoning Telephoning Do not hold the handset up to your ear in handsfree mode as the volume can be very loud. Menu before and during a connection / options menus A short or long keypress of the menu ❯❯❯ softkey in the idle or connected state displays status-related options menus. These menus contain a list of functions that can be executed in any particular device state.
Telephoning Call keys Provides a summary of any call keys / lines available on your handset. Select the key you want to use to make a call and enter the destination. Other menu entries are described on page 55ff. Making external/internal calls Seizing a line When dialling internal and external call numbers it is essential to know whether your system administrator has set up an external or an external preferred key for your phone.
Telephoning Press the ❯❯❯ menu for a couple of seconds and use the Call keys / lines menu to select the call key or INTERNAL key you want t Key in the internal call number or external call number (preceded by the code for seizing a line) Making an external call on a phone with an external preferred key Press the call key (green) (your EXTERNAL key is seized) or Press the ❯❯❯ menu for a couple of seconds and use the Call keys / lines menu to select the call key or EXTERNAL key you want t Key in the int
Telephoning Dial / predial Direct dial t Press the call key (green) and key in the call number Predial t Key in the entire call number and then press the call key (green) When predialling, you can use the C key to correct your inputs. To delete individual digits only, use a short keypress. To delete the entire call number, use a long keypress. Predial menu Press the menu key ❯❯❯ , then select … • Suppress no Your call number is not transmitted to the called party in the external call that follows.
Telephoning Note You can also call up the redial feature by pressing the call key (green) and keeping it pressed down for a moment. Calling from the local caller list Please take a note of the list setting (local / system) you have made for your display (see page 84). Your handset stores the call numbers of answered and missed calls (depending on the transfer of the call number). 50 entries can be stored (the entries are limited to 30 in the Aastra 610d).
Telephoning Calling from the system’s caller list Please take a note of the list setting (local / system) you have made for your display (see page 84). Your communication system stores the call numbers of answered and missed calls (depending on the transfer of the call number). 10 entries can be stored. This list only stores calls that were missed or calls that were made when the phone was busy. The list of answered calls and the list settings can be found in the system menu (see page 75).
Telephoning Calling from the System phone book (Central directory) In idle mode, press the π navigation key. t Enter the first letter(s) of the name you want, then press Ok. Use the navigation keys to select one of the entries displayed. Press the call key; the selected entry is then dialled directly. Note You can also call up the system phone book via the Navigation menu (see page 17) or via the ❯❯❯ menu access when the handset is in idle mode.
Telephoning Menu if subscriber is busy If a subscriber is busy briefly press the menu key ❯❯❯ , then select … • • • • • Select line You obtain a summary of any call keys / lines available on your handset. Select the key you want to use to make a call and enter the destination. Callback Allows you to leave your callback request with the busy subscriber (see also the Callback section on page 56ff). Release call Disconnects the connection.
Telephoning Menu during a call During a call briefly press the menu key ❯❯❯ , then select … • • • • • • Select line If you want to ignore the call, you can select a key from the overview of call keys / lines that may be available on your handset and set up a different connection. Called lines If several calls are received simultaneously on any existing call keys you obtain an overview of the waiting calls and can answer them in a specific order. Accept Lets you answer the call.
Telephoning Answering a call on a different call key c You are making a call and hear the short discreet ringer. Press the ❯❯❯ menu and select from the Called lines options. Use the navigation keys to select the call key / line you want. Your first connection is on hold. You are talking to the caller. Press the end key (red) to end the current connection. The waiting party is once again signalled as a call. Press the call key (green) c You are through once again to the first subscriber.
Telephoning t Key in the internal or external call number. Take note of the type of line seizure (see page 41). c You are through to the called subscriber. To broker (switching back and both between the call partners): Press the Brok. or R softkey. To end the brokering / enquiry call: Briefly press the❯❯❯ menu. Use the navigation keys to select the Release call menu entry. The current call is terminated. Press the Brok. or R softkey. You are through once again to the waiting subscriber.
Telephoning Briefly press the❯❯❯ menu. Use the navigation keys to select the Select line menu entry and the call key for the waiting subscriber. . . . or Press the Brok. or R softkey. c You are through once again to the waiting subscriber. Setting up an enquiry connection from lists c You are making a call. To activate an enquiry call: Press the R key. Your first connection is put on hold.
Telephoning The subscriber called through the enquiry call does not answer: Press the end key (red). The other subscriber is called. The subscriber called through the enquiry call is busy: Press the end key. The connection is put through. or Press the R key. You are through once again to the waiting subscriber. or Briefly press the ❯❯❯ menu. Use the navigation keys to select the Select line menu entry and the call key of the subscriber who is waiting.
Telephoning Select the call key of the waiting subscriber. • • • • 3 party Lets you initiate a three-party conference call. Transfer Lets you put the waiting subscriber through. Brokering Lets you broker between the different subscribers (switching back and both between the call partners). Release call Disconnects the connection. The current call is terminated and you can dial a new number. Other menu entries are described on page 55 beschrieben.
Telephoning To initiate a conference: You have set up an enquiry call (see page 49) If the subscriber answers, you announce the conference call. c Briefly press the❯❯❯ menu. Use the navigation keys to select the 3 party menu entry. To end a conference: Press the end key (red). You are now switched out of the conference. The two remaining participants can continue the call without you.
Telephoning Overview: Other menu items on the options menus The following menu entries can also be provided in the relevant status-related options menus before or during a connection: If the subscriber is busy… • Override blocking Your call is signalled to the called internal subscriber even though he has activated his call blocking function. This menu entry is displayed only when call blocking is activated.
Telephoning • • • Redial list You can look up a call number in your handset’s redial list. As a rule it is not possible to dial an entry. This menu entry is available only if you have set the access to local lists or if the phone is in the dial state with dial tone (see page 84). Caller list You can look up a call number in your handset’s caller list. As a rule it is not possible to dial an entry.
Telephoning Acknowledging paging messages Paging messages can be sent to your phone if your communication system is equipped with the appropriate application. Paging messages are shown on your handset’s display and – depending on the system setting – can also be signalled with a ringer and/or vibra call alarm. The red LED continues to flash. To acknowledge that you have received a paging message, confirm with Ok.
Feature settings variants Feature settings variants There are several ways of setting the features for your phone and for the system: Using menus The handset menus are a user-friendly way of setting the features you want. Some menu entries are only displayed on your handset if you are authorised to use the relevant feature. Contact your system administrator if you have any questions regarding individual features or if you find you are unable to use a particular feature to your satisfaction.
Devices menu Devices menu This section contains all the main features provided by the handset and the OpenCom 1000 communication system. The communication system also supports corded and other cordless phones, which is why some menu entries have different designations even though they refer to the same thing. More details are to be found in the descriptions that follow.
Devices menu Overview Info The menu provides access to the call list, redial list, the voice box (if available), the cost of the last call and the list of active features. Quick access to this information is also possible on the √ navigation key or via the key (delivery setting). Function list Provides a list of special functions available as a result of system expansions (e.g. voicemail, ACD (Automatic Call Distribution) functions, terminal active, etc.).
Devices menu Call filter The call filter* allows you to answer or block incoming calls. You can specify the call numbers and the filter status in the menu. Call diversion Call diversion enables you to forward calls to other internal / external phones. A call can be forwarded immediately, when the connection is busy or after a certain time.
Devices menu "Info" menu Caller list Displays the entries in the local caller list or the system’s caller list. If a phone book entry has been created for a phone number (either on the handset or in the system), the corresponding name is displayed. The ❯❯❯ options available to you with the local caller list are as follows: Dial number... Predial Add to… Details… Delete Delete all Dials the phone number. Transfers the phone number to the predial.
Devices menu The system’s redial list usually offers you the following options: Pressing the C-key briefly: Deletes the selected entry. Pressing Ok: Calls the selected entry. Displays the costs of the last outgoing external call. Costs Active features This menu provides an overview of all the active features that restrict your availability. • • • • • Call blocking Call blocking is activated; see the section entitled “call blocking” on page 77.
Devices menu Other functions can be set up by the system administrator and may be given a different designation. They include settings for using the handset as an attendant terminal and settings for becoming part of an ACD group (ACD, or Automatic Call Distribution, is used for call distribution, for example within a call centre). "Active features" menu The "Active features" menu provides quick access to a number of selected menu items.
Devices menu Create a new entry. The following selected call number will be transferred to the call filter or the VIP list. The entry will be deleted. Shows the number of already stored entries. New entry Add to ... Delete Memory Central directory (System phone book) Entries in the system phone book can only be changed by the system administrator. If you want to select an entry, proceed as follows: t Enter the first letter(s) of the desired name and press Ok.
Devices menu Appointment Shows the list of appointments. Up to three appointments can be entered and activated. Status: On/Off Change Time Show the time set for the appointment. Change Date Change the time setting. Show the date set for the appointment. Change Text Activate or deactivate appointment. Change the date setting. Show the text entered for the appointment. Change Change/enter the text (max. 32 characters).
Devices menu Signalling a set Alarm-clock call You can use Pause to interrupt the signalling for an expired alarm call for 5 minutes. When you call up an alarm-clock call that has been put on Pause (interrupted) you are offered Stop (to deactivate) and Pause (to maintain the interruption). Timer Lets you set a countdown timer (max. 23 hours / 59 minutes). The time remaining until the signalling occurs (using increasingly loud beep tones) is indicated on the display. The timer’s ringer cannot be adjusted.
Devices menu External call Changes the currently set volume for external calls. Unknown number Changes the currently set volume for calls without transmitted caller number. Callback Changes the currently set volume which you receive as a callback. Recall Changes the currently set volume for recalls. VIP call Changes the currently set volume for calls from VIP- call numbers (not call numbers in your VIP-List). Special call Changes the currently set volume for special calls.
Devices menu SOS call Change of the currently set melody for incoming emergency calls. Alarm clock Changes the currently set melody for alarm clock signaling. Appointment Changes the currently set melody for appointment signaling. Text message Canges the currently set melody for text messages (does not apply for Message waiting and paging messages). Note You can listen to the melody with the softkey before saving.
Devices menu Noise detection When this function is active, the volume of the ringer is automatically raised if there is loud background noise. If you want to use this feature, make sure the ringer volume is not on the “increasing” setting. Attention tones Select whether the respective attention tones should be activated or not. Audible confirmation when a key is pressed. Confirm successful/unsuccessful settings. Alert tone on reaching the end of a menu list. Alert tone if the battery is almost empty.
Devices menu “Data management / SD Card” menu Aastra 622d, 632d, 650c only: This menu is only available when your handset is equipped with an optional Aastra microSD card (see page 10). Other data can be stored on the card in addition to the device settings. For more information on the card functions, please refer to the Aastra c/d documentation on the Aastra homepage. "Call filter" menu The call filter allows you to answer or block incoming calls.
Devices menu Details... Delete Delete all Shows call number and name. The entry will be deleted. The list will be deleted after a confirmation prompt. "Call diversion" menu You can divert calls intended for you to a different internal or external call number. With external call numbers you must always key in the code for seizing an external line first. Calls can be diverted immediately, after a delay (if the call was not answered on your handset) or if the terminal is busy.
Devices menu Save now The settings are saved. You will receive a confirmation message either saying pos (successful) or neg (rejected). Divert key Internal Select the call key that is to be diverted. Immediately Calls are diverted immediately. After time Calls are diverted after a certain period of time. Busy Calls are diverted when your phone is busy. On / Off Select whether you want to switch the call diversion function on or off. Dest.
Devices menu "System" menu New system Enter the access code and optionally the PARK code. Contact your System Administrator for more information on this and the protocol setting. Subscription Auto search The handset automatically logs on to the system with the strongest signal currently available. Logon is possible only if the handset has subscribed to the system in question beforehand. Please contact your System Administrator if required.
Devices menu Version info Information concerning the handset hardware and software status is displayed. System Menu / Main Menu The System menu is also displayed under the term Main menu (mainly in status-related menus) as it comprises all the features of the OpenCom 1000 communication system. Calls > Call lists Contains the call lists administered by your communication system. These lists are slightly different in scope to the handset’s local caller list.
Devices menu Type of call > Int. & ext. calls, External calls, Internal calls : Specify which type of call is to be listed in the call lists: internal and external calls, external calls, or internal calls. Calls > Deflect calls A call can be deflected to a different terminal. Under destination enter the other subscriber’s call number and press Ok.
Devices menu Call blocking Activates or deactivates the signalling of calls on your terminal for all call keys / call numbers (INTERNAL/ EXTERNAL / MULTIPLE keys). An internal caller obtains the busy signal or a special dialling tone indicating that call blocking has been activated. An external caller obtains either the busy signal or is switched through to the operator.
Devices menu Special features Terminal mode A selection of terminal mode applications are provided, and their function and operation can be found in the documentation relating to each application. For more information please contact your system administrator. ACD This menu entry is provided if you are a member (agent) of an ACD group (ACD = Automatic Call Distribution). You may be a member of several ACD groups. Select the ACD group you want from the list.
Devices menu DDI barring This function is used to block or allow direct incoming external calls for two user groups. If access is blocked, all incoming calls are signalled to the attendant terminal (operator), from where they are transferred to the terminal in question. If required, contact your system administrator to find out for which user groups the “DDI barring” feature has been set up. Call variant Call variants are used to specify the times at which calls to certain terminals (e.g.
Devices menu Central config. > Subscriber serv. The settings in this menu require a subscriber service password. Call diversions This function allows you to set up call diversions for the call numbers of other internal subscribers (individual INTERNAL/EXTERNAL keys or for the phone in general). You can also program a call diversion for user groups. You can program external call diversions to any subscribers in the public network. Enter the internal call number you want to divert.
Devices menu Alter sub. pass. You can change the PIN (= subscriber password) required to access the subscriber service. Make sure you memorise the PIN and do not divulge it to any unauthorised persons. Should you forget the PIN, contact customer service. Unblock password If you need to access the subscriber service settings more often from your phone, you can configure the access so that a password is not required. This means you will no longer be prompted to key in a PIN when you call up the menu.
Devices menu "Settings" menu Key lock Press Change to activate the key lock (see also page 25). Key programming This menu item allows you to program the softkeys (except for Esc), the sidekeys and the hotkeys (not Aastra 610d, 612d). After calling up the function press the key that you want to program. A selection list of programmable features appears. It is the same selection that is displayed if the programmable key is pressed and held down in Idle mode.
Devices menu Note: The Standard menu structure is described in this User's Guide. In order to find individual menu items in the Easy and Icon schematic diagrams, please use the menu trees shown in the appendix. Further descriptions of the features can then be found in the index. Note: If the menu structure is modified, the handset automatically carries out a restart. Brightness (not Aastra 610d) You can change the brightness of the display to match local lighting conditions.
Devices menu Infos Handsfree Alarm clock Appointment Slowly flashing red LED for a new entry, e.g. in the call list. Lights green LED when the loudspeaker is activated. Slowly flashing red LED when the alarm time is signalled. Slowly flashing red LED when the appointment is signalled. List access The caller list and/or redial list are normally administered on your handset (setting: Local). If a list is also managed in the communication system (setting: PBX), you can select which list you want to display.
Devices menu Please note: If your device supports the features Text messaging and/or Paging, do not set any value under 3 seconds. Handsfree Allows you to answer the call in handsfree mode (activates the loudspeaker). The In charger only or Always settings are used to specify whether the handsfree feature should be activated only when the handset is on the charger or also when you are carrying the handset with you. Microphone Lets you answer the call automatically with or without activated microphone.
Devices menu -> Edit Delete Change the name of a headset. The registration data for the respective headset are deleted after a confirmation prompt. "Security" menu You need to enter a PIN to open the "Security" menu. On delivery this is set to 0 0 0 0 (4 x zero). Phone lock The phone is locked. Incoming calls only can be accepted. Any programmed emergency call key or SOS key of the Aastra 630d / 632d can also be used. To remove the phone lock, see page 25.
Devices menu Pre alarm Use Change to switch the pre-alarm for all alarm types on or off. Alarm tone The pre-alarm can be sounded with or without an alarm tone on the handset. If the alarm tone is activated, the signalling volume increases progressively. Vibrator You can set whether the pre-alarm should also be signalled with vibrator call. Duration You can set the time (10s … 75s) that should elapse before the emergency number is dialled.
Devices menu alarms, pressing any key on the device resets the delay – e.g. if you are navigating the menu. Sensibility Allows you to set the sensitivity (low, medium, high). This allows you to adapt the sensor to the different movements (e.g. ways of walking) of the surveillance personnel: • Low sensibility means: Slow movements are enough to reset the delay once again. • High sensibility means: Only rapid (jolting) movements will reset the delay.
Devices menu VIP list Deletes the VIP list (see page 33). New info Deletes the list with new information. All lists All lists (call list, redial list, call list) are deleted after a confirmation prompt. Key programming All programmed keys will be reset to the status they had on delivery. User settings All the user settings (e.g. language, display settings) are reset to the factory settings after a confirmation prompt.
Devices menu Ringer volume Set your preferred ringer volume (increasing, 1...7). Ringer device Configure where or how the ringer should be signalled (loudspeaker, headset, vibration alarm). Play once Select whether the ringer should ring once or repeatedly. Key click Switch the key click on or off. Confirm tones Switch the confirmation tones on or off. Noise detection Switch the automatic noise detection for a louder ringer on or off. Loud environment Adapt the speech quality in a loud environment.
Team functions Team functions The system administrator has the possibility of grouping several phones together into a team and to program the call keys (see page 38) on these phones with team functions. The team members can then answer and transfer calls on one another’s behalf. This section describes how to make and receive calls within a team using a few basic examples. More detailed explanations of the call keys can be found on page 38.
Team functions Notes • Activated features (such as a call diversion) for your phone's call number(s) also affect the way in which calls are signalled on the team members’ direct call keys. • To reach another team member directly, simply dial their team direct call key.
Team functions of seconds, then select Team hold and press the end key. The renewed call can then be answered and the conversation continued on any phone within the team. Notes • Activated features (such as a call diversion) for your phone's call number(s) also affect the way in which calls are signalled on the team members’ direct call keys.
Team functions be reached from the outside under call numbers 20, 21 and 22. What’s more, on each phone the internal call numbers of the other team members are set up as team direct call keys, which means that the team members are able to reach one another directly. As a member of a PARALLEL TEAM, calls to your call number are signalled both visually and acoustically on your INTERNAL key (I). At the same time calls are also signalled (visually) on the team members’ direct call keys (T).
Team functions EXECUTIVE-SECRETARY team function The EXECUTIVE-SECRETARY TEAM in the example consists of two members: Executive (phone 1 with internal call number 10) and secretary (phone 2 with internal call number 11). A phone has also been provided in the seating area (phone 3).
Team functions If you yourself want to make an internal or an external call, use the INTERNAL key (I) to seize an internal line; you can then dial an internal number immediately or seize an external line by dialling a line code digit (your own call number is then busy as a result). You can also use the executive’s MI key to make calls. However his call number is then busy. To reach the executive directly, simply press the partner direct call key (P). The key tells you whether the phone is free or busy.
Key programming Key programming Your handset provides the possibility of assigning frequently used functions to specific keys. Aastra 610d, 612d You can program the left and middle softkey below the display and the left and right navigation keys. The left and right programmed navigation key can also be used in the handset’s connection state (providing their programming differs from the factory setting with the setting Info and Profile).
Key programming Info The Info menu (caller list, redial,...) can be programmed. New info If there are new messages or new calls for example on the caller list, the list entries are called up directly using the programmed key. Caller list The caller list (local or system) is accessed. Redial list The redial list (local or system) is accessed. Voice box/Voice messages (only on Aastra 650c with Easy / Icon menu structure) Assigns the key with the selection of the voice memory.
Key programming 1 Pickup Answers a call from another phone of your pickup group. Pickup select Answers a call from another phone. Call diversion Assigns the key with access to call diversion. Select line Programs the key with the list of your call keys / lines. Active features Programs the key with the list of active features that restrict your availability (e.g. call diversion), see page 63. Function list The key can be assigned a list of system features.
Appendix Appendix Care and Maintenance Your telephone is a product that meets the highest design and manufacturing standards. It should therefore be treated with care. The suggestions listed below will help you enjoy this product for a long time. Follow all the safety precautions given on page 3. These precautions apply to the handset, the charger cradle and the rechargeable batteries (i.e. the entire telephone) as well as to the accessories.
Appendix The product you have purchased was developed with a state-of-the-art environmental and recycling orientation and thus complies with the guidelines of the European directives. The product is marked with the symbol indicated. When disposal is required, this symbol obligates the owner of the product to dispose of this product at a collection point separate from unsorted household waste. Suitable facilities for the return of electrical and electronic waste have been created for this purpose.
Appendix Limited Warranty (applicable for sales in USA, Canada) Aastra warrants this product against defects and malfunctions in accordance with Aastra's authorized, written functional specification relating to such products during a one (1) year period from the date of original purchase (“Warranty Period”). If there is a defect or malfunction, Aastra shall, at its option, and as the exclusive remedy, either repair or replace the product at no charge, if returned within the Warranty Period.
Appendix After Warranty Service Aastra offers ongoing repair and support for this product. This service provides repair or replacement of your Aastra product, at Aastra's option, for a fixed charge. You are responsible for all shipping charges. For further information and shipping instructions: • In North America, contact our service information number: 1-800-574-1611. • Outside North America, contact your sales representative.
Appendix use this product, either separately or in combination with other equipment.
Appendix (c) any liability of Aastra in relation to a failure to comply with a guarantee that applies under Division 1 of Part 3-2 of the ACL to a supply of goods or services. After Warranty Service Aastra offers ongoing repair and support for this product. If you are not otherwise entitled to a remedy for a failure to comply with a guarantee that cannot be excluded under the Australian Consumer Law, this service provides repair or replacement of your Aastra product, at Aastra's option, for a fixed charge.
Appendix Accessories You can obtain the following accessories through your dealer: Accessories Aastra 610, 620, 630 Charger with international AC-Adapter 68980 Aastra 600c/d series Charger with international AC-Adapter 80E00005AAA-A Aastra 610d Handset 68983 Aastra 612d Handset 80E00008AAA-A Aastra 620d Handset 68982 Aastra 622d Handset 80E00009AAA-A Aastra 630d Handset 68981 Aastra 632d Handset 80E00010AAA-A Aastra 650c Handset 68629 Aastra 620d,622d, 630d, 632d, 650c Power-Bat
Appendix Headsets You will find a list of corded headsets and Bluetooth headsets that you can purchase from your dealer on our Internet site. Aastra headsets that comply with the safety requirements of EN60950-1 Item 6.2. are recommended. This does not constitute any appraisal of the acoustic and functional quality of the headsets of the individual manufacturers.
Appendix Technical specifications Standard: applicable for … USA, Canada DECT / GAP All other countries DECT / GAP No.
Appendix Permissible ambient temperatures for operating the handset: 41° F to 104° F 5° C to 40° C Permissible storage temperature: 23° F to 113° F -5°C to +45°C Charger cradle dimensions: Length / Width / Height 2.99 x 2.95 x 0.94 in Length / Width / Height 76 x 75 x 24 mm Handset dimensions: Aastra 610d / 612d / 620d / 622d: Aastra 630d / 632d: Aastra 650c: Length / Width / Height 5.31 x 1.93 x 0.89 in 5.31 x 2.08 x 0.89 in 5.72 x 1.93 x 0.89 in Length / Width / Height 135 x 49 x 22.
Appendix Menu Structure for all Handsets “Standard” setting Info Caller list Text Messages Voice box 1) Redial list Costs Active features >List< >List< >Call< >List< Function list Active features Bluetooth 2) Mandown 4) No movement alarm 4) Escape alarm 4) Call filter Profiles Alarm Appointment Directories Personal directory Central directory VIP list >List< >List< >List< Date/Time 7) Appointment Time Date Appointment1, 2, 3 Alarm Alarm 1, 2, 3 Pickup Take 1) Time/Alarms Status Time Date Text
Appendix Audio Volume settings Melodies Ringer settings Attention tones Loud environment Audioquality 5) Earpiece Handsfree Corded headset Internal call External call Unknown number Callback Recall VIP call Special call SOS call Alarm clock Appointment Text message 1) Line 1 .
Appendix System New system >Auth.Code< Subscription Auto search [System 1] .... Subscription Enter PARK Show IPEI Protocol System name 7) Phone number 7) External call 7) Internal call 7) Character set Details… Delete Stop searching Show IPEI Version info System menu (Main menu) Calls Call lists In absence Received calls Type of call Deflect calls Call back list Hunt group Call diversions Divert phone Divert key Divert hunt grp.
Appendix Settings Key lock Key programming User name Display >Key< Language Font settings 8) Color schemes 8) Menu structure 9) Illumination List access Brightness/Contrast Display dimming Display Keyboard Charger Conversation LED indications Redia list Caller list Device options Voice box no. 7) Bluetooth 2) Standard Easy Icon Life indication Incoming call Out of range Charge indication Info Handsfree Appointment Alarm clock Automatic Local PBX Automatic Local PBX Silent charging Auto.
Appendix Security 3) Phone lock Change PIN SOS call Alarm Sensor 4) SOS number 7) SOS key Alarm number 7) Alarm auto answer Handsfree in alarm Pre alarm Mandown No movement alarm Escape alarm Reset to default 1) Repeat alarm Personal directory VIP list New info All lists Key programming User settings All Only available when supported by the system Not Aastra 610d, 612d 3) Available after entering PIN 4) Aastra 630d, 632d only 5) Aastra 650c only 6) Only Aastra 622d, 632d, 650c when an Aastra micro
Appendix Menu Structure for Aastra 612d, 622d, 632d, 650c “Easy“ setting System menu Function list Take 1) Pickup Pickup select Costs Main menu Calls Call lists In absence Received calls Type of call Deflect calls Call back list Hunt group Call diversions Divert phone Divert key Divert hunt grp.
Appendix Settings Language User name Time/Alarms 4) Appointment Time Date Appointment 1,2,3 Alarm clock Alarm 1, 2, 3 Date/Time Timer Format settings Audio Earpiece Handsfree Corded headset Internal call External call Unknown number Callback Recall VIP call Special call SOS call Alarm clock Appointment Text message 1) Melodies Line 1…9 / Internal, External Unknown number Callback Recall VIP call Special call SOS call Alarm clock Appointment Text message 1) Play once Silent charging Ringer Vibra
Appendix Bluetooth 7) Subsciptions BT Status Select headset Subscribe headset New system Subscription >Auth.Code< Auto search [System 1] ... Subscription Enter PARK Show IPEI Protocol System name 4) Phone number 4) External call 4) Internal call 4) Character set Details ...
Appendix Voice box no.
Appendix Menu Structure for Aastra 612d, 622d, 632d, 650c “Icon“ setting Info Caller list Voice messages 1) Text messages 1) Redial list Costs Active features >List< >Call< >List< >List< Function list Active features Bluetooth 7) Mandown 6) No movement alarm 6) Escape alarm 6) Call filter Profiles Alarm Appointment Directories Central directory Personal directory VIP list >List< >List< >List< Timer Alarm clock Alarm 1, 2, 3 Pickup Take Time functions Appointment Appointment 1,2,3 Status Off O
Appendix Settings Protection Call blocking Block call key Call waiting on/off Block intrusion Restrict dial Change PIN Cancel features Special features Terminal mode Central config. System service Subscriber serv.
Appendix Profiles Bluetooth 7) System Select Settings BT Status Select headset Subscribe headset New system Subscription No profile Normal Headset Meeting Loud >Auth.Code< Auto search [System 1] ... Subscription Enter PARK Show IPEI Protocol System name 4) Phone number 4) External call 4) Internal call 4) Character set Details ...
Appendix Security 2) Phone lock Change PIN SOS call Alarm Sensor 6) SOS number 4) SOS key Alarm number 4) Alarm auto answer Handsfree in alarm Pre alarm Mandown No movement alarm Escape alarm Repeat alarm Reset to default 1) Only available when supported by the system Available after entering PIN 3) Only when an Aastra microSD card is inserted 4) Not available if the system provides these defaults 5) Aastra 650c only 6) Aastra 632d only 7) Not Aastra 612d 2) 122 Personal directory VIP list New In
Appendix Index "Active features" menu ...................................64 "Audio" menu....................................................67 "Call diversion" menu ......................................72 "Call filter" menu ..............................................71 "Info" menu .......................................................62 "Profiles" menu .................................................89 "Security" menu................................................86 "Settings" menu..................
Appendix I Idle display.........................................................17 Illumination.................................................27, 83 Important information about the battery....10 INTERNAL keys ..................................................38 K Key assignment.................................................15 Key click..............................................................70 Key functions.....................................................19 Key lock............................
Appendix Technical specifications ................................108 Time ....................................................................65 Timer...................................................................67 U USB ........................................................................9 User name..........................................................82 V Version info........................................................75 Vibra call.........................................................
Aastra 600 c/dseries www.aastra.com Created on: 06.05.2013 • Issue 1 • Products similar to illustrations • Right to make technical changes reserved.