THE GAMES FACTORY 2 MULTIMEDIA FUSION 2 USER’S MANUAL Health warning : Some people experience epileptic seizures when viewing flashing lights or patterns. These persons may experience seizures while watching TV or playing video games. Consult your doctor before playing video games if you have an epileptic condition.
You should read the following terms and conditions carefully before using this software. Your use of this software indicates your full acceptance of this license agreement and warranty. 1. GRANTING OF LICENSE. Clickteam, as Licenser, grants to you, the Licensee, a nonexclusive license to use this software program (hereinafter referred to as the «SOFTWARE») in accordance with the terms contained in this license.
License 3 SUMMARY 4 Credits 5 Welcome 6 The Main Interface 7 1. Edit time Vs Run time 2. The Workspace Toolbar 8 8 3. The Property Toolbar 12 4. The Storyboard Editor 13 5. The Frame Editor 15 6. The Objects 21 6.1. The Picture Editor 21 6.2. The Animation Editor 24 6.3. The properties of the Active Object 29 6.4. Object inventory 40 7. The Event Editor 43 8. The Expression Editor 58 9. The Event-list Editor 62 Appendices 65 1. Global events and behaviors 65 2.
© 1996-2006, Clickteam. All rights reserved. This program was created and programmed by Yves Lamoureux & François Lionet Graphics by Nicolas Sourdeval Clickteam is D.T.
Welcome to Multimedia Fusion 2 and The Games Factory 2! This manual has been written for both Multimedia Fusion 2 and The Games Factory 2: these products share a number of common features. Within the manual we will be identifying both products as Multimedia Fusion (or its abreviation of MMF). Any features specified will apply to both products unless otherwise indicated. This manual also applies to the MMF2 Developer version.
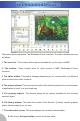
The picture above represents The Multimedia Fusion interface. The main interface parts are as follows: 1. The menu bar. This contains all the options available for you through out MMF. 2. The toolbars. These contain icons for quick access to MMF (Multimedia Fusion) functions. 3. The editor toolbar. This toolbar changes depending on the current editor, and allows a quick access to the editor functions. 4. The project window.
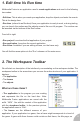
1. Edit time Vs Run time Multimedia Fusion is an application used to create applications and used in the following two modes: • Edit time. This is when you create your application, drop the objects, and enter the events. This is the design time. • Run time. (refered to as Runtime) Once your application is ready to work, or during testing, you can launch the runtime and the objects come to life as a full program.
second page the game itself, and as third page a high-score table. You edit the content of the frame in the frame editor. In the previous picture, the frames are named “Version screen”, “Zeb title screen” and “Funky Jungle 1-1”. • The objects. The objects are the items contained in a frame. For a game, objects can be a ball, the main player character, a trap etc. For multimedia presentations, an object can be a string of text, a text edit zone, a button, a list-box etc.
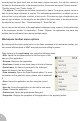
Right clicking on the frame icon opens the following menu: • Frame editor. Opens the frame editor. This option is in bold, it indicates that the Frame editor option is the default option: it is activated when you double click on the frame. You can change this option in the preference dialog. • Event editor. Opens the event editor. Please refer to chapter 8 for more information on the event editor. • Event list editor. Opens the event list editor. Please refer to chapter 9 for more information. • New folder.
Drag & drop, cutting and pasting Drag & drop is possible in the workspace toolbar: simply click on the item you want to move and drop it to the new position. You can drag & drop whole applications, frames and objects. The common edit function of cutting and pasting are possible as well. You can access them from the popup menu you get when clicking with the right mouse button on an item, or from the main menu. Frames and objects can be copied into the clipboard and then pasted wherever you want.
3. The Property Toolbar The property toolbar is an essential part of Multimedia Fusion: it provides the interface to choose all the necessary options for the applications, frames and objects. Using the property toolbar is easy because everything is automatic. The property toolbar adapts to display the properties of the selected object. Select the application in the workspace toolbar, and the application properties will be displayed.
4. The Storyboard Editor The storyboard editor is the place where you edit and create the different frames (screens) of the application. Although you can do that in the workspace toolbar, it may be simpler for some people to use the storyboard editor.
• • fade-out transition. Same as above, but the transition is used when the frame quits. Click on the icon to insert a transition. Shows the size of the frame, in pixels. Just click on the number to resize the frame. This size is the same as the one displayed in the Size property of the frame. Inserting a fade transition Fade in and out transitions are used to make various effects between frames.
5. The Frame Editor The frame editor is where you edit the content of the frames of your application. It allows you to drop the different objects in the frame, and set their respective positions, size, etc. The frame editor edits one frame at a time. The left panel of the window shows as list of the objects contained in the frame. By right clicking on the left panel you can choose to display the objects as small or big icons, and to sort them by size or by name. The main panel shows the frame itself.
Creating a new object You can create a new object from scratch. To do so, you have two options: • Right click on the frame and choose the Insert object option • Open the main menu and choose the option “Insert / New object” • Double click on an empty zone in the frame It will open the “New object” dialog box. The dialog box is organised in two panels. The left panel shows the different categories of objects. As you can see a lot of categories are available.
libraries in the folder. Now you just have to click on one of the library to open it: the content of the right panel is replaced by the content of the library with all the objects. A click on the “..” (previous) icon will re-display the list of libraries. A double click on one object will display the object in real size in a small window. Just click anywhere to erase it. To get the library object in your application, click on it, and drop it in the frame.
Multiple selections You can select more than one object at the same time: either hold the SHIFT key down while clicking on the objects, or draw a rectangle around the objects. You will see that the colors of the selection rectangle are different. The first object of the selection is called the main object, and its border is drawn in red. The other objects are drawn in blue. The main object is important for certain order and size options of the frame editor.
• Duplicate. Creates multiple instances of the same object. The created objects are the same as the source object (they have the same name). Very useful for certain types of games, for example a Breakout game in which you need to create a wall of bricks. • Order submenu The order submenu allow you to set the display priority of the objects, ie. which object is in front of what object. To front and To back option are self-explanatory.
• Cut / Copy / Paste / Delete. The usual edit options are present in this menu. You can copy any kind of object to the clipboard and paste it anywhere as you want. • Properties. Displays the properties of the selected object. Most of the options of the pop-up menu are available in the main MMF menu, and some of them are available in the Frame editor’s toolbar. Using the layers The Frame editor allows the use of layers. Layers are useful to create multiple planes of objects, or perspective objects.
6. The Objects The Frame editor allows you to drop objects on the frame. It is time now to see the objects in details. The Backdrop object The Backdrop object is used to draw backgrounds in the frame. It lies behind all the other objects, and does not interfere with the action. In fact it does nothing but sit there. To create a Backdrop object Choose the “Insert object” option in the frame editor pop-up menu, or in the Insert submenu in MMF main menu.
The Picture editor looks a lot like any other drawing program, and it does function like them. So we will only concentrate on some important icons. If you want the full detail of the icons, refer to the Help file in Multimedia Fusion. Import image This icon opens a file selector for you to choose an image to import. Multimedia Fusion supports many kind of images: Targa, Png, Jpeg, Gif, Bmp, Avi and Pcx.
• Import selection. Allows you to make a selection box around the graphics you want to import. Click on the Select button and then make the box with the mouse pointer in the picture. • Import as selection. The image will be imported as a floating selection and will not replace the current image. Crop The crop button reduces the size of the picture intelligently: it removes the transparent areas around the image, thus keep only the useful part of the image.
The properties of the Backdrop object The backdrop object does not contain a lot of properties. But you will find in the Runtime options tab of the property toolbar an “Obstacle” property. This property is particularly important for platform games: if selected, the object will generate collisions with the moving objects.
• Disappearing: displayed when the object is destroyed • Bouncing: displayed when the object is bouncing • Shooting: displayed when the object is shooting an object • Jumping: for platform movement, displayed when the player is jumping • Falling: for platform movement, displayed when the player is falling • Climbing: for platform movement, displayed when the player is climbing a ladder • Crouch down: for platform movement, displayed when the player is crouching • Stand up: for platform movement, displayed w
The previous picture shows the animation editor at work. As you can see it is based on the picture editor, so please refer to this part of the documentation for more information on how to use the drawing tools. We will concentrate on the new features of the animation editor. Looking at the bottom of the window, from left to right: • The animation selector. Double click on an animation to open it. The different directions and frames will be displayed in the window.
number here. Using 1 causes your animation will play one time, 2 for two times, etc. • Loop. Check this box if you want your animation to loop forever. • Back to. You may not want your animation to loop to frame #1. You may want it to loop to frame 3 for example. Enter in this box the number of the frame you want. • Frames tab. This tab displays in icons, the different frames of the selected animation and direction. A click on the icon opens the image in the picture editor, for you to modify it.
Enter the number of frames for the rotation in the edit box, choose Clockwise or Counterclockwise and click on OK: the rotated frames will be inserted after the image you are editing. • Select all / Unselect. Usual functions to select or deselect the images. • Cut / Copy / Paste / Delete. Clipboard functions that work as usual. • The navigation bar This bar allows you to navigate through the frames of an animation.
6.3. The properties of the Active Object The active object contains a lot of properties. The most interesting ones are the movement properties. Active objects are animated, but they can also move on the screen and create some action in your game. To add a movement to an object, select the object in the frame editor to display its properties, then click on the “Movement” tab in the property toolbar. The first property named “Movement” allows you to define more than one movement for the object.
THE BOUNCING BALL MOVEMENT This movement simulates the movement of a ball: the object goes in straight lines until it encounters an object where it can bounce, or otherwise react, on this object. This is the movement of choice for break-outs, pool, or other ball type games. The bouncing ball movement can also be used by advanced users in a variety of ways, as it is very flexible. • Initial direction. Same as above. • Try movement.
THE PATH MOVEMENT The path movement is a very powerful movement that allows you to record the mouse and draw a path that your object will follow during runtime. You actually draw the path on the screen with the mouse. As you can see, the properties of the path movement are limited to a simple “Edit” button. A click on this button opens the path movement editor. The buttons, from left to right • New line. Draws a single line with the mouse.
• Reposition at end. This option will enforce the position of the object to the original location when the movement end. • Color selection. Choose the color you want to display the path. • Speed. You must first select one or more nodes to use this control. Sets the speed of the current node, from 0 (stopped) to 100 (maximum speed). • Try movement. Click to try the movement and immediately see the results.
THE MOUSE CONTROLLED MOVEMENT This movement is controlled by the user, with the mouse. Basically the object moves accordingly to the movements of the mouse, like the cursor. Player. Indicates which player controls the movement, can be from 1 to 4. Edit. Click on this button to edit the mouse controlled movement. It opens the following box on the frame: The zone drawn with handles on the frame represents the zone of movement allowed for the object.
• Speed. Maximum speed of the object, from 0 to 100. • Acceleration. Acceleration factor, from 0 (no acceleration) to 100 (immediate). • Deceleration. Deceleration factor, from 0 (no deceleration) to 100 (immediate). The deceleration factor indicates the time taken to go from the maximum speed to stopped when the user releases the keys. THE RACE CAR MOVEMENT As its name indicates, the race car movement makes the object run like a car, seen from above.
THE PLATFORM MOVEMENT The platform movement makes the object move like a character of a platform game: it can walk on the left and right, jump, climb on ladders and platforms, and fall from one platform to another. In order to work, the frame must contain backdrop objects (or quick backdrop) and these objects must have the “Obstacle”, “Platform” or “Ladder” property set. You must also define an event in the event editor that stops the object when it collides with the background.
• The Alterable Values The alterable values of the active object are internal memory locations in which you can store numbers. You can have up to 26 different alterable values and you can name them as you want. To edit the names of the alterable values and set their content for when the frame starts, click on the “Values” tab in the property toolbar. Click on the “New” button to add a value, click on the name of the value to edit it, and click on the number to change it.
THE LIVES OBJECT The lives object is also a game oriented object: it displays the current number of lives of the player. The event editor contains actions to modify the number of lives of a player. The lives object reflects these modifications. To create a Lives object Choose the “Insert object” option in the frame editor pop-up menu, or in the Insert submenu in MMF main menu. Then choose the Lives object and drop it somewhere in the frame.
Properties of the counter object When you click on a counter object in the frame editor, its properties are displayed in the property toolbar: • Initial value. Enter the initial value of the counter: the counter will contain this value when the frame starts. The default value is 0. • Minimum value. Defines the lowest possible value contained by the counter. • Maximum value. Defines the highest possible value contained by the counter.
THE STRING OBJECT The String object contains a string of text. It can display the string using a selected font. It is the object to use as soon as you have some text to display. To create a String object Choose the “Insert object” option in the frame editor pop-up menu, or in the Insert submenu in MMF main menu. Then choose the String object and drop it somewhere in the frame.
6.4. Object inventory In this chapter we will describe several of the remaining objects briefly to give you a quick view of all the possibilities contained in Multimedia Fusion. If you want to discover more about an object, you will find its documentation in the help file. Or you can just drop the object in the frame, inspect its properties, conditions and actions: most objects are self-explanatory. Audio objects • CDAudio object.
• Backdrop object. Let you define backdrops in your application. • Quick Backdrop object. Allows you to draw rectangles and ellipses in the back of your frame. Like the Backdrop object, contains the “Obstacle” property. • Active picture object. Loads images from disc and display them in your frame. This object can resize and rotate the images. • Animation object. Display FLI, GIF and files with this object. • Draw object. Draw directly on the screen using the mouse. Only in MMF. • Picture object.
you to display your creations in an Internet browser. Math objects • Double precision object. Calculate in double precision with the functions of this object. Only in Multimedia Fusion Developer. Network objects • Network object. Communicate between two distant machines using this object. Only in MMF. Printer objects • Print object. Print images and text with this object. Storage objects • INI object. Create, read and manage INI files. • Array object. Store array data on disc.
7. The Event Editor Shown as an array, the event editor is a grid in which you are going to display, create and modify all the events that will bring your frame to life. In the frame editor, you can drop objects and set-up the display of your application. But if you try to run an application immediately after finishing your work in the frame editor, you will notice that very little happens.
The display of the event-editor 1. The information zone: gives information about what object is selected and events are displayed. 2. The object bar. You will find in this bar all the objects you have dropped in the frame editor, plus a number of system objects (available for any application) only visible in the event-editor. 3. The conditions are displayed in this area. One line per event. One event can contain more than one condition thus creating a compound condition. 4. The action grid.
The object bar displays the objects of the application. The objects dropped in the frame in the frame editor but also new objects, the system objects, that you will only find in the event editor. From left to right, let’s see the system objects: The special object. This object contains all the system conditions and actions. You can modify global values, perform comparisons, generate random numbers and mathematical functions. The speaker object.
• Open behavior. Please refer to appendix 1 for more information on behaviors. • Hide object with qualifier. The option is only available if you click on a qualifier. Will hide all the objects containing this qualifier. If you click with the left mouse button on one object, it filters the events: only the events containing this object will be displayed, thus reducing dramatically the number of lines displayed.
So we open the condition pop-up menu, find the collision sub menu and choose “Collision with another object” • A new dialog box immediately opens, asking for the object to test the collision with. Double click on the brick “Violet” • The New condition is replaced with the condition we have just defined. As you can see, the objects are displayed with their icons, but you can obtain the name of the object by moving the mouse pointer above the icons.
• You can if you want, have more than one condition in an event, again called a compound condition. The actions will be executed when all the conditions are satisfied at the same time. • You can of course have more than one action for one event: the actions are executed one after the other at high speed. Using the event editor If you click with the right mouse button on a previously created condition, it opens the following pop-up menu: • Edit. Edits the current condition.
Type the text of your comment in the edit zone, choose the font with the “Choose font” button, the colors with the appropriate buttons, and click on OK. Here s how this comment is displayed in the event editor: As you can see comments are very important to make a code clearer. Do not worry, comments do not take any time during the execution of the application as they are totally skipped by the runtime engine. Comments are extremely useful if multiple developers are sharing files.
• Cut / Copy / Paste / Delete: The clipboard functions are available for events. Drag & drop in the event editor Using the event editor, you find soon find out that drag & drop is an indispensable part of the development process. You can drag: • Conditions on one another, or from one event to another. • Actions checkmarks from one column to another. • Events on another events, like this you can re-order the events in your program.
• Limit conditions / Repeat. This condition will make the event repeat a certain amount of times. You are asked to enter a number when this condition is selected. • Group of events / Check for activation. This condition will be true if the selected group of event is activated, or if negated (see above) if the group is not active. • Group of event / On start of group. This condition will be true only if it used within a group, and if this group has just been activated.
Conditions in the timer object • Every. This condition asks for a period of time, example 1 second. During runtime, it will be true every second in our example. Useful for flashing objects, automatic incrementation of a score etc. • Is the timer equal to a certain value? This condition is true when the timer reaches the given time. The timer is initialised to zero at the start of the frame. Conditions of the create object • Pick a random object.
• Position / test position of object. This condition will ask you select which border of the frame to test, and it will be true if the object goes through the given border. • Alterable values / Compare to one of the alterable values. Allow you to compare a value to one of the alterable values. If the comparison is true, the condition is true. • Alterable values / Compare to one of the alterable strings. Allow you to compare a string to the content of one of the alterable strings.
• Play and loop sample. Same as above, but also asks for a number of times to play the sample. • Play music. Allows you to select a MIDI music to play using the music selector. • Play and loop music. Same as above, but asks for a number of time to play the music. Storyboard object actions The actions of the storyboard object control the flow of the application. • Next frame. Quits the current frame and loads (and plays) the next one in the storyboard list. • Previous frame.
As a default, the box shows the objects defined in the current frame. The left pane of the box displays the applications loaded in memory at the time. You can open the application and open each frame and see the list of objects of each frame. You can also click on the “Browse” button to load the object list contained in an application on disc. Once the object is chosen, double click on it to proceed further. The frame is now displayed, with a small dialog box and a flashing cross in the middle of the frame.
Player object actions • Score / Set score. Allows you to change the score of the player. You can also add to, or subtract from the score. The score will be reflected in a score object if it exists on the frame. • Lives / Set number of lives. Allows you to change the number of lives of the player. The number of lives will be reflected in an eventual lives object on the frame. Active object actions The active object contains a lot of actions, designed to control the movement and animations.
• Alterable values / Set. Changes one of the alterable values of the object. • Alterable strings / Set. Changes one of the alterable strings of the object. • Destroy. This very important action allows you to destroy the objects instantly. If a “Disappearing” animation is defined, it will be automatically played before the destruction of the object. If a fade out transition is defined also, it will be played before destruction.
8. The Expression Editor Many actions and conditions in Multimedia Fusion ask for you to enter a number or a calculation. In order to do that, they present you with the Expression editor. The expression editor is a powerful tool that enables you to make calculations, even complex ones, and retrieve information from objects, like their coordinates and include them in the calculation The expression editor looks like a calculator.
A closer look on certain functions: • Pi. Returns the value of the Pi number. • Sin / Cos / Tan. Return the value of the sine, cosine and tangent of an angle. The angle must be expressed in degrees (0-360). • Sqr. Returns the Square root of a positive number. • Ln, Log. Return the logarithm of a number. • Exp. Returns the exponential of a number. • Left$. String function, returns the left part of a string. For example Left$( “Multimedia”, 3) will return “Mul”. • Mid$.
Some of the available functions As for actions and conditions, we are not going to review all the available functions of all the objects: refer to the electronic documentation for an exhaustive list. Special object functions • Generate a random number, =Random( X ). This function, very important for games, will return a random number ranging from 0 and to X-1. X must be lower than 32768. • Retrieve a global value. Returns the value of a global value. • Retrieve a global string.
Active object functions • Movement / Speed. Returns the speed of the object from 0 to 100. • Animation / Current direction value. Returns the number of the direction of the object, from 0 (to the right) to 31. • Position / X Co-ordinate. Returns the X coordinate of the object (the position on screen of the horizontal hot spot of the image). • Position / Y Co-ordinate. Same as above, vertically. • Values / Alterable values. Returns the content of one of the alterable values. • Values / Alterable strings.
9. The Event-list Editor The event-list editor is the fifth main editor contained in Multimedia Fusion. As with the event editor, it allows you edit the events of the application. The difference is in the presentation of the events: they are presented as a list, not as a grid. Some people prefer to use the event-list editor. Note: the Event List editor is not included in The Games Factory, it is only present in Multimedia Fusion.
A click with the right mouse button on a condition or an action opens this menu: • Edit. Edits the parameters of the action or the condition. • Replace. Replace the action or condition by a new one. • Insert. Inserts a new action or condition. • Negate. Negates the condition, if possible. • Cut / Copy / Paste / Delete. The usual clipboard functions are available in the event-list editor. Drag & drop is, like in the event editor, an important part of the eventlist editor.
This dialog allows you fix a certain number of parameters for the printing. • Page ratio. Sets the number of events printed on a page. • How to display the objects? With their name will print only the name of the objects. With their icon will print the icon (maybe difficult to read once printed). Final and best option: with their icon and name. • Number of columns. Allows you to select the number of columns of events in one page.
Appendix 1. Global events and behaviors In this manual we have detailed the events associated with a frame. They are the main events. But you can if you want define other events that might be useful to your application.
Behaviors Behaviors could also be called “Local events”. Behaviors are list of events contained in one object. The events are automatically activated in the frame if the object is present. Behaviors allow you to create “Intelligent” objects that will react as soon as they are dropped in the frame, without the need to define events in the frame list of events. To create a behavior, you must first display the properties of the object in the property toolbar: just click on the object in the frame editor.
Appendix 2. The qualifiers Qualifiers are a way of reducing the complexity of the list of events of the frame. Imagine you create a game in which the player must avoid a lot of different traps. Without qualifiers, you would normally have to detect the collision between the player and trap for each trap: if you have a lot of those, this could create a lot of event lines. A qualifier is a symbol that you associate with an object.
Appendix 3. Fast loops Many times in your program of events, you need to repeat the same action a certain number of times. There are a number of ways of achieving this: you can use the “Repeat” condition from the special object menu, or use a counter to count the number of repeats. Multimedia Fusion provides you with a safe and very fast way of repeating the same actions: the fast loops. What is a fast loop? A fast loop is a system that will repeat the same events a given number of times, at fast speed.
Appendix 4. Creating a scrolling game Scrolling games are fun to play and it is very easy to create a scrolling game in Multimedia Fusion. Here are the different steps to follow. Simple scrolling game • Change the size of your application window (in the application properties) to a reasonable size, like 640x480 or 320x200 for fast scrolling. • Set the size of your frame larger than the window of the application.
• Set the application window size and frame size as explained before. • In the frame editor, open the Layer toolbar, and create as many layers as you need of scrolling planes. • Drop the objects in the planes to create your display. • Click on each layer in the layer toolbar to open its properties in the property toolbar. You will notice two properties: X Coefficient and Y Coefficient. Each of them represents the speed of scrolling of this layer relative to the position in the frame.
Appendix 5. Editing the data elements of an application If you click with the right mouse button on the name of an application in the workspace toolbar, you will find an option called “Data elements”. This very powerful option allows you to manage the data contained in your application. Choose this option and it opens the Data element dialog box. The purpose of this box is to show and edit all the elements of data included in the application.
Pros: you must use this option for large samples (several Megabytes). Cons: here too many induce a small delay before playing the sound. The Binary tab allows you to embed files into your application. These files can be opened directly from the application by objects that need them. This allows you for example to protect graphic files played by the Active Picture object, or a text file displayed by a RichEdit object.
Appendix 6. Extensions You have seen in this documentation that Multimedia Fusion contains a lot of different objects. Not all of these objects are included in the main program, most of them are stored in external files, and are called extension objects.
often “Bonus packs” that contain many new files. If you are fluent in C++ development you can create your own objects: come to the Clickteam web size and download the MMFSDK, the Multimedia Fusion development kit available in the download section of our site. Extension objects can only be created for Multimedia Fusion. The Games Factory extra objects will be published by Clickteam.
Appendix 7. The runtime options If you display the properties of an application (by clicking on the application in the workspace toolbar), you will notice a “Runtime options” tab. This page contains important properties to fine tune the runtime. • Frame rate. Set the number of frames per second of the runtime. The default value is 50, it can go from 1 (one step of animation per second) to 1000 (twenty times as fast as the default settings). • Machine independent speed.
• V-Sync. Will synchronise the display with the vertical synchro of the monitor, resulting in a clearer display. • Enable visual themes. With this option, your application will use the Visual Theme defined by the user in its Windows Screen properties. Without this option, your application will be displayed using the classic Windows style. • Players / Initial score. If you want the scores of the player to be different from zero when the application starts. • Players / Initial # of lives.
Appendix 8. The debugger When your application gets complex, with a lot of objects and a lot of events, sometimes it does not work as you want, due to errors in the logic applied. Multimedia Fusion contains a tool to help you find the problems of your application: the debugger. The debugger is automatically opened when you launch the application. It is a small bar in the top left corner of your screen. This little bar does not interact with your application.
As you can see this window displays information. Information about what is going on within your application. The display is centred on the notion of objects. The initial object displayed is the system object that contains information about the frame rate, the number of the frame, and the global values and strings. All the information is displayed as a tree, you can open the different sections with the mouse. * You can add objects of the application to the display.
Appendix 9. Creating your standalone application The goal of Multimedia Fusion is to create applications that you can distribute around you, give to friends and publish on the internet. This kind of application needs to work alone on a computer, without Multimedia Fusion installed: this is the reason why they are called standalone applications. Multimedia Fusion permits to create three kinds of standalone applications: • Executable files (.EXE) that run when you double click on them • Screen savers (.
Appendix 10. Vitalize! Vitalize! Is an Internet plugin that plays Multimedia Fusion applications, built as Internet applications, directly in a Web browser (MS Internet Explorer, FireFox, etc.). Please refer to the electronic on for more information.
81