
Instruction manual

NOTICE: There is no warranty on kits. It is your responsibility to install the board and lights. Kits cannot be returned. This kit can
consume a lot of current. Be careful if you plan to use a battery source that is capable of delivering a lot of current. Contact a
professional if you need assistance. Hyperdyne Labs assumes no responsibility for the misuse of this kit. Night flying can be
dangerous. User accepts all liability of using this kit in their plane and the responsibility of flying at night.
3
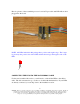
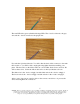
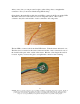
First take the ribbon cable and locate the end with no connector. You want to take your
exacto knife and carefully liberate each wire from the cable by cutting carefully in
between the cable sheath. This will allow you to pull/rip the wire away from the rest of
the sheath.
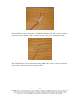
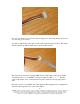
Then splice all the wires using some wire cutters/splicers. The wire is thin so don’t use
too much force when splicing.
LED hookup diagrams
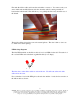
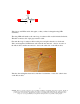
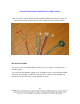
The first LED installed on the ribbon cable is 2 red oval LEDs for the tail. First take 2 of
the oval red LEDs and solder them together like this (in a V-shape):
The first wires on the ribbon cable are red and brown. We will start at the end of the
cable and work down.
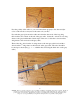
Now solder the + lead of the LED pair to the red wire and the – lead to the brown wire on
the ribbon cable as shown:
+
_