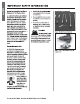
installation Instructions and Use & Care Guide e Residential Gas Water Heater Residential Atmospheric Gas Water Heater with the Flammable Vapor ignition Resistant Safety System PLEASE DO NOT RETURN THIS UNIT TO THE STORE operate, or service it. If you have difficulty following the directions, or g Read this manual and the labels on the water heater before you install, aren’t sure you can safely and properly do any of this work yourself: = Call our Technical Assistance Hotlink at 1-800-527-1953.
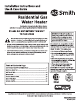
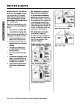
COMPLETED INSTALLATION {TYPICAL) Hot wearer line Draft hood Bas Control Valve/Thermostat {behind cover) Vent pipe Old water /’shut off Expansion tank {Connect to cold water supply) Cold water fine heal drain pan 1™~ 2 = Use and Care Guide Residential Gas Water Heater with inlet Damper Tap relief valve |, Drain valve (behind cover} Drain pan discharge pipe
IMPORTANT SAFETY INFORMATION Read and follow all safety messages and Instructions in this manual. This Is the safety alert symbol, 1t is used to alert you to potential physical in fury hazards, Obey all safety messages that follow this symbol to veld possible property L damage, serous In fury or death. Do not remove any permanent Instructions, labials, or the data plate from ether the outside of the water heater or on the inside of the access panels. Keep this manual near the water heater.
S IMPORTANT SAFETY INFORMATION o reduce the risk of property damages, serious injury or death, read and folio the precautions below, all labels on the water heater, and the safety messages and instructions throughout this manual. RISKS DURING INSTALLATION AND MAINTENANCE Lifting Risk 45 WARNING The water heater is heavy, Follow these precautions to reduce the risk of property damage, injures from lifting or impact injuries from dropping the water heater. ¢ Use at least two people to [ft the water heater.
IMPORTANT SAFETY INFORMATION * if the wale supplied to the water heater is per-heated {for example, by solar system) the temperature in the tank may be higher than the water heater's temperature setting. = Should overheating occur or the burner fail to shut off, wmn off the manual gas supply valve to the water heater and call our Technical Support Center at the number listed on the front of this manual.
S IMPORTANT SAFETY INFORMATION Fire and Explosion Risk if Hot Water is ot Used for Two Weeks or More. £ CAUTION Hydrogen gas builds up in a hot water system when Ris not used for & long period {two weeks or mayoress. Hydrogen gas is extremely flammable. If the hot water system fiats not been used for two weeks o more, open a hot water faucet for several minutes at the kitchen sink before slung any electrical appliances connected 1o the hot water system.
GETTING STARTED Review all of the Instructions before you begin work, Improper installation can damage the water heater, your home and other property, and can present risks of serious injury or death. This water heater is design certified by CSA International as a Category |, non-direct vented water heater which takes its combustion air either from the installation area or from air dusted 1o the unit from the outside.
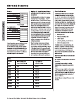
GETTING STARTED GETTING STARTED Example: Gas Fuming Appliance | BTU/HR Rating Gas Water cheater | 45,000 Fume | 75,000 Beyer | 20,000 Total | 135,000 Your Appliances: Gt Fuming Appliance e Water Hester BTU/HR Rating Kyoto ‘Table 2 provides examples of minimum square footage {area) required for various BTU/HR totals. Areas used for storage or which contain large objects containing less air than 15 assumed for the room sizes in Table 2 ~ see Option A for more specific calculations.
GETTING STARTED A2: Calculate required air volume Water heater installed in an unconfined attic or garage requires that the space ba at least 50 cubic feet per 1,000 BTU/ HR of the total input for all gas burning appliances in the same area. [Total BYU/MR/2000] x 50 = Cubic fest of alr required. Example: {135,000/ 1000} x 50 = 6,750 If the air volume of the room is less than the required sir volume, you must provide two permanent outside air openings that draw In sufficient alr. Use Option B.
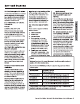
GETTING STARTED GETTING STARTED covering {in decimals e.g., 60% = .6) For example, an installation ares that requires openings with 100 square inches of free area would need 134 square inch openings if using metal Louvers rated at 75% free area (100 sg. =134 sq.
GETTING STARTED Venting & WARNING! Carbon Monoxide Hazard, This water Hester must be supplied with adequate air and vented o outdoors. The vent system must be installed by a qualified person. Examples of a qualified person include gas technicians, authorized gas company personnel, and authorized service technicians. Allure to properly vent the water heater can result In savers injury or death from carbon monoxide poisoning.
GETTING STARTED GETTING STARTED s The vent pipe must be firmly attached and sealed to prevent it from falling out. ¢ Toad in removing the vent pipe, & thimble o slip joint may be used. = The vent pipe must not extend beyond the inner edge of the chimney as it may restrict the space between it and the opposite wall of the chimney. Do not terminate the vent pipeline chimney that has not been certified for this purpose, Some local codes may prohibit the termination of vent connectors in a masonry chimney.
GETTING STARTED TYPICAL BIOG VALVE INSTALLATION 0% CONURBATION FACE INERTIA § PUTREFY WATER REPEATING BEATEN ® The domestic hot water line from the water heater should be vertical past any mixing naive or supply ine to the Mammon TR GOLDWATER PEAT scrumhalves! FRITO alr handier to remove alr bubbles from TEMPERED WATER CHEEK ARAGUAYA R Es oo apply e the system. Otherwise, these bubbles o FATE RES VALVE! (GRIST HIT TEMPS LINTED VAL l will be trapped in the air handier heat 4 MESS.
INSTALLATION INSTALLATION Verify that your home is equipped and up-to-date for proper operation installing a new water heater is the perfect time to examine your home’s lambing system and make sure the system is up to current code standards. There have likely been plumbing code changes since the old water heater was installed. We recommend installing the following accessories and any other beaded changes to bring your home up to the latest code requirements.
INSTALLATION increases In water pressure {despite the use of a Pressure Reducing Valve in the home’s main water supply ling}. The Safe Drinking Water Act of 1874 requires the use of back flow presenters and check valves to restrict water from your home reentering the public water system. Back flow presenters are often installed in water meters and may not be readily visible. As a result, most all plumbing systems today are now “closed,” and almost 2il homes now need a Thermal Expansion Tank.
INSTALLATION INSTALLATION Verify that the location is appropriate 4 WAKING! Do not store or use flammable materials, vapors, or Households in the same location where this water heater Is installed. Before installing your water heater, ensure that it will be located: Indoors in an area with adequate air supply. Ins 2n area that will not freeze. As close as possible to a chimney or vent, I @ metal drain pan piped to an adequate drain. In an ares suitability for vertical installation.
INSTALLATION On the old water heater, tum the control knob on the gas control valve to the OFF position. Figure 17 Turn gas control/temperature knob OFF. ‘Turn the manual gas valve for 3 the water heater’s supply line OFF, Open a hot water faucet and let the hot water run entail R is cool [This may take 10 min Utes or longer}. Figure 15 Let the hot water run anti 1t s conk, & WARNING| Be sure the water runs ool before draining the tank to reduce the risk of scalding.
INSTALLATION INSTALLATION line is turned off. Disconnect the gas ling from the water heater's gas control valve and cap it Remove the old water heater, Wse an appliance dolly or hand truck to move the water heater. £ WARNING! Use two or more people to remove or install 3 water fester, Allures to do so can resulting Back or other injury, Sl Installing the New Water Heater Completely read all instructions before beginning.
INSTALLATION Signore 25 Temperature and Pressures Relief Valve Pipe * The discharge pipe must not be smaller than the pipe size of the T&P Rueful Valve. The plops must also be able to withstand 250°F {121°C} without distortion, Use only copper or COPY pig. Do not use any other type of pipe, such as PVC, iron, flexible plastic pipe, or any type of hose. = Terminate the discharge pipe s maximum of six inches above a floor drain or outside the building.
INSTALLATION INSTALLATION S Connect the Water Supply Note that ali piping and components connected to the water heater must be suitable for use with potable water. Determine the type of water pipes in your home. Most homes use copper water pipes, but some use COVE or cross linked polyethylene (APEX. Use fittings appropriate for the type of pipe in your home. Do not use iron or PYC pipe. i 2 Connect the cold water supply using 3/4 inch National Pipe Thread “NPT" 1o the fitting marked “C* {COLD}.
INSTALLATION Figure 28 The Thermal Expansion Tank should be pressurized with using s hand pump, to mate the hoer's incoming water pressure, Verify Connections and Completely Fill Tank To remove air from the tank and allow the tank to fill completely with water, folio these steps: Remove the aerator at the 1 nearest hot water faucet. This allows debris in plumbing system to be washed out of the pipes.
INSTALLATION INSTALLATION Proper clearances from combustible surfaces maintained and sufficient room to service the water heater. Not installed directly on a carpeted floor. o Metal drain pan In staled and piped to an adequate drain. + Water heater not located near an air moving device {fan, clothes dryer).
OPERATION Normal Operation This water heater i5 equipped with an girder damper which increases thermal efficiency by minimizing the air flow through the flame arrest or during off cycles. When a hot water tap is opened, water is drawn from the top of the tank and the inlet tube definers cold water o the bosom of the tank. Eventually, cold water enters the tank, lowering the temperature to below the thermostat set point.
OPERATION OPERATION Nee the implicit flame s E established, stand at arm's length away and turn the gas control knob counterclockwise to ‘ON. {See Figure 33.} 7 Thermostatic desired sating. B Replace the outer cover. Shut down Instructions Set the thermostat to its lowest i setting {PILOT LIGHTING]. Push gas control knob down z slightly and tum clockwise to “OFF. Do not fores.
OPERATION Turn the gas control knob on the gas control valve to the right to the following settings. . 130°F 140°F .t 150°F e “YERYHOT® 155°F NOTICE: The temperatures above are approximates. The actual temperature of the heated waver may vary, 2 Wait for the water to heat up. I you have no hat water after 1w hours, refer to the Troubleshooting Section (see page 26). NOTICE: If the tank is Tull of cold wares, condensation may form inside the water heater.
TROUBLESHOOTING TROUBLESHOOTING No Hot Water Use the following as a guide to help determine why you have no hot water: Checking the Pilot Light Check the spark ignite. Dim the room lights and look through the view port wife clicking the ignite bunion, if you don't see & spark through the view port, check 1o make sure the ignite wire is firmly inserted into the white connector if you see a spark, make sure the gas supply valve is turned on, and try fighting the pilot using the gating instructions on page 23.
TROUBLESHOOTING Sediment or Lime in Tank. With an existing water heater, f you have some hot waiter but not as much as you're used o, there may be 2 build up of sediment or lime on the bosom of the tank. Sediment or ime build up can reduce the efficiency of your water heater. Heavy deposits can damage the water hater. See the Maintenance section for steps on draining and flushing the water heater. Temperature Too High Adjust the thermostat on the water heater to a lower settling.
MAINTENANCE MAINTENANCE Routine Maintenance Routine maintenance will help your water heater fast longer and work better. If you can't perform these routine maintenance tasks yourself, contact a qualified person. Draining and Flushing the Water Heater Tap water contains minerals that can form sediment in the bottom of the tank. The amount of sediment formed depends on the hardness of your tap water, the temperature settings, and other variables.
MAINTENANCE Refill the tank by opening the 10 cold water supply valve, Make sure a hot water faucets open and the drain valve is closed. Allow 2 hot water faucet to run full for at least three minutes to make sure the tank has all the air removed and is completely full of water. Once you are ca rain the tank is completely full of water, close the hot water faucet. Relight the pilot using the 11 instructions on page 23 and adjust the gas control knob to the desired temperature.
MAINTENANCE MAINTENANCE Actuator gas supply line is crimped or plugged if the actuator gas supply tube is crimped, kinked, or plugged, replace the actuator assembly {actuator, bracket, and supply tube). When you are finished, check for gas leaks by brushing on an approved noncorrosive leak detection solution. If such a solution is not available, use a mixture of hand dish washing soap and water {ons part cheap to 15 parts warier} or children’s soap bubble solution. Bubbles forming indicate 2 leak.
MAINTENANCE £ WARNING] Hot water will be released. Before operating the T&P relief valve manually, check that it will discharge in a safe place. f water does not flow freely from the end of the discharge pipe, turn the gas control fob o the GFF position and call a qualified person to determine the cause. At least every five years, have 3 qualified person inspect the T&P Relief Valve and discharge pipe.
MAINTENANCE MAINTENANCE Removing the Gas Control Valve/Thermostat: Remove the ignite with the ignite bracket by sliding & 1/4” flat-head screwdriver behind the top of the ignite bracket and gently remove allowing the ignite to hang freely off to tha side of the unit.
MAINTENANCE IMPORTANT: Use approved thread sealant tape or pipe joint compound on the gas inlet piping connections and the fitting on the back of the gas control valve/thermostat. Do rot under tighten the gas control thermostatically, this could result in 2 weer leak, water damage, and/ or flooding. Do not over tighten the gas control thermostatically, this would result in damage to the valve. Fill the water heater with water.
REPAIR PARTS Replacement parts may be ordered through your plumber or the local distributor. Parts will ba shipped at prevailing prices and billed accordingly.