
Operating Guide


Residen al Electric Water Heater Use and Care Guide • 9
Step 2:
Verify that the loca on
is appropriate
Before installing your water heater,
ensure that:
1
The water heater will be:
• Installed indoors close to
the center of the plumbing
system.
• In a suitable drain pan piped to an
adequate floor drain or external
to the building (Figure 6 on page
8).
• In an area that will not freeze
• In an area that is suitable for install-
ing the water heater vertically
2
The loca on has adequate
space (clearances) for periodic
servicing.
3
The fl oor can support the
weight of a full water heater.
4
Your area is not prone to
earthquakes. If it is, use
special straps as required by
local building codes.
NOTICE: The state of California re-
quires bracing, anchoring, or strapping
the water heater to avoid its moving
during an earthquake. Contact local
u li es for code requirements in your
area, visit h p://www.dsa.dgs.ca.gov,
or call 1-916-445-8100 and request
instruc ons. Other loca ons may have
similar requirements. Check with your
local and state authori es.
5
The loca on is not prone to
physical damage by vehicles,
fl ooding, or other risks.
Vehicle
Stop
Drain
Drain
P
a
n
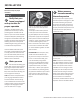
Figure 8 - In a garage, install a vehicle stop
to avoid water heater damage.
6
Avoid loca ons such as a cs,
upper fl oors, or where a leak
might damage the structure
or furnishings. Due to the normal
corrosive ac on of water, the tank will
eventually leak. To minimize property
damage from leaks, inspect and
maintain your water heater in accor-
dance with this manual’s instruc ons.
Install a suitable drain pan under the
water heater piped to an adequate
drain. Inspect the drain pan, pipes, and
surrounding area regularly and fi x any
leaks found. Drain pans are available at
Lowe’s® . Leaks are frequently in the
plumbing system itself and not the
water heater.
Step 3:
Removing the old water
heater
1
Read each installa on step
and decide if you have the
necessary skills to install the
water heater. Only proceed if you can
safely perform the work. If you are not
comfortable, have a qualifi ed person
perform the installa on.
2
Locate the water heater’s
circuit breaker and turn it OFF
(or remove the circuit’s
fuses).
3
On the old water heater,
remove the electrical
junction box access panel.
Using a non-contact circuit tester,
check the wiring to make certain the
power is OFF.
WARNING! Working on an energized
circuit can result in severe injury or
death from electrical shock.
4
Disconnect the electrical
wires.
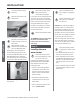
5
Open a hot water faucet and
let the hot water run un l it is
cool (This may take 10
minutes or longer).
Figure 9 - Let the hot water run until it is cool.
WARNING! Be sure the water runs
cool before draining the tank to reduce
the risk of scalding.
6
Connect a garden hose to the
drain valve and place the
other end of the hose in a
drain, outside, or a bucket. (Note that
sediment in the bo om of the tank
may clog the valve and prevent it
from draining. If you can’t get the
tank to drain, contact a qualifi ed
person.)
INSTALLATION