X7 Oscar Wireless Gaming Mouse Model: XG-760 www.a4tech.
THIS DEVICE COMPLIES WITH PART 15 OF THE FCC RULES. OPERATION IS SUBJECT TO THE FOLLOWING TWO CONDITIONS: (1) THIS DEVICE MAY NOT CAUSE HARMFUL INTERFERENCE AND (2) THIS DEVICE MUST ACCEPT ANY INTERFERENCE RECEIVED, INCLUDING INTERFERENCE THAT MAY CAUSE UNDESIRED OPERATION. Federal Communications Commission Requirements The equipment has been tested and found to comply with the limits for Class B Digital Device, pursuant to part 15 of the FCC Rules.
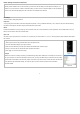
Mouse Button Diagram Hardware Installation 1). Connect the Multi-link receiver Take out the Multi-link receiver from bottom of the mouse and connect it to your computer or Notebook. 2). Insert the batteries Push down the mouse cover to open the battery cover and insert the supplied batteries. Please make sure the positive (+) and negative (-) ends of the battery match the polarity indicators inside the battery compartment. 3). Turn on your Mouse Push the power switch to ON position and turn on your mouse.
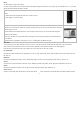
X7 Oscar Mouse Editor Mode Name/Select: Mode Number: Select a mode number to edit. Mouse Button Definition: Name a new mode or select modes to use. Description of Reminder: Display current mouse button settings or setup new settings to mouse buttons. Enter short description here for each button setting, which will be displayed later as the reminder on the screen. Save new settings to receiver and apply the new settings immediately.
Button Settings and Relevant Functions Click any “button definition area” on the main menu; you will see the function listing as shown below. According to your preference, you may select one of them as the button setting. You also can enter a short description on the “Description of reminder” area, which will be displayed on the screen when it is activated as the reminder. No Settings There is no button setting being defined. Keyboard...
Memo See below "Memo" section in more details. One click to open the Memo screen and list out all the current button settings as the reminder. You may setup any of mouse buttons of 2, 3, 4, 5, 6, wheel up(UP) and wheel down(DN) with "Memo" function. Usage: 1). Select "Memo" from the pull-down button menu as figure C shows. 2). Click "Apply" to save button setting.
this gesture function is only available for mouse button and . See more details on the Gesture 16-in-1 section. Screen Shot Button / / can be set as "Screen Shot". One click to take a screenshot of a chosen area of the screen or video and quickly share with others. Screenshot Usage Configure your screenshot button: 1. Open the Main Menu and choose any of mouse buttons , or as “Screen Shot” function. 2. Select “Screen Shot” from the pull-down button menu(Shown as right). 3.
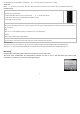
DPI Levels & Color Indicator Suitable Resolution of display DPI Levels (Default) Indicator Color Recommended for: (Recommended) ) DPI 1: 400DPI No light 800×600 Slow-Speed and normal accuracy player DPI 2: 800DPI Green 1024×768 Medium-Speed and average accuracy required player DPI 3: 1,200DPI Yellow 1152×864 Fast-Speed and above average accuracy required player DPI 4: 1,600DPI Red 1280×960 High-Speed and pinpoint accuracy required player DPI 5: 2,000DPI Red & Yellow 1280×1024 Ext
The “Gesture 16-in-1” offers customizable 16 functions in 1 click with gesture button. You may setup 16 most-frequently-used commands to the Gesture buttons or from 6 categories, more than 30 commands, including Keyboard, Mouse, Hyperlink, Office, Text, Multimedia, Internet and Key Setting Reminder. Using the mouse to draw the lines as any of 16 preset directions, the corresponding command will be executed immediately.
3. Click “ ” to save to receiver’s memory. 4. Draw the line in Excel.
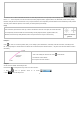
Auto Launch on Boot: If this task is selected, X7 Oscar Mouse Editor will be auto-executed when the system boots up. Mouse-Control Panel: Select “Mouse-Control Panel” will open “Mouse Properties” setup screen of your Windows system, e.g., you may setup mouse pointers and other often -used mouse settings. 4-way Wheel A. The 4-way Wheel is the latest scrolling technology. It splits working screen into 2 areas, A and B as shown above.
Check Battery power: Click "Check Power" in "power-saving management" to check the battery power status. Low Battery Inform: When the mouse power is low, Low Battery Inform page will pop up at the right corner of your screen to remind you to replace the batteries in time. Note: Light color mouse pads can save more power than deep color ones. 500Hz full speed in the gaming mode will consume much more power.
ID Pairing Program Effective Meeting: Multi-link receiver is designed with memory, The “New Mice/KBs ID Pairing” program allows to link up to 3 sets XFAR G3/ G5/ G7/ G9/ G10 series of mice & KBs to operate on the same computer. The “A4tech G-Family” program provides the best sharing of meeting to consolidate all member intelligences. Portability: The Multi-link receiver allows to link up to 3 sets XFAR G3/ G5/ G7/ G9/ G10 series of mice & KBs.
Press any key to wake up the mouse before “ID pairing” is performed. >>Locate the power switch (Normally you can find it on the mouse bottom side). >> Make sure the power switch is in OFF position and then switch it to ON position within 30 seconds. (If power switch is in ON position, switch it to OFF and back to ON position within 30 seconds).
Step 1: Launch the "Macro Manager"(Open the Oscar Mouse Editor >> Select "Macro Manager" from the task pull-down menu of the designated button) Step 2: Knowing the instructions of “Macro Manager” . Keyboard Simulation Area . Mouse Simulation Area . Record Button When you want to record your settings, click on " " area and: 1). Start to record your actions which you have done by pressing "F11" on your keyboard. 2). Stop to record your actions which you have done by pressing "F12" on your keyboard.
Step 1: Click on "Play Macro Once Only" of the "Macro Manager Menu" >>Select "Play Macro Repeatedly" >> Select "Press to start, Release to stop" as shown right. Step 2: Tick the box of "Perform delay each time a key is pressed" >>Select "mSec" of time unit in the "Time unit" Step 3: Input "64" of time value in "Time" box. >>Click "Left " on "Mouse Simulation Area". Step 4: Input "200" of time value in "Time" box. >>Click "Left" on "Mouse Simulation Area".
Step 1: Tick the box of the "Perform delay each time a key is pressed" and "Perform delay each time a key is released" at "Macro Manager Menu">> Select "mSec" of time unit in the "Time unit". Step 2: Input "64" of time value in "Time" box. >>Click "Left" on "Mouse Simulation Area". Step 3: Input "70" of time value in "Time" box. >>Click "Left" on "Mouse Simulation Area". Step 4: Input "85"of time value in "Time" box.
Step 1: Click on "Play Macro Once Only" at the "Macro Manager Menu" >>Select "Play Macro Repeatedly">>Select "Press to start, Release to stop". Step 2: Tick the box of "Perform delay each time a key is released" >>Select "mSec" of time unit in the "Time unit". >> Input "110" of time value in "Time" box. Step 3: Click "Left " on "Mouse Simulation Area". Step 4: Input "3" of coordinate value in "Mouse Relative Coordinate Y Aix " box.
Step 1: Input "799" of coordinate value in "Mouse Relative Coordinate X Axis Box" of the "Macro Manager Menu">>Click "Plug In". Step 2: Select "mSec" of time unit in the "Time unit" >> Input "23" of time value in "Time" box. >>Click "Plug In". Step 3: Repeat three times from step 2 to step 3. Step 4: Input "500" of coordinate value in "Mouse Relative Coordinate X Axis Box". >>Click "Plug In". Step 5: Click "Plug in" in "Time Control Area" of "Macro Manager Menu".
Notice To ensure that your mouse sends and receives perfectly, please read below instructions for your reference: 1. Avoid Channel Confliction from Auto Channel Hopping 1). Left-click on the icon " " at your system tray and select "RF Channel Setting". 2). Select "Channel-lock" to define a private channel to secure better wireless communication quality. 2. Avoid Interference from iron panel of PC.
Product Support Need help with technical support? Please go to: http://www.a4tech.com/ennew/support.asp and our support team will respond within 72 hours. **All pictures and description mentioned above is for reference only and is subject to change without notice.