Radio Wireless Wheel Mouse User’s Guide MODEL: RFW-33 Trademark Recognition Windows, Office 97 and MS-IntelliMouse are registered trademarks of Microsoft Corp.
THIS DEVICE COMPLIES WITH PART 15 OF THE FCC RULES. OPERATION IS SUBJECT TO THE FOLLOWING TWO CONDITIONS: (1) THIS DEVICE MAY NOT CAUSE HARMFUL INTERFERENCE AND (2) THIS DEVICE MUST ACCEPT ANY INTERFERENCE RECEIVED, INCLUDING INTERFERENCE THAT MAY CAUSE UNDESIRED OPERATION. Federal Communications Commission Requirements The equipment has been tested and found to comply with the limits for Class B Digital Device, pursuant to part 15 of the FCC Rules.
INTRODUCTION Congratulations on your purchase! Your new RF-Mouse is easy to install and offers you a host of useful features. The Radio receiver can be conveniently placed to give you the freedom you need while working. The vertical wheel allows you to scroll, or zoom in and out in a document. It is included with 2-wheels and 3-buttons. You can program the mouse buttons to launch the NetJump or LuckyJump for a quick start to programs you run frequently.
Inserting the Batteries The RF-Mouse uses two AAA batteries. For best performance, use only alkaline batteries. Refer to the following to insert the batteries: 1. Press the tab on the bottom of the mouse cover as shown here and remove the cover. 2. Insert the two AAA batteries. (The correct polarity is indicated on the battery compartment casing.) 3. Replace the cover. Checking the Batteries power To check the battery power, right-click the mouse icon in the Taskbar.
Changing the RF-Mouse ID Code You can use a new RF-Mouse on your computer without changing the Radio receiver; you just need to change the ID code. Refer to the following: 1. Press [Shift + Alt + F11] or [Shift + Alt + F12] to call up the RF-Mouse ID Code window. 2. Move the RF-Mouse for a few seconds to establish a connection, then click Connect ID. 3. The new ID code is Connected and the RF-Mouse window closes. 4. Click Exit to close the RF-Mouse ID code window.
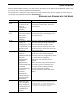
USING THE MOUSE With the iWheelWorks software, you have all the advantages of the Microsoft IntelliMouse wheel, and but you can also scroll in Windows 95/98/2000/NT. Your mouse has a wheel; the wheel functions as both a wheel and a button. Simply click the wheel as you would a programmable standard Third button. SCROLLING AND ZOOMING WITH THE MOUSE Task Vertical Scroll Horizontal Scroll Zoom AutoScroll LuckyJump What is it? Lets you scroll up or down in the current application window.
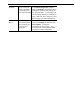
NetJump Lets you choose from commands commonly used for Web browsing. In the Mouse Properties window select the Buttons tab and then assign NetJump in the drop-down menu for the desired button. See Settings Tab and Executing NetJump Commands on page 5 and Take Your mouse on a Test Run on page 8 for more information. Command Menu Create your own Command Menu for launching all your favorite programs. In the Mouse Properties window select the Settings tab and then click New/Update.
MOUSE PROPERTIES SETTINGS From the Mouse Properties window you can customize System many settings for your mouse including button Tray assignments, scroll wheels and cursor movement. To open the Mouse Properties window double-click on the mouse icon in the system tray. The Mouse Properties window has six tabs that are described below. Buttons Tab Button Assignments: Click the down arrow to select the preferred function for each button. (See the Settings Tab for more information.
Executing Net Jump Commands NetJump combines commonly used tasks for Web browsing into one convenient grid and puts them right under the cursor. To use NetJump, open the Mouse Properties window and select the Buttons tab. Assign NetJump in the drop-down menu of the button you want. Click OK to close the Mouse Properties window. Now click the assigned button to open the NetJump grid and execute your command. (See the Settings Tab section above for instructions on customizing NetJump.