
User's Manual


Changes or modifications not expressly approved by the party responsible for compliance could void the user's authority to operate
3
Insert the installation diskette into your floppy disk drive
.
tart button and then click Run.
dialog window, type
A:\setup, where “A” is the letter of your floppy disk drive.
and follow the instructions on your screen to complete the installation.
Selecting the Frequency Channel
board and Mouse operates on two frequency channels. To prevent interference when using two
RF Mice in close proximity a different frequency channel should be used for each mouse. Refer to the
following to change the frequency channel for your keyboard and
mouse: Set the frequency channel on the receiver to 1 or 2.
Set the frequency channel on the
keyboard and mouse to
1 or 2.
The Wireless keyboard and mouse ID code
Each keyboard and mouse is assigned a unique ID code at manufacture, so the receiver only picks up the signal from your mouse and prevents other Wireless keyboard
or mouse radio signals from operating on your computer. This feature can also be disabled, allowing other Wireless pointing devices to operate your computer.
Connecting the Wireless Mo
use ID Code
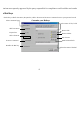
When the driver installation is finished your computer reboots and the Wireless Mouse window (shown on the right)
Move the Wireless Mouse for a few seconds to establish a connection, then click
Connect ID. The
code of your mouse is recognized and another RF pointing device will not function on your computer.
if no other RF pointing devices are within 3 meters range or if you want other RF pointing devices to be
able to access your computer.