User Manual Model: G9-350 www.a4tech.
THIS DEVICE COMPLIES WITH PART 15 OF THE FCC RULES. OPERATION IS SUBJECT TO THE FOLLOWING TWO CONDITIONS: (1) THIS DEVICE MAY NOT CAUSE HARMFUL INTERFERENCE AND (2) THIS DEVICE MUST ACCEPT ANY INTERFERENCE RECEIVED, INCLUDING INTERFERENCE THAT MAY CAUSE UNDESIRED OPERATION. Federal Communications Commission Requirements The equipment has been tested and found to comply with the limits for Class B Digital Device, pursuant to part 15 of the FCC Rules.
1. Hardware Installation 1). Connect the Multi-link receiver Take out the Multi-link receiver from bottom of the mouse and connect it to your computer. 2). Insert the batteries Open the battery cover and insert the supplied batteries. Note: Make sure the positive (+) and negative (-) ends of the battery match the polarity indicators inside the battery compartment. 3). Turn on your Mouse Push the power switch to ON position and turn on your mouse.
2. Software Installation (Note: The software is applicable to Windows 2000/ XP/ 2003/ Vista/ Windows 7) 1). Uninstall previous installed mouse software. 2). Insert the enclosed CD to start installation and follow the on-screen instructions to finish the software installation. " will appear on your desktop screen, and then you have successfully installed the 3). The shortcut icon " software. (Otherwise, installation is failed and you have to remove the software and re-install.
3. Knowing the "16-in-1" software "16-in-1" software offers programmable 16 functions in 1 click with RIGHT button.
Gesture 16-in-1 1). Click " " of "Gesture Button will pop up as below. " at the "Main Menu" page and select "Gesture 16-in-1". The setup screen Setup Screen 2). Click any " " at "Setup Screen", you will see the function list.
Open a File You may setup the "Gesture Button " to open a file or program by one-click during presentation. Usage: 1). Select “Open a File” from the pull-down menu of the "Gesture Button " as "Figure 1" shows. Figure.1 Figure 2 2). A screen of file listings will pop up as "Figure 2" shows. 3). Select a file that you would open it with the "Gesture Button " and click “Open”. 4). Now you can see a file you selected has been assigned to "Gesture Button ." 5). Click “Apply” to save the new setting.
Text Commands Multimedia Internet: Quick access to Office, such as: New File, Open File, Save File, Redo, Undo. Quick access to Multimedia commands, such as: Media Player (Open), Previous, Next, Stop, Play/Pause, Mute, Volume+, Volume-…etc. Quick access to usually used Internet commands, such as: Backward, Forward, Stop, Refresh, Search, My Favorite, Web Browser, E-mail...etc.
8
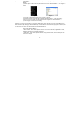
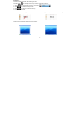
Example 2: See the contrast in EXCEL after drawing the line. Now let's take " 1. Select " 2. Click " " as example to show you how to use these functions: " icon to represent "Zoom In" as shown: " to close the setup screen. 3. Click “ ” to save to receiver’s memory. 4. Draw the line in Excel. Original After drawing the line, the column has been enlarged Draw the line in Windows Picture and Fax Viewer.
DPI Setting Click " " on "DPI Settings" of the Main Menu of "G9 16-in-1" software to adjust 5-level sensitivities among 800-1000-1200-1600-2000 DPI depending on different display applications The icon will be displayed at the system tray when you adjust the DPI-level. You also can change the DPI-level directly by pressing the DPI shift button(upon the model used).
Mouse Report Rate Mouse Report Rate is the term that how many times the mouse sends data to the computer in one second. For instance, "Report Rate 500Hz" means "the mouse sends 500 times of data to the computer in one second". G9 16-in-1 offers 3 report rates, e.g., 125Hz, 250Hz and 500Hz respectively. The higher times stands for the smoother the cursor movement and precise click response, especially suitable for game play, which requires high speed and quick response.
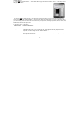
Task listing of G9 16-in-1 Left or Right click on the icon " " at the right-down corner of your system tray, you will see “G9 16-in-1 Task Listing” pops up as shown below: Following will brief each task and its functionality. 1). Auto Launch on Boot If this task is selected, G9 16-in-1 will be auto-executed when the system boots up. 2). Mouse-Control Panel Select "Mouse-Control Panel" will open "Mouse Properties" setup screen of your Windows system, e.g.
3). 4-Way Wheel Step 1: Right-click on the icon " " at the right-down corner of your system tray and select "4-way Wheel". Step 2: See instructions on the popped 4-way Wheel window to learn on how to execute vertical and horizontal scrolling. A. The 4-way Wheel is the latest scrolling technology. It splits working screen into 2 areas, A and B as shown. Depending on cursor position, the wheel will perform vertical or horizontal scrolling.
4). Power Management at the right-down corner of your system tray and select Click on the icon "Power Management" to define wake-up modes and sleeping time. According to the stand-by status, the intelligent power-saving management supports "Slight, Little, Middle & Deep" 4 working modes. User may define the time interval to enter into the Deep Sleeping Mode, and 6 seconds enter into Deep Sleeping Mode after the PC is power off. Move to Wake Up: This is convenient to awake the mouse, and it consumes 0.
Low Battery Inform: When the mouse power is low, Low Battery Inform page will pop up at the right corner of your screen to remind you to replace the batteries in time. Low Battery Inform Page 5). RF Channel Setting: Click on the icon at the right-down corner of your system tray and select "RF Channel Setting" to indicate RF signal and set a specific channel to avoid RF interference. Auto Channel Hopping: This is G9 16-in-1 default setting.
Detect Receiving Signal Level: Moving the mouse, the indicator will display current signal level. The less level value means the better receiving signal, value under 120 means the devices are working in good condition. The value may increase when working in a long range venue, or there is strong interference. Try different allocation of mouse and receiver till the best improvement is secured. Signal Level Indicator 6).
Suggest Improvements: 1. Use a USB extension cable for the receiver and keep it away from the computer or any interfering sources. It is highly recommended to use it for the long range meeting venue or when there is strong wireless conflict nearby. 2. Plug receiver on the same side with the mouse, it may avoid potential wireless conflicts from the notebook computer. 7).
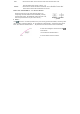
②Click “ ” will start to add new mice and keyboards. (For better operation, you may need another mouse to perform ID pairing before the wireless mouse is applicable). The Multi-link, red-shelled receiver may works with up to 3 sets of mice and keyboards simultaneously. With each attendant a mouse in hand, it increases efficiency. See more details on below “New IDs for Mice/KBs” and “How to Add a New Device Using New Mice/KBs ID Pairing” sections.
③.Follow on-screen instructions to perform “ID Pairing” as shown on the right, click “Next” to continue. ④Press any key to wake up the mouse before “ID pairing” is performed. >>Locate the power switch (Normally you can find it on the mouse bottom side). >> Make sure the power switch is in OFF position and then switch it to ON position within 30 seconds. (If power switch is in ON position, switch it to OFF and back to ON position within 30 seconds).
⑥. After above ID pairing is completed, you can follow the below steps: 1.Click "OK" to complete the ID pairing. 2.If you need to perform another ID pairing for the new devices, click “New Mice/KBs ID Pairing” again and repeat above steps 2, 3, 4 to perform another ID pairing. After you have finished adding all the new mice and keyboards, click “Into G-Family Management” to manage the multiple mice and keyboards.
1). Left-click on the icon " " at the right-down corner of your system tray and select "RF Channel Setting". 2). Select "Channel-lock" to define a private channel to secure better wireless communication quality. 2. Avoid Interference from iron panel of PC. Please plug the Multi-link receiver into “3“、“4“ to avoid shielding wireless signal when placing at “1“、“2“. “1,2,3,4“ USB Ports 3.
Troubleshooting & FAQ If the mouse is not working: 1. Make sure the mouse power is on. 2. Try another USB port. 3. Ensure the Multi-link receiver is inserted. 4. Check battery and battery installation. Product Support Need help with technical support? Please go to: http://www.a4tech.com/ennew/support.asp and our support team will respond within 72 hours. **Features and specifications of all A4TECH products are subject to change without notification.