
Operating instructions


Red printout
Black printout
Print characters 0-9, A-Z, minus, period,
slash, dollar, and comma
Carriage return
Space (by operation of the blank key)
Tabulation
Messages are typed out automatically, requiring no
assistance from the operator. However,
a
typeout
should be immediately observed since the message
may contain instructions requiring
a
decision and
action on the operator's part. All error messages are
printed in red. Program-controlled
typeouts change
the ribbo~ color autonlatically.
All messages logged on the console typewriter serve
as
a
log of the performance of each program. If the
program has been prepared with this in mind,
it
will
cause the console typewriter to log the identification
of the programs,
a
listing of tape labels, and instruc-
tions to the operator.
If,
however, the program
is
not
complete to that extent, the operator may manually
inject his own comments into the log. This can be
done by operating the console typewriter keyboard in
the same manner
as
any standard typewriter while the
computer
is
temporarily halted. The typewriter can
be usedwhen the control console
is
set for either AUTO
or MANUAL operation.
Since typewriter controls and keys are of such general
familiarity, and most electric typewriter manuals des-
cribe the same parts
as
those on the console type-
writer, no parts description will be included here.
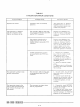
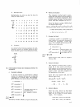
All parts mentioned in this
writeup
are
called out on
Figure
V-
1.
A lever under the left end of the keyboard controls the
pressure, and the indicator above it shows the range
from
0
to 10. The higher the number, the greater the
impression. It
is
recommended that the type impres-
sion control be adjusted
as
low
as
is
consistent with
good copy.
The carriage return must always be specified by the
program. If aprogrammer forgets the carriage return,
the typewriter will type to the right margin and con-
tinue typing characters on top of each other at the end
of the line (unless the operator notices it in time to
manually move 'he carriage back).
In the rather
rare
case
when the program uses the typewriter for exten-
sive output, the program may specify tabulation.
A11
the program can do
is
specify 'activate the tab key,'
so the setting of the tab stops must be done by the oper-
ator prior to the running of the program. When tabula-
tion
is
used, the location of the tabulator stops will be
specified to the operator at the same time and in the
same manner
as
are other operating instructions.
The typewriter ribbon seldom causes the operator any
concern, for
a
ribbon
lasts
a
number of months and
is
replaced when necessary by the service engineer.
SETUP
PROCEDURE
Only two steps in the setup procedure need
to
be done
regularly
at
the beginning of each shift. They are:
1.
Turn typewriter power on by moving the
power toggle switch to the rear position.
The veiwing window above the switch shows
white to indicate that power
is
on.
2.
Load paper in the typewriter in the same
way
as
in any standardbusiness typewriter.
The paper
is
continuous strip, so the oper-
ator must make a mental note of whether
the supply installed is sufficient to
last
throughout the shift.
The following steps are used less frequently, possibly
only at time of initial setup. Spacing of margins, tabs,
and lines depends somewhat upon policy at the indivi-
dual computer site. This spacing may change, however,
with a change in program printout format. In setting
margins and tabs, typewriter power must be on.
1.
Set the line space lever for one, two, or
three spaces between lines. One or two
spaces are most frequently used.
2.
Set the margins. It
is
customary but not at
all
mandatory that the left margin be set ten
spaces in from the left
edgeof thepaper and
the right margin be set as
far
right
as
is
possible without going beyond the right edge
of the paper.
a. Set the left margin:
(1)
Touch the carriage RETURN key to
place the carriage
at
the leftmar-
gin.
(2)
While holding down the MAR SET
key, move the carriage
to
the de-
sired location to the right by spac-
ing with the space bar or to the
left
by spacing with the BACK SPACE
key.
b. Set the right margin:
(1)
Move the carriage to the right mar-
gin by tabulating with the TAB KEY.
(2)
While holding down the MAR SET
key, move the carriage
to
the de-
sired location to the right by spac-
ing with the space bar or
to
the
left by spacing with the BACK
SPACE
key.
3.
Set the tab stops. The GET Conventions
manual specifies that the first two tab-