
Manual


HV-WP/HW-WP Series Page 39
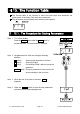
13. Simple Batch Function
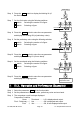
Step 6 Press the MODE switch to display the blinking HI (of
the final value).
Step 7 Set the final value using the following switches.
∧ switch Selecting the number of a figure.
< switch Selecting a figure.
Step 8 Press the ENTER switch to store the new parameter
and display the blinking OK (of preliminary value).
Step 9 Set the preliminary value using the following switches.
∧ switch Selecting the number of a figure.
< switch Selecting a figure.
Step 10 Press the ENTER switch to store the new parameter
and display the blinking LO (of zero band).
Step 11 Set the zero band using the following switches.
∧ switch Selecting the number of a figure.
< switch Selecting a figure.
Step 12 Press the ENTER switch to store the new parameter
and display the weighing mode.
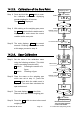
13.2. Operation and Performance (Examples)
Step 1 Select the parameter f6 8 of the function table.
Step 2 Set the parameters of the final value, preliminary value and zero band.
Step 3 The comparison result is always displayed.
Comparison Condition
Gross < Zero band ..........LO is displayed and output.
Final - Preliminary ≦ Net.....................OK is displayed and output.
Final ≦ Net ....................OK, HI are displayed and output.
HI
Final
v a l u e
LO
Ze r o b a n d
Prelimin a r y v a l u e
OK
L a s t page
B l i n k i n g
,
B l i n k i n g
,
B l i n k i n g
,
W e i g h i n g v alue
and
c o m p a r i s o n result