
Use and Care Manual

coat/floor leveler according to the manufacturer’s guidelines. Cover the ground surface with a minimum 6 mil
(0.15mm) plastic poly sheeting moisture barrier.
Warning: This product should not be installed over carpet. Installation over carpet will void the
warranty. When installed in rooms with direct sunlight, during the peak hours of sunlight, the use of
blinds/shades or drapes to avoid prolonged direct sunlight period is recommended.
Excess moisture exposure can damage the flooring and breed mold/mildew growth on subfloor and walls. This
is not considered a defect in the flooring.
If considering Radiant heat, flooring can be installed over 1/2” (12mm) embedded radiant heat. Radiant heat
systems must have a minimum of 1/2” (12mm) separation from the product. Maximum operating temperature
should never exceed 85°F (30°C). Use of an in-floor temperature sensor is recommended to avoid overheating.
Before installing over new radiant heat systems, operate the system at maximum capacity to force any residual
moisture. The maximum moisture content should be 2.5% (CM method). Before starting the installation, turn
the heat off for 24 hours before, during, and 24 hours after installation. During installation, make sure the
temperature in the room of installation is between 60-80°F (15-25°C). After installation, the system can be
turned on and the temperature can be raised gradually (5°F per hour) until returning to normal operating
conditions.
Warning: Electric heating mats that are not embedded into the subfloor are not recommended for use
underneath the flooring. Using electric heating mats that are not embedded and applied directly
underneath the flooring will void the warranty.
Installation
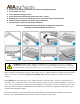
•Set spacers to allow an expansion gap of 1/2” (10mm) around the perimeter of the subfloor for movement or
product expansion. Do not remove the spacers until the installation is complete. The expansion gaps should be
covered by molding (Figure A).
•Measure the length of the room in inches. Divide it by the length of the planks. If the resulting number is less
than 8”, you will need to cut your first plank accordingly to avoid having planks that are less than 8” on the
opposite end of the room.
Note: Use saw to cut plank to size. If cutting with a jig saw, the wood surface should be turned down. If cutting
with a hand saw, the wood surface should be face up.
•Installation should start in a left-hand corner and proceed from the wall with the tongue facing the wall.
Position the first plank 6” (15.2cm) from the starting wall but not up against the spacers (Figure B). The entire
row will be moved against the spacers in a later step.
•Interlock the next plank at the end joint of the first plank by inserting the tongue into the groove of the
adjoining planks. Square the joints by tapping the long edge with the profiled tapping block and soft-faced
hammer. Next, lightly tap down on top of the plank at the short joint with the soft-faced hammer (Figure C).
Continue this method to finish the first row. Cut the last piece of the row to fit, and allow for the 1/2” (10mm)
expansion gap. Install as above.