
User's Manual


4 Installing 7signal Sapphire 8
7signal Ltd, Panuntie 6, FI-00620 HELSINKI, FINLAND, +358 40 777 7611, info@7signal.com, www.7signal.com
7signal Sapphire Deployment Guide Release 3.1
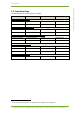
o 100% of space for OS installation, mount point “/” (LV1)
Physical volume on RAID5 has two logical volumes
o 80% of space for databases, mount point /opt/7signal/databases (LV2)
o 20% of space for database log files, mount point /opt/7signal/database-
logs (LV3)
Sapphire installation
o Sapphire components are installed to /opt/7signal (on LV1)
o Sapphire databases are installed to /opt/7signal/databases (on LV2) and
database logs are directed to /opt/7signal/database-logs (on LV3)
(7signal DBMS installer asks for location of databases and database log files).
4.2 Setting up Eyes
Step 1: Connect to Eye unit:
By default Eye units have IP address 192.168.0.1 with net mask 255.255.255.0.
Connect to address 192.168.0.1 as root by using a SSH client.
# ssh root@<Eye IP address>
The root default password is ‘7signal’. It is strongly advised to change this password as it is
factory default for every single Eye unit.
Step 2: Configure IP settings:
Setting IP address of the management interface:
# 7config ip set addr <IP address>
Setting network mask of the management interface:
# 7config ip set mask <dot-format-mask>
Setting port of the management interface (optional):
# 7config ip set port <port>
Verify the settings with the ‘show’ command:
# 7config ip show
Step 3: Reboot Eye unit:
Reboot the Eye unit to make the changes effective:
# reboot