
User's Manual


53
Testing multiple wlan networks in one test profile
One monitoring station may test multiple access points that provide multiple wlan networks.
In the context of test profiles wlan networks are referred as ESSIDs (essid later in the text).
Testing on multiple essid’s is achieved by either copying and editing individual test element
in a profile or copying a complete template to pasted to an existing profile.
Whenever it is possible to define an essid to a test element there may be exactly one essid
per element or no essid at all. The latter means that the test in question shall be executed
against all access points managed by the monitoring station. The former limits the access
points to ones that have the essid and are managed by the monitoring station.
Operations on Templates
Templates are for copying and editing. There are two different supported methods for that,
“Duplicate” to make a fresh copy of the sample profile and “Copy as essid” that adds the
template profile to an existing test profile.
Duplicate
1. Select “Manage | Test Profiles” to open the management tree on the left.
2. Choose the appropriate template and right-click for the submenu.
3. Select “Duplicate” to open the Test Profile pane.
4. Give a name to the new Test Profile.
5. Bound Tests window is for informative purposes here only. Editing if desired is
available later.
6. In “Common Values” one may enter test parameters that apply to every test in the
profile.
7. Saving options
a. Select “Cancel Changes” to undo changes.
b. Select “Keep Changes to save the intermediate work.
c. Select “Save All Changes” to finalize the work on this pane.
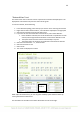
Copy as essid
The pre-requisite here is to have existing test profiles that shall be the target for pasting all
elements in the template. This is one form of cut&paste operation.
1. Select “Manage | Test Profiles” to open the management tree on the left
2. Choose the appropriate template and right-click for the submenu
3. Select “Copy as essid” (no visible results)
4. Right-click on Test Profile icon and select “Insert essid” to open essid pane on the
right
5. Insert an existing essid name
6. Optionally, insert other common parameters in the table “Common Values”
7. Select “Save All Changes” to insert the test elements in the template to the test
profile as individual essid. All tests under the essid contain the same parameters,
such as Sonar etc.