EPSON Stylus C86 Quick Guide Basic Printing Printing Photos Replacing Ink Cartridges Solving Problems Requirements and Notices CPD-17832 4049262-00 xxx
Contents Basic Printing . . . . . . . . . . . . . . . . . . . . . . . . . . . . . . . . . . . . . . . . . . . 3 Loading Paper . . . . . . . . . . . . . . . . . . . . . . . . . . . . . . . . . . . . . . . . . . . . . 3 Printing in Windows . . . . . . . . . . . . . . . . . . . . . . . . . . . . . . . . . . . . . . . . 4 Printing with Macintosh OS X . . . . . . . . . . . . . . . . . . . . . . . . . . . . . . . . . . 6 Printing with Macintosh OS 9 . . . . . . . . . . . . . . . . . . . . . . . . . . . . . . . .
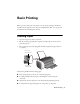
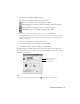
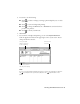
Basic Printing Before you start, make sure your printer is set up and its software is installed as described on the Start Here sheet. If you’re using Windows NT® 4.x, see page 10 for instructions on installing the software. Loading Paper 1. Open the output tray and its extension. 2. Fan the stack of paper and place it against the right edge of the slot. Don’t push the paper in. 3. Press in the side of the left edge guide and slide it against the paper (but not too tightly).
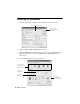
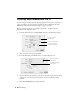
Printing in Windows 1. From the File menu, click Print. You see a Print window like this one: Select your printer here Click here to open your printer software 2. Make sure Epson Stylus C86 Series is selected. 3. Click the Properties or Preferences button. (If you see a Setup, Printer, or Options button, click it. Then click Properties or Preferences on the next screen.) 4.
. Select from these Quality Option settings: Draft: For rough drafts with reduced print quality Text: For text-only documents with higher text quality Text & Image: For documents with text and images with higher quality Photo: For photos and graphics with good quality and speed Best Photo: For photos or graphics with high print quality Note: For more information about printer settings, click the ? or Help button.
Printing with Macintosh OS X If you’re using an OS X compatible printing application, follow the steps below to print a document. (If you’re using an application that’s compatible only with Macintosh® Classic mode, follow the steps on page 8 instead.) Before you begin, make sure you added your printer to the Print Center as described on the Start Here sheet. 1.
6. Select the following Print Settings as necessary: Select the type of paper you’re using Select Color or Black ink Select higher quality or faster printing (if available) Click Print Note: For more information about printer settings, click the ? or Help button. The Quality setting on this screen gives you the best combination of quality and print speed for most prints. For instructions on printing at the highest quality (Photo RPM), see page 17. 7. Choose other settings as necessary, then click Print.
Printing with Macintosh OS 9 Before you begin, make sure you selected your printer in the Chooser as described on the Start Here sheet. 1. From the File menu, select Page Setup. Select the following settings: Make sure you see C86 Series Select your paper size Select your document or image orientation 2. After you choose your settings, click OK. 3. From the File menu, select Print. 4.
5. You can also do the following: ■ Click to reduce or enlarge your image, print multiple layouts, or add a watermark. ■ Click ■ Click to change the Print button to Preview. You can then click it to preview your printout. ■ Click to turn on background printing. to check your ink levels. 6. Click Print. 7. If you turned on background printing, you can select Epson Monitor IV from the Application menu in the upper right corner of your screen.
Installing Printer Software for Windows NT 4.x Before you begin, complete the instructions on the Start Here sheet for setting up your printer. For instructions on installing printer software in Windows® XP, Me, 2000, 98, or on a Macintosh, see your Start Here sheet. Note: Use a parallel cable to connect the printer to your computer. Windows NT 4.x does not support a USB connection. 1. Turn on your computer. (Make sure your printer is still on.) 2. Put the Epson CD-ROM in your drive. 3.
Printing Photos You can print beautiful snapshots and enlargements with or without white borders. See the section on loading paper, below, then see one of the following sections for instructions on printing photos in Windows or Macintosh. Loading Paper Here are the recommended papers and sizes for printing photos: Paper name Sizes Paper Type or Media Type setting Epson DURABrite Ink Glossy Photo Paper 4×6 Letter (8.
As with traditional photos, Epson recommends proper care that will minimize color changes and lengthen display life: ■ Frame prints under glass or a protective plastic sleeve to protect them from atmospheric contaminants like humidity, smoke, and high levels of ozone. ■ As with all photographs, keep your prints away from direct sunlight. ■ For proper storage, keep your prints in a photo album or plastic photo storage box in acid-free, archival sleeves commonly available from most camera stores.
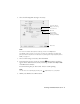
Printing Photos in Windows 1. Start your photo program and open your photo file. 2. Open the File menu and click Print. Make sure your printer is selected, then click Properties or Preferences. (If you see a Setup, Printer, or Options button, click it. Then click Properties or Preferences on the next screen.) You see a window like this one: Select Photo or Best Photo Click here for photos without white borders 3. Select Photo or Best Photo as the Quality Option setting. 4.
Customizing Your Photo Settings 1. On the Main tab, click the Advanced button in the bottom right corner of the window. If you see a warning note, click Continue. 2. Select the following advanced settings as necessary: Select a color management method (To choose No Color Adjustment, click ICM first) Click here to select Photo RPM (5760 × 720) for the best print quality on certain paper types Select Print Options as necessary Note: For the highest print quality, select Photo RPM.
4. Select the following page layout settings as necessary: Select image position options here Select image resizing options here Select borderless printing options here Note: Some layout settings may not be available, depending on other settings you choose. 5. Select image position or resizing options as necessary. These affect only your printed image, and are not available for borderless printing. 6.
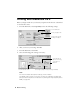
Printing Photos on Macintosh OS X 1. Start your photo program and open your photo file. 2. From the File menu select Page Setup. You see a window like this one: Select Stylus C86(Sheet Feeder Borderless for photos without white borders 3. For pictures without white borders, select Stylus C86(Sheet Feeder Borderless) in the Format for pull-down list. 4. Select your Paper Size. 5. Select portrait or landscape as the orientation setting. 6. Click OK. 7. Open the File menu and click Print.
8. For pictures without white borders, select Stylus C86(Sheet Feeder Borderless) in the Printer pull-down list. 9. Select Print Settings from the list. 10. Select the Media Type for the paper you’re using. 11. Select Quality (for higher quality) or Speed (for faster printing) using the slider. 12. Do one of the following: ■ Click Print. ■ If you want to print at a higher resolution or use special settings, continue with the steps in the next section. Customizing Your Photo Settings 1. Click Advanced.
3. If you’re printing photos without white borders, select Expansion from the pull-down list. You see a window like this one: 4. Adjust the Expansion slider to choose Min, Max, or the in-between setting. Min retains the entire image in your print, but there may be a small white edge on the borders of the print. Max expands the image to ensure that there are no unprinted edges, but the edges of the image may not appear in the print. 5. Click Print. Printing Photos on Macintosh OS 9 1.
4. For photos without white borders, click the Borderless checkbox. Read the message and click OK. Click the Expansion button. You see a window like this one: Adjust the Expansion slider to choose Min, Max, or the in-between setting. Min retains the entire image in your print, but there may be a small white edge on the borders of the print. Max expands the image to ensure that there are no unprinted edges, but the edges of the image may not appear in the print. Then click OK. 5.
Customizing Your Photo Settings 1. On the printer settings window, select Custom, then click Advanced. 2. Select these advanced settings as necessary: Select color management settings here Click here to select Photo RPM (5760 × 720) for the best print quality on certain paper types Select various print options here Note: For the highest print quality, select Photo RPM. Please note that printing will take longer in this mode. 3. Click OK to save your settings, then click Print.
Replacing Ink Cartridges When the red ink light flashes, one or more ink cartridges are low on ink. When the red ink light stays on, you need to replace the cartridge(s). When you print, you’ll also see a message on your screen telling you which cartridge is low or empty. Purchasing Ink Cartridges Use these Epson ink cartridges within six months of installing them and before the expiration date on the package.
Ink Cartridge Precautions Warning: Keep ink cartridges out of the reach of children. If ink gets on your hands, wash them thoroughly with soap and water. If ink gets in your eyes, flush them immediately with water. Don’t remove the cartridge label, or ink will leak. Don’t remove the green IC chip from the cartridge. Installing a cartridge without an IC chip can damage the printer. Avoid touching the green IC chip, as this can damage the ink cartridge.
Removing and Installing Ink Cartridges Be sure you have a new ink cartridge before you begin. Once you start replacing a cartridge, you must complete all the steps in one session. 1. Make sure the printer is turned on (the green power light should be on, but not flashing). Then open the printer cover. 2. Press and release the ink button. The print head moves to the left, and the cartridge that needs to be replaced stops under the ink out mark. The power light begins to flash.
4. Open the cartridge cover. 5. Squeeze the back tab of the empty cartridge as you lift it out of the printer. Don’t take the used cartridge apart or try to refill it. Warning: If ink gets on your hands, wash them thoroughly with soap and water. If ink gets into your eyes, flush them immediately with water.
6. Before you remove the new cartridge from its package, shake it four or five times. 7. Unwrap the new ink cartridge and lower it into the holder. Push down gently until the cartridge is firmly seated. Caution: Don’t touch the green circuit board on the front of the cartridge; you may inhibit normal operation and printing. Don’t touch the green part 8. If you need to replace other ink cartridges, repeat steps 5 through 7 before continuing with step 9.
9. Close the cartridge cover. 10. Close the printer cover and press the charging the ink delivery system. ink button. The printer begins The green power light flashes and the printer makes noise. Charging takes about half a minute. When it’s finished, the green power light stops flashing and stays on, and the red light goes out. Caution: power light is flashing, unless the Never turn off the printer while the green printer hasn’t moved or made noise for more than 5 minutes.
Solving Problems Checking the Printer’s Lights Lights Explanation Green power light flashes The printer is receiving a print job, replacing an ink cartridge, charging ink, or cleaning the print head. Red is on Your paper ran out. Load more paper, then press the paper button to resume printing. paper light Red paper light flashes Paper is jammed in the printer. Press the paper button to eject the paper.
Problems and Solutions You see banding (light lines). ■ Make sure the paper Type or Media Type setting matches the paper you’re using. ■ The print head nozzles may need cleaning; follow the instructions below to clean the print head: 1. Make sure the printer is turned on but not printing, and the red light is off. ink 2. Windows: Right-click the printer icon on your taskbar (in the lower right corner of your screen). Select Head Cleaning.
4. When the green power light stops flashing, make sure paper is loaded in the printer, then do the following: Windows: Click Print Nozzle Check Pattern. Then click Print. Macintosh: Click Confirmation, then click Next. The nozzle check pattern prints. 5. If the nozzle check pattern has no gaps or white lines as shown, click Finish. If the pattern has gaps, click Clean to clean the print head again.
Where To Get Help Epson provides technical assistance 24 hours a day through the electronic support services and automated telephone services listed below. Service Access World Wide Web From the Internet, you can reach Epson Support at http://support.epson.com. At this site, you can download drivers and other files, look at product documentation, access troubleshooting information, and receive technical advice through e-mail.
Requirements and Notices Windows System Requirements ■ A Microsoft® Windows compatible PC with a Pentium®-equivalent processor (233 MHz or faster recommended) ■ Windows 98 SE, Windows Me, Windows 2000, Windows XP, or Windows NT 4.
Important Safety Instructions Before using your printer, read these safety instructions to make sure you use it safely and effectively: ■ Be sure to follow all warnings and instructions marked on the printer. ■ Use only the type of power source indicated on the printer’s label. ■ Connect all equipment to properly grounded power outlets. Avoid using outlets on the same circuit as photocopiers or air control systems that regularly switch on and off.
■ Unplug the printer and refer servicing to qualified service personnel under the following conditions: If the power cord or plug is damaged; if liquid has entered the printer; if the printer has been dropped or the case damaged; if the printer does not operate normally or exhibits a distinct change in performance. Adjust only those controls that are covered by the operating instructions. Ink Cartridge Safety Instructions ■ Keep ink cartridges out of the reach of children.
FCC Compliance Statement For United States Users This equipment has been tested and found to comply with the limits for a Class B digital device, pursuant to Part 15 of the FCC Rules. These limits are designed to provide reasonable protection against harmful interference in a residential installation. This equipment generates, uses, and can radiate radio frequency energy and, if not installed and used in accordance with the instructions, may cause harmful interference to radio or television reception.
Declaration of Conformity According to 47CFR, Part 2 and 15 for Class B Personal Computers and Peripherals; and/ or CPU Boards and Power Supplies used with Class B Personal Computers: We: Epson America, Inc. Located at: MS: 3-13 3840 Kilroy Airport Way Long Beach, CA 90806 Telephone: (562) 290-5254 Declare under sole responsibility that the product identified herein, complies with 47CFR Part 2 and 15 of the FCC rules as a Class B digital device.
Epson America, Inc. Limited Warranty What Is Covered: Epson America, Inc. (“Epson”) warrants to the first retail purchaser that the Epson printer covered by this limited warranty statement, if purchased and operated only in the United States or Canada, conforms to the manufacturer’s specifications and will be free from defects in workmanship and materials for a period of one (1) year from the date of original purchase.
label or serial number be removed or should the product fail to be properly maintained or fail to function properly as a result of misuse, abuse, improper installation, neglect, improper shipping, damage caused by disasters such as fire, flood, and lightning, improper electrical current, software problems, interaction with non-Epson products, or service other than by an Epson Authorized Servicer. If a claimed defect cannot be identified or reproduced, you will be held responsible for the costs incurred.
Copyright Notice All rights reserved. No part of this publication may be reproduced, stored in a retrieval system, or transmitted in any form or by any means, electronic, mechanical, photocopying, recording, or otherwise, without the prior written permission of Seiko Epson Corporation. The information contained herein is designed only for use with this Epson product. Epson is not responsible for any use of this information as applied to other equipment.
Printed in xxxxxx xx.