
User's Manual

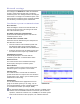
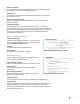


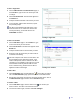
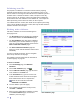
Table Of Contents
- C-Series User Guide
- Safety information
- Regulatory compliance
- Overview
- Software installation
- Typical workflows
- Startup and shutdown
- Installing system security updates
- Managing the 3M™ SelfCheck™ System
- Home page
- Basic administration
- Advanced administration
- General maintenance
- Solving problems
- Obtaining service and supplies
- Appendix A: Email notification messages

44 ⎟
Validating item IDs
The purpose of a validator is to minimize network traffic by rejecting
invalid ID formats before the ID is sent to the circulation system. It can
also be useful for screening out invalid IDs when the SelfCheck system is
in Offline mode. A validator is similar to a filter, except that it can only
accept or reject an ID. Therefore, it does not include action commands. If
the ID matches one of the validators in the validator list, it is accepted for
further processing. If the ID does not match, the ID is rejected.
If no validator has been created, then all IDs are accepted for processing.
If one or more validators have been created, then only IDs that match the
validator constraints are accepted.
Working with validators
Like filters, validators are created and managed on
three page levels:
The ID Settings page lists all filters and validators
and contains a link to the Item Validators page.
The Item Validators page lists all item validators
and enables you to test the validators as a group.
Here you can also delete validators and access the
Add and Edit Item Validator pages.
The Add and Edit Item Validator pages are
where you create and edit validators and test them
individually.
To return to a higher-level page, use the navigation
bar in the top left corner of the page.
The validator constraint commands are described in
“
ID filter language” on page 46.
ID Settings page
To create a validator
1 On the ID Settings page, click Edit Item
Validators.
2 On the Item Validators page, click .
3 On the Add Item Validator page, type the name
of the validator in the Name box.
4 In the Constraints box, type one or more com-
mands that define the ID format to be accepted.
Each command must be on a separate line.
There are two constraint commands:
CONTAINS and LENGTH.
5 Test the validator. (See next page.)
6 If the validator test shows the result you want,
click Add … Validator.
7 When you have added all the validators you want,
on the Item Validators page, test the list of
validators. (See next page.)
Item Validators page