
Overview of Primary Product

Section 3: MAINTENANCE
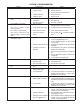
1) At least every six months you should check the time of day setting. Power outages of two (2) hours or less will not affect the time clock as the control
valve has the ability to hold the correct time of day due to a capacitor on the printed circuit board. Power outages of more than two (2) hours will
require the resetting of clock to the correct time. Refer to Page 2-5 to resolve.
2) If your CBF Series Residential Backwash Filtration System contains activated carbon, replacement is required if the taste and odor being reduced
reappears in the treated water or if pressure drop due to fouling of the media becomes excessive.
3) Filter Sand typically lasts an indefi nite period of time. It may be necessary to replace them, if the pressure drop across the fi lter bed becomes too
great or fi ltration results drops.
4) Neutralizer media: Calcite must be replenished at least annually. At the time of installation, it is advisable to mark the level of the media on the
outside of the tank. At a later date you can shine a bright light through the tank comparing the current level with the mark. If the level is down by
more than three (3) inches, add media back to the original mark.
TO REPLENISH (REBED) MEDIA:
CAUTION
To reduce the risk associated skin, eye, and respiratory tract irritation from gravel and fi lter media during installation:
• Gravel and several types of fi lter media may be used in this product, depending upon the application. During installation, dust may cause irritation to skin,
eyes, and respiratory tract.
• Utilize a NIOSH-approved dust fi lter mask, protective gloves, and appropriate eye protection when handling and pouring gravel and fi lter media.
• To request an MSDS relating to this product call 203-238-8965 or visit the web at http://solutions.3M.com/WPS/Portal/3M/EN_US/MSDS (click MSDS
search). For emergencies, call 800-364-3577 or 651-737-6501 (24 hours).
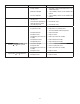
1) Pressure must be relieved on water treatment system by turning the bypass valve to the bypass position. Then initiate an immediate manual regen-
eration cycle as described on Page 2-5.
2) Disconnect the power cord from the electrical outlet.
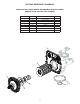
3) Remove the drain line for the control valve and clamp assembly around the valve body and fl anged tank. Disconnect the bypass from the control
valve and separate. Next lift the control valve off the media tank.
4) Using fl exible tubing, insert down the distributor tube and siphon the water from the media tank to aid in adding or replacing fi lter media. Cover the
distributor tube with the extension tube and cap to prevent media from entering the distributor tube.
a. If using Calcite or Neutralizer media, add the media you are using to the line on the side of the media tank. Then refi ll the media tank with
water utilizing a hose or clean bucket. Proceed to Step # 5.
b. If utilizing Activated Carbon media that needs to be entirely replaced you will need to empty the media tank of both the gravel underbed and
media. The use of a garden hose and several buckets to place the spent media into is helpful. The changing of the media should take place
outdoors as this can be messy. Once the media tank is emptied, you can rinse the media tank out and inspect the distributor for damage or
fi nes being lodged into the slots of the basket assembly. Clean as required before loading the media with gravel or fi lter media. Place the
distributor into the media tank and ensure it is in the dimple on the bottom of the media tank. Utilizing the extension tube, red cap and funnel
place over the distributor tube and into the opening of the fl anged tank. Next take the correct amount of gravel and dump into the media tank.
Hold the distributor tube and gently shake the media tank to level the gravel in the media tank. Next load the fi lter media into the media tank
to the proper level. This can be determined by observing the media level line on the outside of the media tank. Gently shake the media tank to
level the media. Using a hose or clean bucket fi ll the media tank with water to help saturate the fi lter media before placing the control valve on
the media tank. Using a clean rag or paper towel, wipe the opening of the media tank to remove any media fi nes before attaching the control
valve. Dispose of spent media in accordance with federal, state, and local regulations.
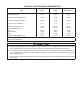
5) Reattach the control valve to the media tank by sliding the control valve pilot tube adapter over the distributor tube. Let the control valve rest on the
fl anged portion of the media tank. Then using a swift and downward motion push the control into the opening of the media tank until seated. Do not
rock the valve into position as rolling or pinching of the o-ring can occur. Reinstall clamp as described Section 2 Step 5 (Figure 2).
6) Reattach the bypass valve to the control valve and slowly open the bypass. Allow the Backwash Filtration System to fi ll with water and set for the
required time period. Refer to Figure 5, page 2-4 to determine the amount of time to wait before backwashing can occur.
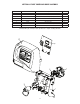
7) Plug the control valve into the electrical outlet and set the time of day on the display.
8) Once the saturation time has been achieved, manually initiate an immediate regeneration (see Page 2-5). Backwash the media until the water runs
clear. Observe the color of the water in the drain line discharge to determine if is has washed long enough. The water should be fairly clear and absent
of fi nes before quitting the cleaning process. If not, proceed to regenerate the unit again until the water runs clear to the waste drain.
9) Re-bedding of media tank is now complete.
3-1