
Operation Manual

UP Plus
3D Printer User Manual
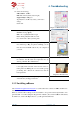
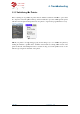
22. Select
the following:
Z Resolution:
“0.2mm”
Fill:
Hollow Honeycomb (bottom right)
Support Angle:
30 degrees
Typically
these are the only values you’ll need to
change.
Click “OK”
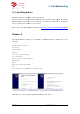
23.
Select the overall print quality
Normal
= Average quality
Fine
= Good quality and takes longer
Fast
= Draft quality and takes less time
Now click “OK” to start your first print!
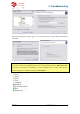
24.
The software will now spool the print job to printer.
Once finished spooling, the printer will
then disconnect the USB cable from your computer if
you wish.
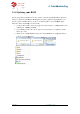
25.
The printer will now start to preheat the
the extruder. You can watch the temperature raise by
clicking “3D Print” and “Maintenance”
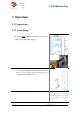
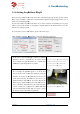
26. Make sure the
extruder vent
to the right).
This is located on the left side of the e
truder print head.
Having the door closed with speed up
pre-
heating time on both the extruder head and the
heated platform.
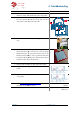
27. Onc
e the printer has finished printing
and break away the support material.
3.1.2 Installing software
Visit
www.3DPrintingSystems.com/support
and install the software.
Windows:
Start the UPx.xx setup.exe file and install it to the specified directory (Default is
gram files/UP
” or for 64bit computers Program files x86
the UP drivers, and the UP sample files into your Program files/UP folder.
4.
Troubleshooting
3D Printer User Manual
v 2013.6.10
the following:
“0.2mm”
Hollow Honeycomb (bottom right)
30 degrees
these are the only values you’ll need to
Chapter 3.3.6 Print Preferences
Select the overall print quality
= Average quality
= Good quality and takes longer
= Draft quality and takes less time
Now click “OK” to start your first print!
The software will now spool the print job to printer.
Once finished spooling, the printer will
beep, you can
then disconnect the USB cable from your computer if
Chapter
The printer will now start to preheat the
platform and
the extruder. You can watch the temperature raise by
clicking “3D Print” and “Maintenance”
extruder vent
door is closed (turn lever
This is located on the left side of the e
x-
Having the door closed with speed up
heating time on both the extruder head and the
Chapter 4.1 Extruder Vent
e the printer has finished printing
remove the part
and break away the support material.
3.1.2 Installing software
www.3DPrintingSystems.com/support
to download the latest software for MAC and Windows
Start the UPx.xx setup.exe file and install it to the specified directory (Default is
” or for 64bit computers Program files x86
\UP”). Note: This insta
lls the UP software,
the UP drivers, and the UP sample files into your Program files/UP folder.
Troubleshooting
Chapter 3.3.6 Print Preferences
Chapter
4. Printing
Chapter 4.1 Extruder Vent
to download the latest software for MAC and Windows
Start the UPx.xx setup.exe file and install it to the specified directory (Default is
“Pro-
lls the UP software,