
User Guide
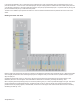
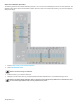
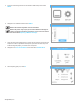
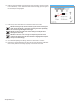
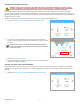
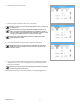

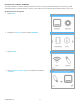
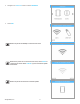
Table Of Contents
-  Introduction
-  Important Safety Information
-  CubePro 3d Printer Features and Benefits
-  At a Glance
-  Specifications and Requirements
-  Unpacking and Setting up Your CubePro
-  Printing Your Creation
-  Finishing Your Creation
-  CubePro Software
-  Operation Procedures
-  CubePro Maintenance
- Restoring Roughness to the Print Pad
- Cleaning the Jet Wiper
- General Cleaning
- Adjusting the Jet Wiper Assembly
- Calibrating the Print Pad
- Calibrating the Z-Gap And Print Pad Level
- Calibrating the Offset Jets
- Calibrating the Wipe Function
- Testing the Print Jets and Extruders
- Moving the Print Jets
- Updating the CubePro Firmware
- Replacing Fuses
- Lubricating The Bearing Rods
- Error Codes
- Contacting Support
-  Cubify Sustainability Program

693D Systems, Inc.
5. Insert the mass storage device into the CubePro USB inlet port and select
PRINT.
6. Navigate to the calibration le and select PRINT.
NOTE: The lename may differ from the illustration.
NOTE: The printer may require you to install additional cartridges or
replace a cartridge. Follow the instructions on the screen and refer to
the section titled Replacing A Material Cartridge.
7. Once the printer has nished printing, remove the print pad from the printer and
inspect the scales. If adjustments are required, proceed to the next step. If the
scales are aligned properly, no further action is required.
8. Navigate to the Print Jet Calibration screen and select OFFSET JETS.
9. When adjusting print jet 2, select B.