IMPORTANT Read before flying! Operation Manual
Contents 01 03 04 06 Meet IRIS Parts Charger Propellers 07 11 12 13 18 18 19 19 Learn to Fly Safety Altitude Hold Mode First Flight Stabilize Mode Loiter Mode Return-to-Launch Mode Autonomous Mode and Missions 21 Specifications and Resources 22 Learn More and Support
Meet IRIS. Thank you for purchasing IRIS. IRIS is an autonomous quadcopter and personal aerial imaging platform powered by open-source hardware, software, and firmware. Please read this manual carefully before your first flight and pay close attention to safety information. Happy flying! ! Important note: When using a GoPro with IRIS, always ensure that the WiFi on the GoPro is turned OFF.
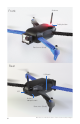
Front Antenna Safety button Front arms (blue) Rear USB port LED Battery compartment Rear arms (black) 02 IRIS does not include the GoPro frame shown in these images.
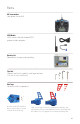
Parts RC transmitter Your direct link to IRIS 3DR Radio With micro-USB and Android OTG ground station adapters Battery kit Power pack, charger, and guard bag Tool kit Wrench and small, medium, and large hex keys (1.5 mm, 2 mm, and 3 mm) Red legs For extra visibility (optional) Use the small (1.5 mm) hex key to remove the set screw in the bottom of the leg. Slide out the leg to remove it, and replace with the new leg. Replace the set screw and fasten until it sits flush with the surface.
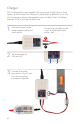
Charger IRIS is powered by a rechargeable lithium polymer (LiPo) battery. Store battery at half charge then charge fully before flying. Batteries must ship at half charge, so please charge before your first flight. Each full battery provides 10 to 13 minutes of flight time. 1 Connect charger to the power adapter cable and a wall outlet. Connect the red cable to the + port and the black cable to the - port. + – 2 Set the charger to LiPo and 3A. LiPo 3 Connect the white connector to the 3S port.
4 Secure battery inside the guard bag while charging. Charge until the status indicator displays green. Charging ! Complete Battery Safety Protect battery from extreme heat, extreme cold, puncturing, and flammable surfaces. Always transport, charge, and store the battery in the guard bag. Charge battery using a designated LiPo balance charger only. Always monitor battery while charging. Flying with a low battery is a safety risk and can render the battery unusable.
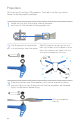
Propellers IRIS uses two SF and two SFP propellers. To attach, find the rings shown below inside the propeller package. 1 Select the ring with the smaller internal diameter and insert it into the back of the propeller hub. 2 Add SFP propellers to the front-left and Use the wrench to remove the nut and washer from the motor. back-right motors and SF propellers to the front-right and back-left motors with the writing on the propellers facing up.
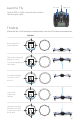
Left Stick Learn to Fly left stick right stick Control IRIS in flight using the transmitter’s left and right sticks. Left Stick Throttle Left Stick Left Stick Move the left stick forward and backward to control altitude and acceleration. left stick Left Stick Before takeoff, set stick fully down. Take off by raising stick halfway to center. Left Stick To increase altitude, raise stick slowly. To maintain altitude, set stick to center position. Lower stick to decrease altitude.
ver + Land ver + Land Yaw wer just slightly wer just slightly hover Move the left stick horizontally LeftStick Stick to rotate IRIS and change orientation. Left hover For a slow rotation, move the stick slightly away from the center in either direction. Moving the stick farther from the center creates a faster rotation. Left Left left stick ft Yaw t Yaw Move stick to the left to rotate counterclockwise. ght Yaw ght Yaw Move stick to the right to rotate clockwise.
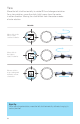
Pitch and Roll The right stick allows you to control IRIS’ position in the air. Move the right stick to tell IRIS to move in that direction: forward (toward the blue arms), back (toward the black arms), left (toward the left arms), or right (towards the right arms). How far you move the stick from the center before releasing it tells IRIS how fast to move. right stick Move stick forward to fly forward. Forward Forward Forward Forward Back Move stick back to fly backward. Move stick left to fly left.
Flight Modes ze Use the two switches above the right stick to select a flight mode. Set the right switch in the up position to select the group of modes shown in white on the transmitter, or set the right switch in the down position to select the group of modes shown in blue. After selecting a group of modes using the right switch, set the left switch in the up, center, or down position to select a mode. Both switches must be set to Stabalize Stabalize position to select the correct a mode.
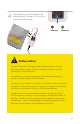
! Flight Safety IRIS has powerful motors and high-speed propellers. Never place your hands near propellers while IRIS is armed or the safety button displays solid red. Always press the safety button until it displays blinking red before handling. Always fly in an open area away from people and buildings; do not attempt to fly indoors or in a confined space. Do not fly over people, near airports, or in any situation that could pose a hazard to those around you.
Altitude Hold Mode (ALT) Allow IRIS’ autopilot to help you fly by engaging altitude hold mode (ALT). This autopilot-assisted flight mode maintains altitude automatically. Set the left stick to center, and IRIS will hover at the current altitude. Adjust altitude and orientation with the left stick, and navigate with the right stick. To select altitude hold mode, set the left mode switch to center and the right switch to down (center/down).
First Flight Select an open area for flying, away from people and buildings, and remember to bring the Flight Checklist, wrench, and a fully charged battery. Determine the boundaries of your flying area before takeoff, and select a level, unobstructed space as a launch point. Follow these preflight and postflight steps in the order shown here and on the Flight Checklist every time you fly. Preflight 1 Check IRIS.
2 Power on transmitter. If the left stick is not fully down, the transmitter will display an alert message. Ensure the transmitter is always turned on while IRIS is powered. If communication with the transmitter is lost, IRIS will initiate an automatic recovery landing. ! 3 Connect battery. Press the sides of the battery compartment together and rotate the door down. Insert battery and attach the yellow connectors.
4 Press safety button. Press the safety button until it is solid red. IRIS is now live. Do not handle IRIS while the safety button is solid red and IRIS is live. Always press the button until it displays blinking red before approaching propellers. Stand back! ! Inactive, safe to handle 5 Check LED. SCALE 1 : 2 Check the LED to view the status of IRIS. Wait to proceed until you see the blinking blue light indicating that you’re ready to fly.
Left Stick Left Stick Flight Left Stick L Take off by raising the left stick halfway to center. L Gain altitude by raising the left stick. L Hover by setting the left stick to center. L Rotate counterclockwise and clockwise by moving the left stick left and right. Left Stick Left Stick R R R Release the right stick to level IRIS. Fly forward, backward, left, or right by moving the right stick in the Left Stick direction you want to fly. L Slowly lower the left stick to descend.
Postflight 1 2 Disarm motors. L 3 After landing, hold the left stick downleft until the motors stop spinning. Disconnect battery. 4 Press safety button. Press the safety button until it displays blinking red to make IRIS safe to handle. Power off transmitter. Your first flight is now complete! : 2 shown here and ReferSCALE to the1steps on the Flight Checklist every time you fly. Tips for New Fliers: Practice these exercises to help you master flight controls.
Stabilize Mode (STB) Stabilize mode (STB) is IRIS’ most acrobatic flight setting. In stabilize, the autopilot provides basic stabilization while allowing full manual control of both sticks. In this mode, you’ll need to make continuous, small adjustments to the left and right sticks to maintain a hovering altitude, navigate, and maintain orientation without autopilot assistance. Select stabilize mode by setting both switches up.
Return-to-Launch Mode (RTL) Stabalize To recall IRIS to the launch point during flight, execute a return-to-launch (RTL) command. RTL automatically returns IRIS to the launch point, and can be used any time you would like to land quickly. RTL requires GPS lock prior to takeoff. Altitude Hold 1 15 meters When commanded to RTL, IRIS will: Loiter 1 Achieve minimum altitude of 15 m (50 ft) or maintain current altitude if above 15 m. 2 Move to launch point and loiter for 5 seconds. 3 Land at launch point.
Missions 1 Perform a pre-mission test flight. Fly a brief test flight in stabilize mode to verify Stabalize that all controls (throttle, yaw, roll, and pitch) are responding normally. Hold 2 Arm in stabilize mode. STB up-up 3 Altitude Hold Switch to autonomous mode (AUTO). AUTO Loiter nomy down-up Launch nomy Hold 4 Raise the left stick slightly to initiate the mission. With the motors armed, switch to AUTO by setting the left switch down and the right switch up.
Specifications Autopilot hardware: Firmware: GPS: Telemetry radio: Motors: Frame type: Propellers: Pixhawk APM:Copter 3.1 3DR uBlox GPS with Compass (LEA-6H module, 5 Hz update) 3DR Radio Telemetry V2 (915 mHz or 433 mHz) 850 kV V 10 x 4.7 SF puller type, counterclockwise rotation (2) 10 x 4.7 SFP pusher type, clockwise rotation (2) Battery: Low battery voltage: Minimum voltage: Maximum voltage: 3 cell 11.1 V 3.5 Ah lithium polymer 10.5 V 9.9 V 3 cell (13.2 V 4 cell) 12.6 V 3 cell (16.
Learn More Visit 3drobotics.com/iris/info to learn about: »» Opening the shell »» Replacing the arms and motors »» Connecting and calibrating an RC system »» Installing software »» Planning a mission »» Updating firmware »» LED meanings and tones Visit copter.ardupilot.com to learn about: »» Additional flight modes »» Configuring parameters, including yaw behavior during autonomous flight, descent speed during RTL, and more Visit planner.ardupilot.com (Mission Planner) and planner2.ardupilot.