
User Manual


7
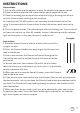
INSTRUCTIONS
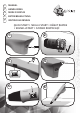
Preperations
1. Put the USB-cable into the adapter and put the adapter into a power source.
2. Place the other end of the USB-cable into the power socket of the pen.
3. Place the drawing mat on top of your template. Using a drawing mat will pre-
vent the filament from sticking to your template.
4. Check that the PLA/ABS switch is set according to the filament you will be
using, if you work with the filament from the box, the button needs to be set to
PLA.
5. Press the power button. The indicator light will start blinking red. The print head
will now start to heat up. After 80 seconds, the pen is heated up and the indicator
light will turn green. At this point the pen is ready for use.
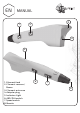
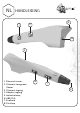
Instructions
1. Place the chosen filament into the filament entrance with a
straight cut end.
2. Press the filament feed button once to grip the filament and
feed it into the pen.
3. After a few seconds, the filament will be fed through to the
front of the pen and the melted filament will come out of the
print head.
4. You can now start your creation. Do not let the print head
touch the drawing mat to prevent any heat marks, it is preferable
to keep a distance of 0.5cm.
5. When you want to stop the flow of filament, press the filament
feed button once more.
6. If you want to have more control over the filament flow, you can opt to operate
the feed manually. For this you keep the filament feed button pressed down while
you work. The filament will stop feeding through as soon as you release the fila-
ment feed button.
7. When you place the pen aside, it will turn off automatically after two minutes.
To continue your work, press the Power button again and wait for the indicator
light to turn green as it heats up again.
Example:
EN