
User Manual

page 15
... print your plane | www.3DLabPrint.com
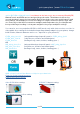
5.2. Fuselage assembly
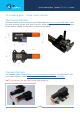
Glue together the fuselage parts with CA glue (position locks and pins will help you) use the
activator. You can use snap knife to clean the shape of printed parts, but mostly this is not
necessary.
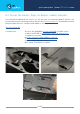
Glue together F1-F6 fuselage parts. Insert pen spring to F7 part, insert canopy lock, glue F7
to fuselage and test a canopy lock functionality. Glue the rest of the fuselage parts F8-F12.
Glue the canopy parts 1-4 together and test the perfect fit with fuselage and canopy lock
functionality.
NOTE: Don‘t glue the tailparts yet !!! (for rudder, elevator and stabilizers proceed to the next
step)
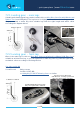
See video guide #5
You will need: CA Glue - medium or similar medium viscosity CA glue
Activator for CA Glue or similar, but gas presurized aerosol is better
1x ballpoint pen spring (a spring from old ballpoint pen will work fine)
Snap knife
Soldering Iron or any hot tool
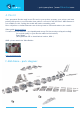
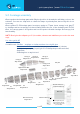
F2
120g/4.76oz
EDF mount ring
26g/0.91oz
equipment holder
15g/0.52oz
F3
110g/4.36oz
F4
170g/6.74oz
F5
140g/5.55oz
60x pins
F6
152g/6.03oz
F7
95g/3.76oz
F8
89g/3.53oz
F10
65g/2.57oz
F11
70g/2.77oz
F12
30g/1.19oz
canopy lock
12g/0.42oz
canopy 1
42g/ 1.66oz
canopy 2
48g/ 1.90oz
canopy 3
42g/ 1.66oz
canopy 4
28g/ 1.11oz
F1
16g/0.63oz
F9
70g/2.77oz
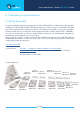
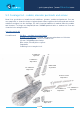
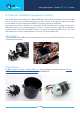
EDF Unit
EDF ring fills the space
betwen mount and unit.
Adjust the length of this
part if needed.
F3
EDF mount ring
F5
108mm/4.25inch
125mm/4.92inch