
User Manual

page 14
... print your plane | www.3DLabPrint.com
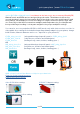
5. Assembling the printed parts
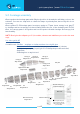
5.1 Wing assembly
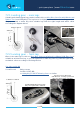
For perfect alignment glue the wing parts L1 and L2 (R1 and R2) on a flat surface. Do the same
with parts L3 and L4 (R3 and R4). Start glueing wing on center section, L1-L4 and R1-R4. Glue
both sides with CA glue together (position locks and pins will help you), use the activator.
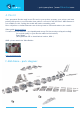
Continue with the rest of the parts of the wing symetrical on boths sides (L5/R5 - L10/R10).
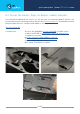
You can use snap knife to clear the printed parts (mostly for the landing gear and ailerons
installation), but usually this is not necessary.
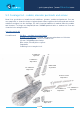
Glue together all parts of flaps L1 and L2 (R1 and R2) and ailerons L1-L4 (R1-R4) and use
suitable 0,8 mm carbon rod or wire as a hinge. Try if you could easily push the 8 mm wing
carbon spar inside the wing slot.
See video guide #4
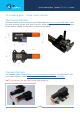
you will need: CA Glue - medium or similar medium viscosity CA glue
Activator for CA Glue or similar, but gas presurized aerosol is better
Snap knife
0,8 mm carbon or steel wire
wing L 1
40g/1.58oz
aileron L 1
19g/0.75oz
flap L 1
18g/0.71oz
R wing completed
flap L 2
18g/0.71oz
aileron L 2
18g/0.71oz
aileron L 3
9g/0.24oz
aileron L 4
3g/0.12oz
wing L 3
50g/1.98oz
wing L 2
9g/0.24oz
wing L 5
83g/3.29oz
wing L 6
63g/2.50oz
wing L 7
44g/1.74oz
wing L 8
35g/1.38oz
wing L 4
63g/2.50oz
wing L 9
15g/0.59oz
wing L 10
3g/0.12oz