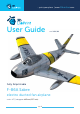
... print your plane | www.3DLabPrint.com User Guide rev. 2018/09 Fully 3d printable F-86A Sabre electro ducted fan airplane scale ~1:7,3, wingspan 1427mm (55.
... print your plane | www.3DLabPrint.com F-86A Sabre – fully printable R/C plane for your desktop 3Dprinter Future of flying - Print your own plane. Speedy guide We’re still trying to move things further, so this project is again full of improvements for better durability, easier assembly, better geometry solution and more..., we hope you enjoy it, although this print may test your abilities and quality of your printer...
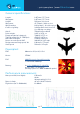
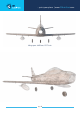
... print your plane | www.3DLabPrint.com General specifications: Length: Wingspan: Height: Wing area: Wing loading: Center of gravity: Airfoil: Print weight: Empty weight (w/o battery): Takeoff weight (2x 3s 3700 lipo): Max takeoff weight: Never exceed speed, VNE: Design maneuvering speed, VA: Stall speed: Powerplant EDF: 1427mm / 55.7 inch 1427mm / 55.7 inch 560 mm / 21.8 inch 45,76 dm2 / 4.92 sq foot 104 g/dm2 / 28 oz at sq foot 248mm (9.
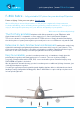
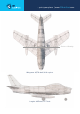
... print your plane | www.3DLabPrint.com F-86A Sabre, History The North American F-86 Sabre, is a transonic jet fighter aircraft. Produced by North American Aviation, the Sabre is best known as the United States‘ first swept wing fighter that could counter the swept-wing Soviet MiG-15 in high-speed dogfights in the skies of the Korean War (1950–1953), fighting some of the earliest jet-to-jet battles in history.
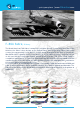
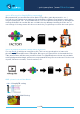
... print your plane | www.3DLabPrint.com Included: 1. STL 3d files Universal STL files designed for use with desktop FMD 3d printers and slicer software such as Simplify3D (recommended) CURA or MatterControl (these STLs are not compatible with Slic3r or Makerware slicers). 2. Factory files for Simplify3D slicer with all our settings, these Factory files include all you need.
... print your plane | www.3DLabPrint.com 4. Gcodes Basic Gcodes prepared for direct use, as universal as possible. Should work with i3 style printers. We cannot guarantee that it will work with your printer, but they‘re 100% compatible with PRUSA i3 ORIGINAL 3d printers. 5. Prepared settings for CURA and MatterControl slicers If you don‘t like Simplify3D for any reason, there is the possibility to use another free slicer. Please check the Help section or the latest Cura settings. 6.
... print your plane | www.3DLabPrint.com Centre of Gravity Wing area: 45,76 dm2 / 4.92 sq foot Lenght: 1427mm / 55.
... print your plane | www.3DLabPrint.com Wing span: 1427mm / 55.
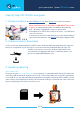
... print your plane | www.3DLabPrint.com Step By Step PDF/VIDEO userguide 1. Choose airplane at www.3Dlabprint.com. Our Facebook for live information. Basic requirements for F-86A Sabre is 200/200/175mm build volume. recommended nozzle size 0.4mm (alternatively 0.35 - 0.5mm), heated bed is very recommended. PLA filament (or PETG, APLA, htPLA, PC-max.... not ABS) and some flex for tires...
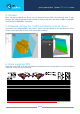
... print your plane | www.3DLabPrint.com option B Factory files Simplify3D (recommended) We prepared all you need in these files (basic FFF profiles, parts layout, and so on...) You can use our settings as a starting point and edit according to your printer needs, print only the spare parts, etc... It should work as it is for most printers, but please go through the settings and edit it as needed. We are not liable for any damage resulting from the use of our settings.
... print your plane | www.3DLabPrint.com option D CURA or MatterControl (considered as the last resort, we recommend Simplify3D) MatterControl and CURA are free and provide good results. The airframe is still strong enough, but don‘t expect the best quality. Both slicers lacks some very useful features, and finer settings, like multiple processes according to Z height, retraction options, layer start, etc.
... print your plane | www.3DLabPrint.com 4. Print it Save generated Gcodes and insert SD card to your printer, prepare your printer and start printing. We prefer to use SD rather than a direct connection via USB. Note: ABS filament is not suitable for this. Scaling the model will lead to unusable result! Note: ninja flex or similar fillaments can stick very hard to PEI based surfaces, be careful...
... print your plane | www.3DLabPrint.com Basic Tips and Advice Please experiment with your extrusion multiplier to achieve the same weights as in the list. HotEnd temperature is very important for a strong result. The reason is the plastic leaving the nozzle has to melt the previous layer to create solid joint. Please try increasing the temperature to find the best value (215° up to 260° Celsius). Turn OFF cooling fan (Heatbreak fan of course has to be left ON).
... print your plane | www.3DLabPrint.com 5. Assembling the printed parts 5.1 Wing assembly For perfect alignment glue the wing parts L1 and L2 (R1 and R2) on a flat surface. Do the same with parts L3 and L4 (R3 and R4). Start glueing wing on center section, L1-L4 and R1-R4. Glue both sides with CA glue together (position locks and pins will help you), use the activator. Continue with the rest of the parts of the wing symetrical on boths sides (L5/R5 - L10/R10).
... print your plane | www.3DLabPrint.com 5.2. Fuselage assembly Glue together the fuselage parts with CA glue (position locks and pins will help you) use the activator. You can use snap knife to clean the shape of printed parts, but mostly this is not necessary. Glue together F1-F6 fuselage parts. Insert pen spring to F7 part, insert canopy lock, glue F7 to fuselage and test a canopy lock functionality. Glue the rest of the fuselage parts F8-F12.
... print your plane | www.3DLabPrint.com 5.3. Fuselage tail - rudder, elevator pushrods and servos Now it‘s a good time to install the tail stabilizers, elevator, rudder and pushrods. You can use snap knife to clean the shape of printed parts. Glue together the horizontal and vertical stabiliser and glue it to the fuselage. UP side of vertical stabiliser is marked. Glue the rudder and elevator. For hinge use shaped 0,8 mm / 14AWG pushrod wire or carbon rod. You can clear the holes using hot wire.
... print your plane | www.3DLabPrint.com 6.1. Servos for aileron, flaps, air brakes, rudder, elevator Proceed with installing all the servos. Use 1,2 mm wire for pushrods. Make Z bend or use your preffered pushrods fixing method. We like these Pushrod Keepers. Thread pushrods and hinge the flaps, ailerons, elevators and rudder in correct position.
... print your plane | www.3DLabPrint.com 7.1 Landing gear - nose, main retracts Top Quality Retracts The best retracts set you can buy for your F-86A Sabre are Electron retracts ER-30eVo with Electron steering system and 4mm leg pins. Great quality, perfect nose leg steering. Great retracts suitable for any plane. The best on the market. Standard Retracts Use standard 33mm x 35mm Servoless Retract with 4mm metal pins. for main legs.
... print your plane | www.3DLabPrint.com 7.2.1 Landing gear - main legs Suitable main landing gear legs can be found in this set Alloy Oleo Strut Set with Wheels and Rubber Tires from Hobbyking. The legs has to be slightly bent to fit into the landing gear slot. Or you can find or make any other suitable legs with the right lenght and wheel offset according the diagram below. 25mm/0.97inch 105mm 4.13inch 4mm pin 7.2.
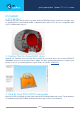
... print your plane | www.3DLabPrint.com 8.1 Electro Ducted Fan propulsion system Our F-86A Sabre was designed for 90mm EDF. We tested it with 6S and 8S Li-Pol and 3-4kg thrust. The use of more powerful drives has not been tested or designed for. We do not take responsibility for using overpowered EDFs. Be careful with the powerplant. You can use hot wire or dremel tool to prepare the EDF holder in the fuselage. Mount your EDF, push it well to the outtake and use screws to secure it in place.
... print your plane | www.3DLabPrint.com Standard Power Dr Mad Thrust 11-Blade Alloy 90mm - standard quality, not so nice sound. Mount strap for 90mm Alloy DPS Fan NOTE: Our Dr Mad Thrust unit arrived without holder, probably you‘ll need it ordered separatelly Mount strap for 90mm Alloy DPS Fan. See video guide #9 You will need: 90mm EDF for 6s-8S Li-Pol, 3-4kg thrust, not so long body... Dr Mad Thrust 11-Blade Alloy 90mm EDF unit with 1750kv Motor - 90mm or similar fitting screws 9.1.
... print your plane | www.3DLabPrint.com 10. RC equipment and final assembly Glue the controller holder and mount it to the fuselage. Install your receiver, connect battery, setup servos, etc. with your trasmitter, check the throws an neutrals. Set recommended deflection according to the videoguide. Check CoG point (see CG- tags on wings). Use 820mm/32inch of 8mm carbon tube for wings reinforcement. Carbon tube marks CoG. Make sure the battery is placed properly and secured.
... print your plane | www.3DLabPrint.com 10.2. Flying setup aileron Setup flight modes on your RC system. +20mm Start mode -20mm Flaps down for 15°, lower the undercarriage, 30% expo.
... print your plane | www.3DLabPrint.com 11. Pilots Please Attention! For the first flights we recommend setting the center of gravity to around 5 mm forward of the CG tag - nose heavy, this increases the stability (you can use heavier battery). Also increasing the expo settings on your transmitter for elevator and aileron to 60 % calms the response from your stick inputs or you can decrease elevator and ailerons deflection. Make sure the battery is well fixed in proper position.
... print your plane | www.3DLabPrint.com Shopping list Printing material: 2,5 kg of PLA RC: 12 chanell receiver by your RC system EDF: Use any 90mm EDF by your choice. We tested: 12 Blade High-Performance 90mm EDF Unit - high quality 3553-1800 90mm EDF Brushless Fan Motor Dr Mad Thrust 11-Blade Alloy 90mm - standard quality Mount strap for 90mm Alloy DPS Fan or similar for 6S Li-Pol with not so long body...