
User Manual


page 18
... print your plane | www.3DLabPrint.com
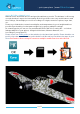
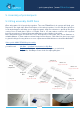
6. Servo installation
Cut loose the servo holder ears on aileron servos. Install the prepared servos to wing servo
bays. Use a 1mm steel wire with Z bends as a linkage between the servos and aileron control
horns. Elevator servo will be fixed by screws directly to the fuselage.
Video guide A6M2 ZERO Servos
you will need: 3x HXT900, or similar 23x12x26 mm
Snap knife, Z pliers
CA Glue + activator or Hot Glue
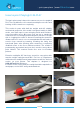
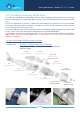
7. Motor & ESC & battery holder
Fix the battery by velcro tape and mount it in the front of the fuselage, find the perfect
balance and CG position by moving it. Mount the motor using 4x M3 screws and nuts to the
printed universal motor holder 16 x 19mm. For long motors you can flip the holder to the
front. Glue universal motor mount with motor into the fuselage in right position.
Video guide A6M2 ZERO Motor Setup
you will need:
4x M3/8mm screws + washers
Velcro tape
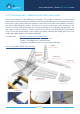
LW planes setup
(230W)
Motor: any 2830 size motor for 3S Li-Pol up to 70grams
ESC: any 20A/3s Brushless Speed Controler + connector XT60
Propeller: GWS 9 x 7,5 (ugly orange) or 9x6
Battery: any 1500mAh / 3s, 140-160g