
User guide


198 CHAPTER 9: REPORTING
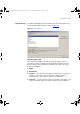
Click Generate Report to create the report you have selected in the
Reports list. This will produce the report and open it in your default web
browser. If you have some items selected, you will be presented with a
dialog asking if you wish to produce a report for all items in the current
inventory file. The default is ‘Yes’. If you answer ‘No’, the report will be
produced based on the current selection. If Generate Report is clicked
when there is no selection, the report is automatically produced on all
items in the current inventory file. See “
‘Generate Report’ not Working”
on page 208
if you have problems generating a report.
Custom Report Types launches a dialog where you can add, edit and
delete custom/user-defined reports. See “
Custom Report Types Dialog”
on page 200
for more information.
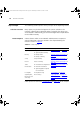
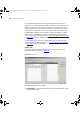
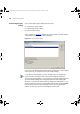
History Tab
The History tab of the Reports dialog allows you to view previously
generated reports as shown in Figure 90:
Figure 90 History Tab
The following options are available:
■ View Report — click this button to launch the selected report in your
default web browser.
3Com Network Administrator for HP OpenView.book Page 198 Wednesday, November 12, 2003 2:33 PM