
User Guide Hub/Switch SuperStack II Switch 1000
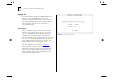
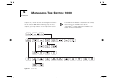

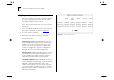
Table Of Contents
- About This Guide
- Getting Started
- Installation and Setup
- Setting Up for Management
- Managing The Switch 1000
- Setting Up Users
- Creating a New User
- Deleting a User
- Editing User Details
- Assigning Local Security
- Choosing a Switch Management Level
- Setting Up the Switch Unit
- Setting Up the Switch Ports
- Setting Up the Switch Database (SDB)
- Setting Up Resilient Links
- Setting Up Traps
- Setting Up the Console Port
- Resetting the Switch
- Initializing the Switch
- Upgrading Software
- Advanced Management
- Status Monitoring and Statistics
- Safety Information
- Screen Access Rights
- Trouble-shooting
- Pin-outs
- Switch 1000 Technical Specifications
- Technical Support
- Glossary
- Index
- 3Com Corporation Limited Warranty
- Electro-Magnetic Compatibility

4-6 C
HAPTER
4: M
ANAGING
T
HE
S
WITCH
1000
Assigning Local Security
The Local Security screen shows a matrix of options
for access method (Console Port, Remote Telnet,
Community-SNMP) and access level.
These steps assume the User Access Levels screen is
displayed.
1
Select the LOCAL SECURITY option. The Local Secu-
rity screen is displayed, as shown in Figure 4-6
.
2
Fill in the fields as required.
3
When you have filled in the form, select OK.
Access options are:
Console Port
Enabled / Disabled
To prevent access
to the management facilities via the console port,
disable access to the facility for each access level.
Console port access for
Security
is enabled and
cannot be changed. This prevents accidental dis-
abling of all access levels from management.
Remote Telnet
Enabled / Disabled
Telnet is an inse-
cure protocol. You may want to disable all access
to the management facilities via Telnet if there is
important or sensitive data on your network.
Community-SNMP
Enabled / Disabled
The Switch
can be managed via SNMP using a remote Network
Manager. Community-SNMP does have some
simple security features, but it is an insecure proto-
col. You may want to disable all access to the man-
agement facilities if there is important or sensitive
data on your network.
Figure 4-6
Local Security screen