
User Guide Hub/Switch SuperStack II Switch 1000

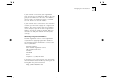
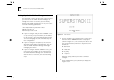
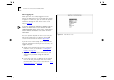
Table Of Contents
- About This Guide
- Getting Started
- Installation and Setup
- Setting Up for Management
- Managing The Switch 1000
- Setting Up Users
- Creating a New User
- Deleting a User
- Editing User Details
- Assigning Local Security
- Choosing a Switch Management Level
- Setting Up the Switch Unit
- Setting Up the Switch Ports
- Setting Up the Switch Database (SDB)
- Setting Up Resilient Links
- Setting Up Traps
- Setting Up the Console Port
- Resetting the Switch
- Initializing the Switch
- Upgrading Software
- Advanced Management
- Status Monitoring and Statistics
- Safety Information
- Screen Access Rights
- Trouble-shooting
- Pin-outs
- Switch 1000 Technical Specifications
- Technical Support
- Glossary
- Index
- 3Com Corporation Limited Warranty
- Electro-Magnetic Compatibility

3-8 C
HAPTER
3: S
ETTING
U
P
FOR
M
ANAGEMENT
After Logging On
When you have successfully logged on to the
Switch, the Main Menu screen is displayed as shown
in Figure 3-3. From here, you can select the options
needed to manage the unit. Refer to the screen
map on page 4-1
.
If you have installed an ATM OC-3c Module into the
Switch, the Main Menu screen contains an ATM
CONFIGURATION option. Refer to the “SuperStack II
Switch ATM OC-3c Module User Guide” for more
information.
Access to options depends on the access level you
have been assigned. Access rights to the VT100
screens for the Switch are listed in Appendix B
.
If you are a user with
security
access level, and are
using the management facility for the first time, we
suggest that you:
■
Assign a new password for your user, using the
Edit User screen, as described in “
Editing User
Details” on page 4-5.
■
Log on as each of the other default users, and
change their passwords using the Edit User
screen.
■
Create any new users, in addition to the default
ones. To do this, you assign each user a name,
password and security level, as described in “
Cre-
ating a New User” on page 4-3.
Figure 3-3
Main Menu screen