
User Guide Hub/Switch SuperStack II Switch 1000

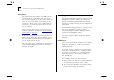
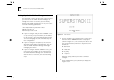
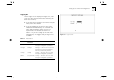
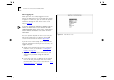
Table Of Contents
- About This Guide
- Getting Started
- Installation and Setup
- Setting Up for Management
- Managing The Switch 1000
- Setting Up Users
- Creating a New User
- Deleting a User
- Editing User Details
- Assigning Local Security
- Choosing a Switch Management Level
- Setting Up the Switch Unit
- Setting Up the Switch Ports
- Setting Up the Switch Database (SDB)
- Setting Up Resilient Links
- Setting Up Traps
- Setting Up the Console Port
- Resetting the Switch
- Initializing the Switch
- Upgrading Software
- Advanced Management
- Status Monitoring and Statistics
- Safety Information
- Screen Access Rights
- Trouble-shooting
- Pin-outs
- Switch 1000 Technical Specifications
- Technical Support
- Glossary
- Index
- 3Com Corporation Limited Warranty
- Electro-Magnetic Compatibility

Setting Up the Switch for Management 3-7
Logging On
At the Logon screen displayed in Figure 3-2, enter
your user name and password (note that they are
both case-sensitive):
■
If you have been assigned a user name and pass-
word, enter those details.
■
If you are logging on for the first time (after
installation or initialization), use a default user
name and password to match your access
requirements. The defaults are shown in
Table 3-1. If you are setting up the Switch for
management, we suggest that you log on first
as
admin
.
Figure 3-2
Logon screen
Table 3 - 1
Default Users
User Name Default
Password
Access Level
monitor monitor monitor — this user can view, but not
change all manageable parameters
manager manager manager — this user can access and
change the operational parameters
but not special/security features
security security security — this user can access and
change all manageable parameters
admin (no password) security — this user can access and
change all manageable parameters