
User Guide Hub/Switch SuperStack II Switch 1000

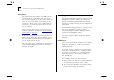
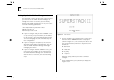
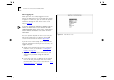
Table Of Contents
- About This Guide
- Getting Started
- Installation and Setup
- Setting Up for Management
- Managing The Switch 1000
- Setting Up Users
- Creating a New User
- Deleting a User
- Editing User Details
- Assigning Local Security
- Choosing a Switch Management Level
- Setting Up the Switch Unit
- Setting Up the Switch Ports
- Setting Up the Switch Database (SDB)
- Setting Up Resilient Links
- Setting Up Traps
- Setting Up the Console Port
- Resetting the Switch
- Initializing the Switch
- Upgrading Software
- Advanced Management
- Status Monitoring and Statistics
- Safety Information
- Screen Access Rights
- Trouble-shooting
- Pin-outs
- Switch 1000 Technical Specifications
- Technical Support
- Glossary
- Index
- 3Com Corporation Limited Warranty
- Electro-Magnetic Compatibility

3-6 C
HAPTER
3: S
ETTING
U
P
FOR
M
ANAGEMENT
Setting Up the Switch for Management
The following sections describe how to get started if
you want to use an SNMP Network Manager to
manage the Switch. It assumes you are already
familiar with SNMP management. If not, we recom-
mend the following publication:
“The Simple Book”
by Marshall T. Rose
ISBN 0-13-812611-9
Published by Prentice Hall
■
If you are using IP and you have a BOOTP server
set up correctly on your network, the IP address
for the Switch is detected automatically and you
can start managing the Switch without any fur-
ther configuration.
■
If you are using the IPX protocol, the Switch is
allocated an IPX address automatically. You can
start the SNMP Network Manager and begin
managing the Switch.
■
If you are using IP without a BOOTP server, you
must enter the IP address of the Switch before
the SNMP Network Manager can communicate
with the device. To do this, take the following
steps:
Figure 3-1
Main Banner
1
At your terminal, press [Return] two or more times
until the Switch 1000 Main Banner is displayed
(shown in Figure 3-1). The console port detects the
line speed (baud rate) from these keystrokes and
defaults to:
■
auto-baud
■
8 data bits
■
no parity
■
1 stop bit
Data bits, parity and stop bit values cannot be
changed.
2
At the Main Banner, press [Return] to display the
Logon screen.