
User Guide Hub/Switch SuperStack II Switch 1000

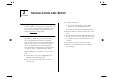
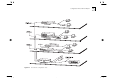
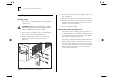
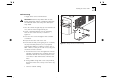
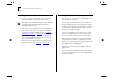
Table Of Contents
- About This Guide
- Getting Started
- Installation and Setup
- Setting Up for Management
- Managing The Switch 1000
- Setting Up Users
- Creating a New User
- Deleting a User
- Editing User Details
- Assigning Local Security
- Choosing a Switch Management Level
- Setting Up the Switch Unit
- Setting Up the Switch Ports
- Setting Up the Switch Database (SDB)
- Setting Up Resilient Links
- Setting Up Traps
- Setting Up the Console Port
- Resetting the Switch
- Initializing the Switch
- Upgrading Software
- Advanced Management
- Status Monitoring and Statistics
- Safety Information
- Screen Access Rights
- Trouble-shooting
- Pin-outs
- Switch 1000 Technical Specifications
- Technical Support
- Glossary
- Index
- 3Com Corporation Limited Warranty
- Electro-Magnetic Compatibility

Unit Overview — Rear 1-13
Power Socket
The Switch 1000 automatically adjusts to the
supply voltage. The fuse is suitable for both 110V
A.C. and 220–240V A.C. operation. For informa-
tion on replacing fuses, refer to Appendix A
.
Unit Serial Number
You may need this serial number for fault reporting
purposes.
Redundant Power System Socket
Use one of these sockets to connect a SuperStack II
Redundant Power System (RPS) to the unit. You can
use either socket. Refer to “
Connecting a Redun-
dant Power System (RPS)” on page 2-6.
Reset Button
Using the reset button simulates a power-off/on
cycle. This has the same effect as carrying out a
reset via the VT100 interface; refer to “
Resetting the
Switch” on page 4-27.
Console Port
Connect a terminal to the console port to carry out
remote or local out-of-band configuration and man-
agement. The console port is set to auto-baud, 8
data bits, no parity, and 1 stop bit.
Plug-in Module Slot
Use this slot to install a Plug-in Module. The Module
can be used to provide a high speed link to the rest
of your network. 3Com provides a range of Plug-in
Modules; contact your supplier for availability.
When a Plug-in Module is not installed, ensure the
blanking plate is secured in place.
Transceiver Module Slot
Use this slot to connect a Transceiver Module and
provide a 10Mbps link to the rest of the network.
Port 1 is automatically switched from the front
10BASE-T port to the Transceiver Module port
when a Module is installed. 3Com provides a range
of Transceiver Modules; contact your supplier for
availability.
When a Transceiver Module is not installed, ensure
the blanking plate is secured in place.
Ethernet Address
This label shows the unique Ethernet (or MAC)
address assigned to the unit.